
Appearance
Cut an edit in the video editor
The video editor puts the takes of your shots on a timeline. A clip can follow the latest revision of its stage, so the edit keeps up with production, and the Desktop Helper exports it as an MP4 on your computer.
The editor needs the Video editor module on in the studio (see Modules), and a role with Editor module set to Use (see Roles and permissions). Without both, Editor doesn't show in the header. Everyone who can open the editor can change any of the studio's edits: there is no view-only access.
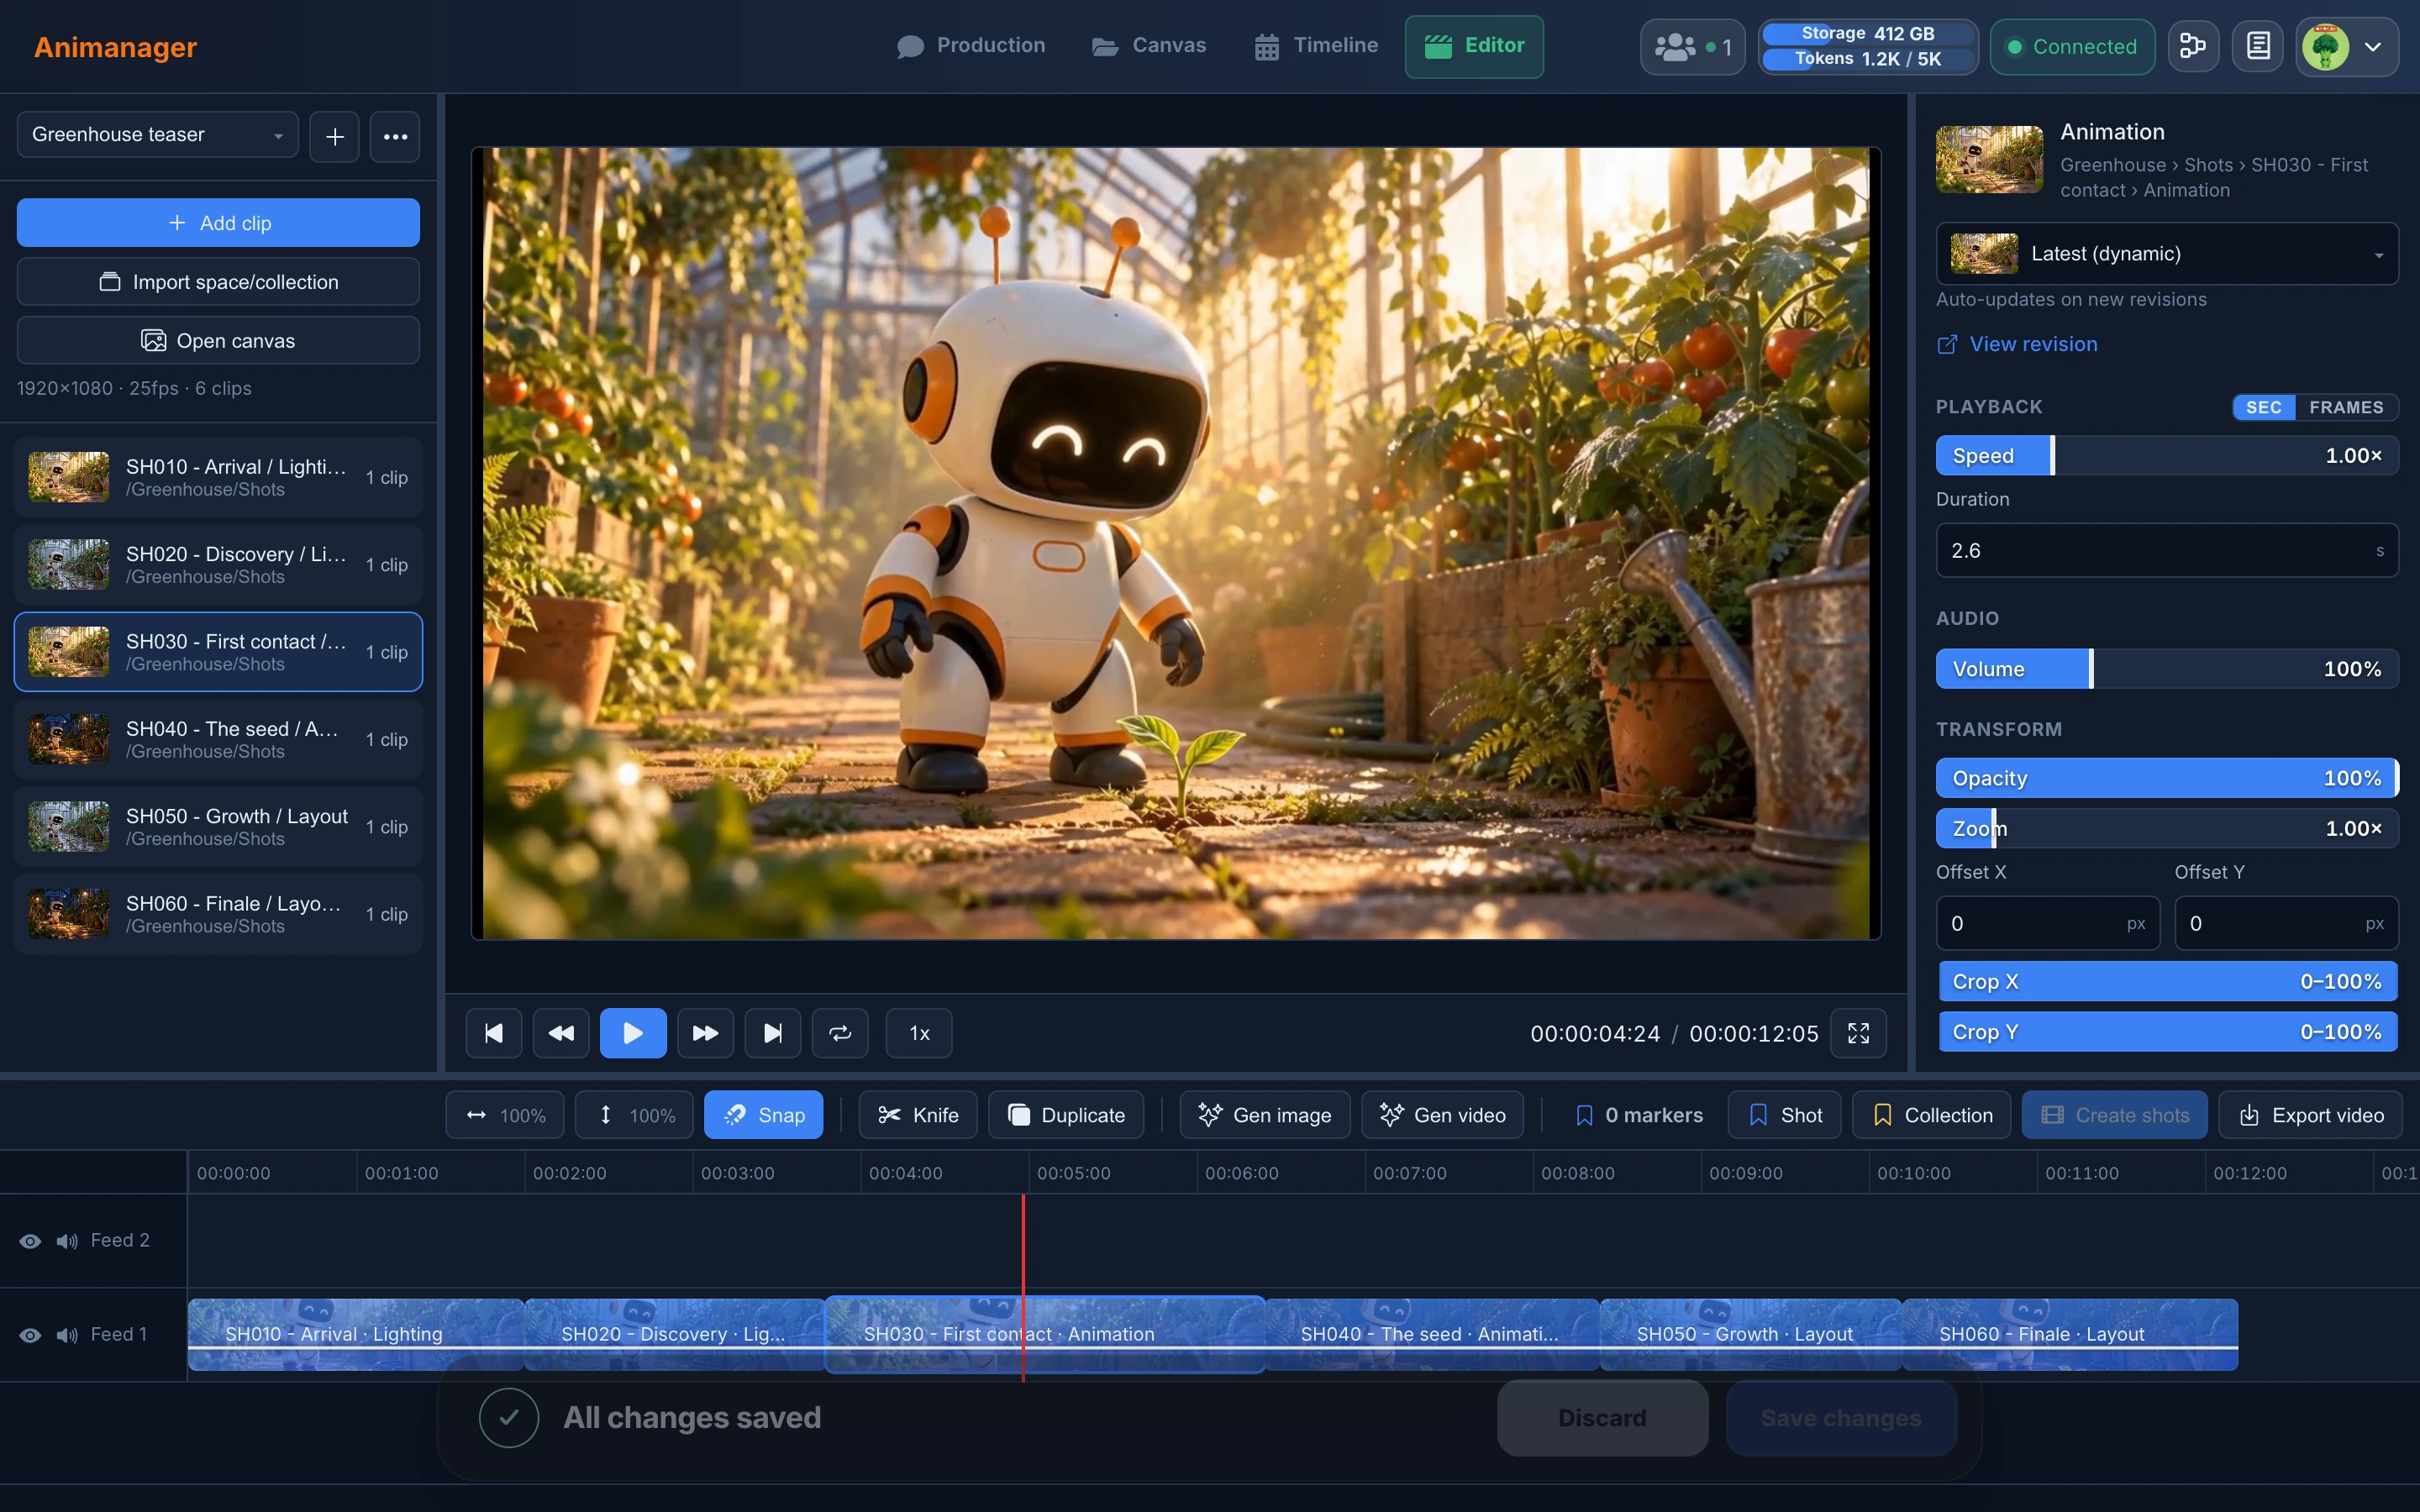
The window has four parts: the project and its sources on the left, the preview in the middle, the properties on the right and the timeline at the bottom. Drag the lines between them to resize them. Animanager remembers the sizes on that computer.
Projects
An editor project is one edit: a name, a size and a frame rate, and the clips on its timeline. Projects belong to the studio, so everyone with the editor sees the same list.
- Click Editor in the header. It reopens the project you had open last in this studio.
- Press + (New project). Give it a Name, pick a Resolution (1920 × 1080, 1280 × 720, the vertical 1080 × 1920, the square 1080 × 1080, or type your own) and a Frame rate from 23.976 to 60 fps.
- Press Create.
The project menu at the top left switches between projects, with archived ones in their own group. The … button (Project options) has:
- Rename, typed in place.
- Duplicate: a copy named "Greenhouse teaser copy_001", with its clips and imported sequences, which opens straight away.
- Archive and Unarchive: an archived project stays in the list under Archived and isn't reopened on its own.
- Delete, after you confirm.
These four take effect at once for everyone, without Save changes. The address of the editor names the open project, so you can send a teammate a link to it.
Deleting a project can't be undone
Delete removes the project for the whole studio at once. The revisions of the shots are not touched.
Add clips
Add clip:
- Press Add clip and type part of a shot and a stage in Search item › stage…, such as "SH030 anim".
- Pick the stage. Its revisions with a video, an image or a sound are listed.
- Choose Latest (dynamic) to follow the stage: the clip switches to each new revision as soon as it is published, even while you have the edit open. Or choose a version, such as v3, to keep that take.
The clip lands at the end of the first lane. A video takes its own length; a still image starts at five seconds and can be stretched as long as you want.
Sources: every revision or canvas media already used in the project is listed on the left, as "SH030 - First contact / Animation · Latest", with how many clips use it. Click one to see its clips on the timeline, and drag it onto a lane to use it again. Selecting clips on the timeline lights up their sources.
A whole space or collection: Import space/collection brings one clip per item, in order, and keeps the sequence in step with production. See Follow a sequence in the editor.
Edit on the timeline
The timeline has lanes named Feed 1, Feed 2 and up, with an empty lane on top: drop a clip there to start a new lane. Video, images and sound share the same lanes. A clip on a higher lane covers the ones below it.
- Select: click a clip. Shift+click adds one, and dragging across an empty part of the lanes selects every clip in the box. Ctrl/⌘+click selects every clip on that side of the playhead, which helps to move the rest of the edit along.
- Move: drag a clip, also to another lane. A clip dropped over another one replaces the part it covers: the clip underneath is trimmed, split or removed. A selection of several clips moves together. Nothing else shifts to make room.
- Trim: drag the left or right edge. A video can't be stretched past its own length. If a clip runs longer than its media, the extra part is hatched and plays nothing.
- Fade: hover a clip and drag one of the dots near its top edge, at the start or the end, inwards. The fade works on picture and sound.
- Cut: press Knife (K) and click a clip where you want to cut it. A line shows where the cut lands. A or Esc brings back the normal pointer.
- Duplicate: Duplicate (D) puts a copy of the selected clip at the end of its lane. Alt+drag leaves a copy where you drop it.
- Delete: Delete or Backspace.
- Volume: drag the line across a clip up or down; the percentage follows the pointer, up to 300%. Alt+click the line to add a point and shape the volume over time, drag a point to move it, and Alt+click it or press Delete to remove it.
Each lane has two buttons: the eye (Hide video) hides its picture but keeps its sound, and the speaker (Mute) silences it. Both are saved with the project and the export respects them.
The toolbar above the lanes:
- The % zoom: drag left or right. Alt+scroll zooms too, around the playhead, and Shift+scroll moves along the timeline.
- The row height: drag up or down to make the lanes taller or shorter.
- Snap, on by default: clips, the playhead and markers snap to the start, to clip edges, to markers and to the playhead. Everything also snaps to whole frames, always.
- Shot, Collection and Create shots mark shots on the edit and create them in production. See Mark shots and create them from an edit.
- Gen image and Gen video: see Generate from the edit.
- Export video: see Export the edit.
Click or drag on the ruler to move the playhead. Ctrl/⌘ + Z undoes clip changes, up to a hundred steps. Markers, lane buttons and project settings are not undone.
Clip properties
Select a clip to change it in the properties panel. With several clips selected, the panel says "3 clips selected · changes apply to all".
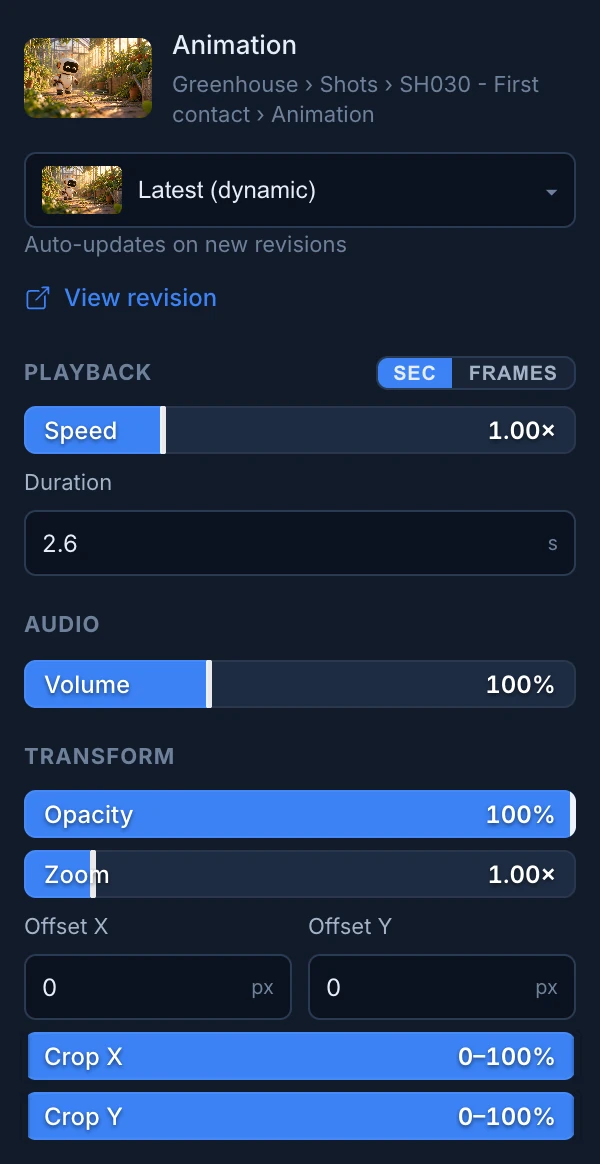
- The revision: switch between Latest (dynamic) and any version of the stage. View revision opens it in a new tab.
- Playback: Speed from 0 (Still, a frozen frame) to 4×, and Duration. Sec | Frames switches the unit.
- Audio: Volume from 0 to 300%. With volume points on the clip, the slider moves the curve at the playhead.
- Transform, for pictures: Opacity, Zoom, Offset X and Offset Y, and Crop X and Crop Y, each a range with two handles. The picture always fits inside the frame first.
Drag a number left or right to change it, with Shift for fine steps, or click it to type. With nothing selected, the panel shows the project: its Name, FPS, Width and Height. Markers, timecodes and created shots follow the project's frame rate.
Watch the edit
Under the preview: Go to start, Previous frame, Play, Next frame and Go to end, the loop button (off by default), the playback speed (0.5x, 1x, 1.5x or 2x) and the timecode, in hours:minutes:seconds:frames or as a frame count when Sec | Frames in the properties is on frames. Fullscreen adds a seek bar, and the controls hide after a few seconds while it plays.
If the Desktop Helper is running, the editor downloads the media of the timeline in the background and plays it from your computer, so playback stays smooth on a long edit.
Save and work together
Your changes to the timeline stay in this window until you save. The bar at the bottom says Unsaved changes: press Save changes (or Ctrl/⌘ + S), or Discard to drop them.
- Closing or reloading the tab with unsaved changes asks first, and so does switching to another project.
- Create shots, Gen image, Gen video and opening a clip's canvas save first.
- When someone else saves the project, your timeline reloads with their changes, unless you have unsaved changes of your own.
- A clip on Latest (dynamic) switches to a new revision as soon as it is published.
The last save wins
Two people editing the same project at once don't see each other's unsaved changes, and the second Save changes replaces the first. Leaving the editor for another page of Animanager also drops unsaved changes without asking. Save before you go, and agree who cuts which project.
Generate from the edit
To make a new picture or clip from shots already on the timeline, select them and press Gen image or Gen video. The editor saves, adds a new clip above them and opens its canvas in a separate window, with the media of the selected clips already wired into a generator. Write the prompt and generate as on any canvas.
That window, Clip media, is the canvas of the clip. The star marks what the clip plays: star a result and the timeline plays it straight away. Double-click such a clip on the timeline to open its canvas again.
Open canvas, above the timeline, opens the canvas of the whole project, with its Clip creator: each media, frame or folder you connect to it becomes a clip on the timeline, and a frame or folder plays its starred item. See Generate images and video on the canvas.
Export the edit
- Press Export video.
- Choose the Resolution (the project size, 75%, 50% or 25%), the Frame rate and the Quality: High, Balanced or Compact.
- Press Export and choose where to save the file in the Desktop Helper's dialog.
- The dialog shows each step: downloading the media, rendering and finalizing. Hide closes it while the export carries on.
- When it says Export finished., with the file's path and size, press Done.
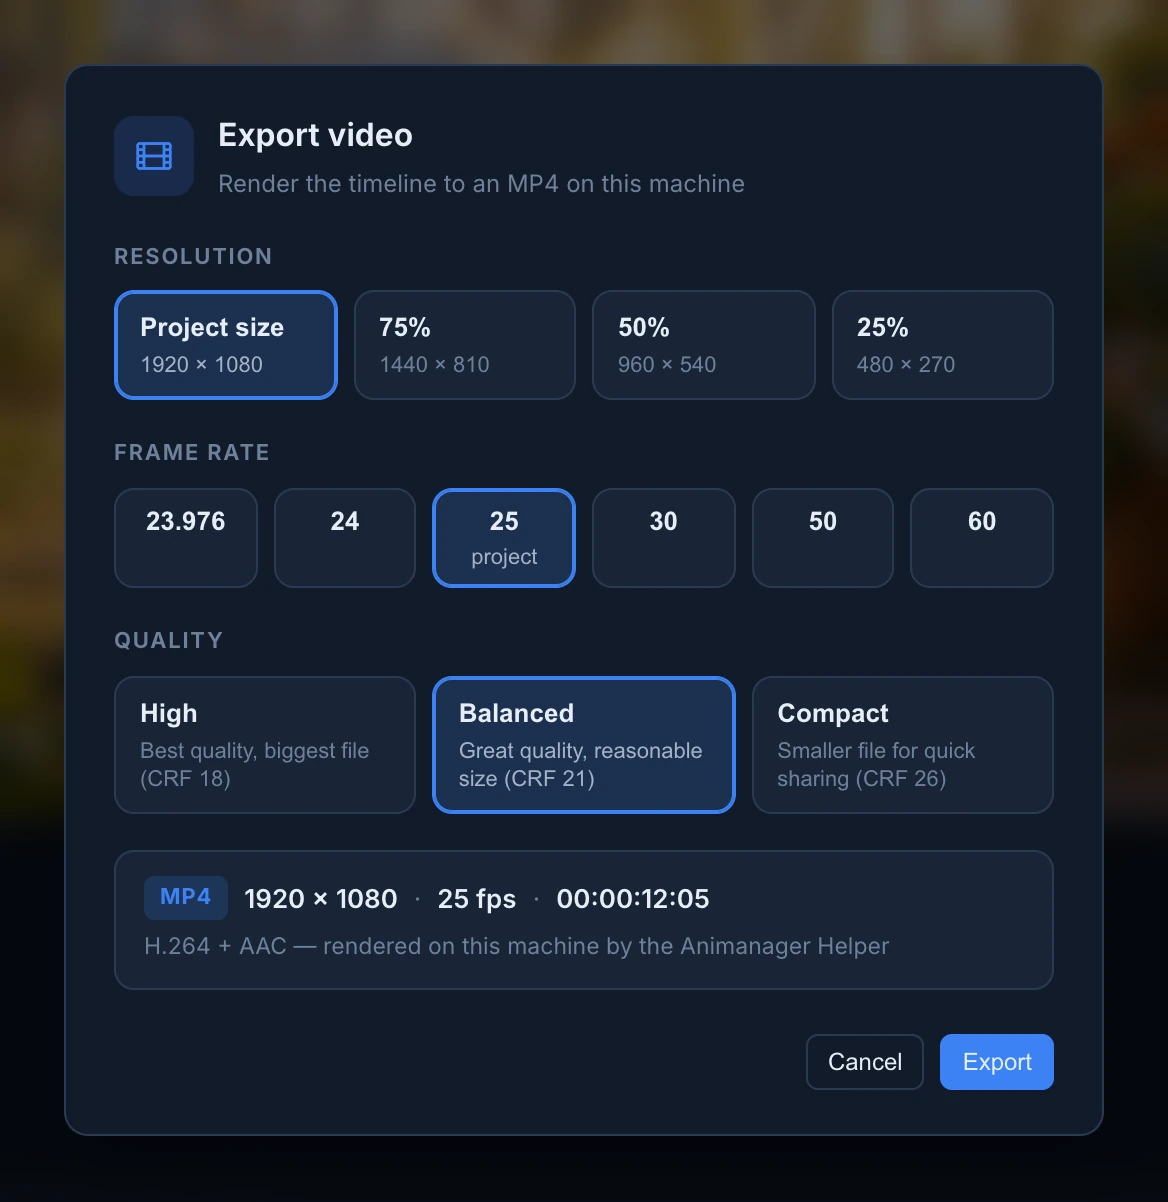
The export is an MP4 rendered on your computer by the Desktop Helper, from the timeline as it is, saved or not. Hidden lanes are left out and muted lanes are silent. The frame rate is rounded to a whole number: 23.976 exports at 24. Only one export runs at a time.
If the Helper isn't running, or is too old to export, Animanager asks you to install or update it, then Connect and continue. See Work locally with Desktop Helper.