
Appearance
Connect stages: inputs and masters
When the stages of a space are connected, each stage starts from what the earlier stages published: the file to continue, the characters to link, the storyboard to look at. You set the connections once, and Desktop Helper and the Blender add-on put the files in place for every item.
The idea
Every stage works in its own file. When a stage publishes a revision, that revision becomes available to the stages that come after it. How a later stage receives it depends on how the two stages are connected: it can continue from the whole file, link or copy parts of it, just download its files, or ignore it. Desktop Helper does the downloading and places everything in your stage folder, and the Animanager add-on puts it together inside Blender.
You need the Files and helper module and a connected Helper to work this way. See Work locally with Desktop Helper.
An example shot
This is the pipeline of a space whose shots go through Layout, Blocking, Location, FX, Spline and Lookdev, as the pipeline editor shows it. Each line is a connection. Each stage lists its inputs, and the pill next to an input is the mode of that connection.
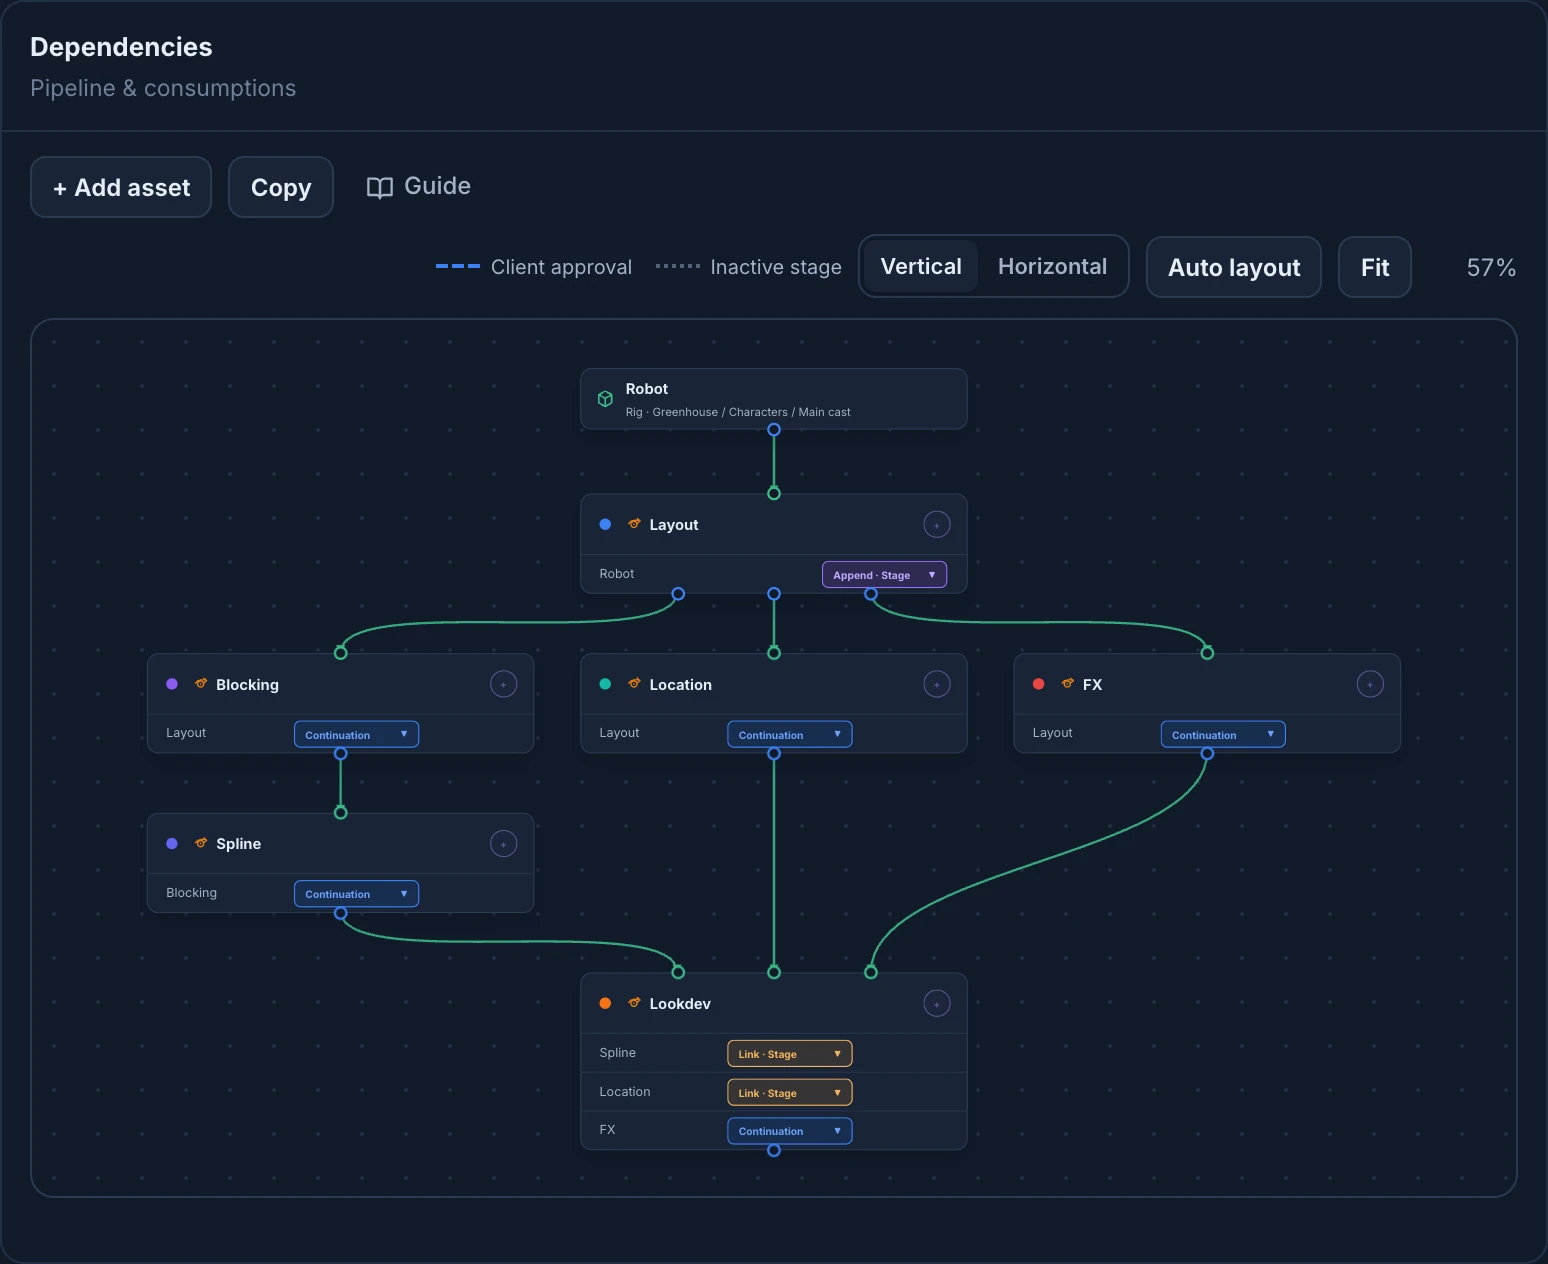
- Layout brings the character in as editable data and animates the camera.
- Blocking, Location and FX each start from a copy of Layout's file. Spline starts from Blocking's file.
- Lookdev continues from FX and links the stage collections of Spline and Location.
Because Location, Spline and FX all come from Layout, the same character reaches Lookdev several times. Blender then asks you to reconcile the copies. See Reconciliation in Blender.
Where connections are set up
Connections live in the Dependencies card of a space or a collection, and in the Dependencies section of an item.
- A space or a collection: choose Settings in its Tree context menu. The Settings page opens on Project → Pipeline, and Settings for shows the space or collection.
- An item: choose Configure Item in its context menu, or press its gear in the Grid. The Item Settings dialog has a Dependencies section.
- A workflow: Settings → Studio → Workflows & pipeline, on the Workflows & stages tab. The Pipeline button in the header opens it too. A space started from a workflow keeps its own copy of it.
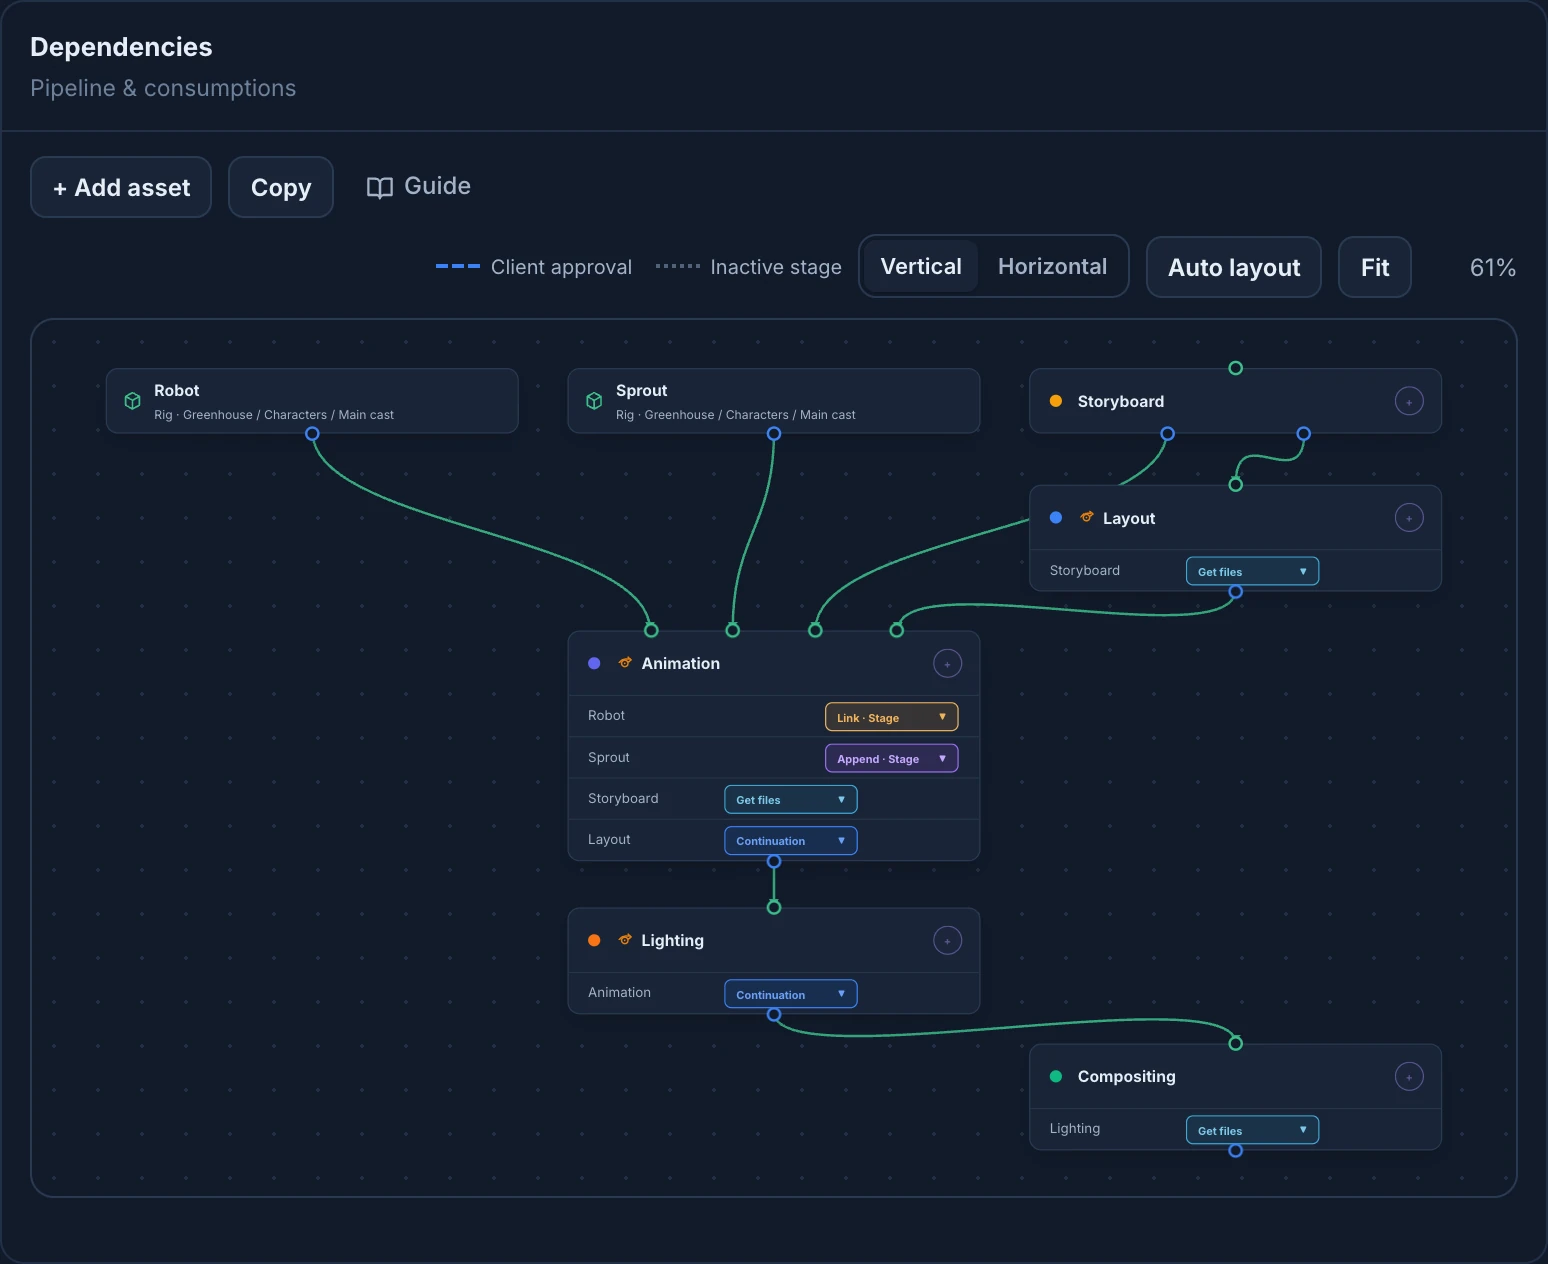
With the project itself in Settings for, Project → Pipeline lists the project's spaces: pipelines are set per space, so pick one. Edit studio workflows opens the workflows.
Edit the pipeline
- Drag from a stage's output port (Drag to a stage to connect) to another stage to connect them. The stage under the pointer turns blue.
- Press + Add asset to bring in one stage of another item, for example the Rig stage of a character. In Add asset, open the item in the tree and pick its stage, then press Add asset. Workflows have no + Add asset, and an item can't use one of its own stages as an asset. An asset only sends: connect it to the stages that use it.
- Each input of a stage has a coloured pill. Click it to choose the mode. See Input modes.
- Save: Save changes in the save bar of the Settings page, or Save Changes in the item dialog. Nothing is saved before. In Settings, Discard drops your changes.
A connection is refused when it would end where it started, repeat one that exists, or close a loop: the editor says why, such as That connection would create a cycle. Two other mistakes block saving until you fix them, and the editor marks them: a loop of connections (Cycle detected, drawn in red) and a stage with two Continuation inputs.
Client approval
An input can wait for the client. Point at the input in the stage card and press Needs approval: the connection turns into a blue dashed line, and the later stage waits until the client approves the earlier one. Press it again to turn it off. It exists only between stages, not on assets.
Select, remove, copy and paste
- Click a stage or a connection to select it. Shift + click adds to the selection, and Shift + drag on the background draws a box around several.
- To remove a connection, point at it and press the red × in its middle, or select it and press Delete or Backspace. It goes at once, without asking.
- To remove an asset, select it and press Delete or Backspace. Its connections go with it. Stages can't be removed here: take a stage out of the space in Stages.
- Copy, or Ctrl/⌘ + C on the canvas, copies the whole pipeline, or only the selected stages. Click the canvas first so the keys reach it.
- Ctrl/⌘ + V adds what you copied to this pipeline: copied connections replace the same ones here, and the rest stays. Paste and the copied name, in the toolbar, replace the whole pipeline instead. On a workflow it asks first.
- Only stages that this space, collection or item uses are pasted. Copies stay inside the studio and this browser.
Look around
- Scroll with the mouse wheel to zoom, from 20% to 250%, and drag the background to move around. Fit shows the whole pipeline.
- Vertical and Horizontal turn the graph, and Auto layout tidies the stages. Both are saved with the pipeline, for everyone.
- Stages the space doesn't use show only when a connection still points at them, dimmed and with a grey dotted line: the connection is dropped when you save.
- The + on a stage card adds pipeline metadata to it, such as the frame range. See Pipeline metadata.
The book button next to Copy opens this page on Input modes.
Collections and items
A collection uses the pipeline of its space, and an item the one of its collection. A collection's card says Inherited from space and the space's name, or Changed here once you change it. Use inherited on a collection, and Use parent settings in the item dialog, go back to the parent's pipeline when you save. A change on a collection or an item only adds to what it takes from above: later changes to the space still reach it.
To give several items the same pipeline, select them and choose Configure Item. See Configure several items at once.
A connection between two stages of the same item also orders the work: the second stage waits for the first in the schedule. An asset only delivers files and never holds up the schedule.
Connections do not grant access
An asset from an item you can't open shows as Restricted asset, and its input is skipped for you. Ask for access to that item. Inputs from stages of the same item are never skipped.
Input modes
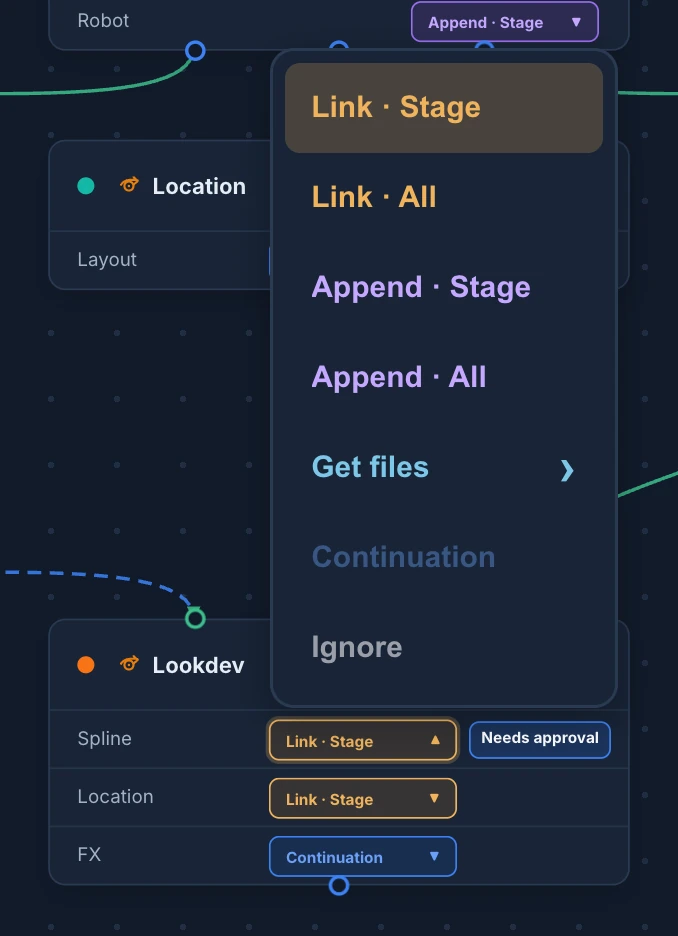
The pill menu lists the modes in this order. Stages whose work files are not Blender files don't show the Link and Append modes.
Link · Stage
Links only the source stage's own collection into your file. Linked data is read only: you see it and render it, but you can't edit it.
Use it when you need the result of another stage as a reference that stays up to date. Example: Lookdev links Spline's animation.
Link · All
Links every top-level collection of the source file, each one separately. Still read only.
Use it when the source file has several collections you need, not just the stage collection. Example: a set dressing stage that keeps props and set in different collections.
Append · Stage
Copies the source stage's collection into your file as editable data. You can change it freely.
The copy is made once. If the source publishes a new version, the add-on tells you and offers Replace or Copy. See An append is out of date.
Use it when you need to change what you receive. Example: Layout appends the character to pose and place it.
Append · All
Like Append · Stage, but copies every top-level collection of the source file. They arrive inside one collection whose name ends in (all).
Get files
Downloads the source revision as plain files. Nothing is linked or copied into your Blender file. It works for any kind of stage, for example Storyboard → Layout.
From the pill, open the submenu Will download from this input to choose what to download. All four are on at first, and the last one ticked can't be turned off:
- Primary: the published work files.
- Export: the files from the revision's exports folder.
- Files: the files from the revision's files folder.
- Media: the review media of the revision.
The files are placed in the source stage's folder, not in yours. See Masters on disk.
Continuation
Uses the complete published file of the source stage as your starting work file. Your stage picks up where the previous one stopped, with everything that file already links or appends.
- A stage can have only one Continuation input. Once one input is a Continuation, the option is greyed out on the others.
- Other inputs can use any other mode next to a continuation.
- The copy is made only when you have no work file yet. It becomes your own file, and your revisions belong to your stage.
Use it for stages that refine the same file. Example: Blocking continues from Layout, Spline continues from Blocking.
Ignore
Keeps the connection for the schedule, but the source is not used as an input. Nothing is downloaded.
Use it when a stage must wait for another one but doesn't need its files. Older pipelines that used None or Pass through now show Ignore.
Defaults when you connect
- If the stage already has a Continuation input, a new input starts as Ignore.
- If all the stage's inputs are links, a new input starts as Link · Stage. If they are all appends, as Append · Stage. If they are all Get files or all Ignore, as that mode.
- Otherwise a Blender stage starts with Link · Stage, and any other stage with Ignore.
Masters
The master of a stage is the revision later stages receive. Unless someone pins one, it is the latest revision, and its card shows Master · Latest.
- Mark as master on an older revision pins it, and so does Pin this revision in the Master · Latest menu. Later stages keep receiving that revision even after newer ones are published. Its card shows Master · Pinned.
- To go back to the latest revision, click Master · Pinned, or press Follow latest in the stage's Master: chip.
- Pinning a master copies no file. It only changes which revision later stages receive.
- A pinned master can't be deleted: the edit menu shows Master cannot be deleted until you follow latest again.
- Mark as master appears when you point at the header of a revision card that isn't the master.
Go back to the inputs of a good revision
A revision remembers the version of each input it used. Press Revision technical info at the top right of its card: Inputs used lists each input with that version and how it came in (Continuation, Linked, Append or Files), or Nothing published when its source had no revision yet.
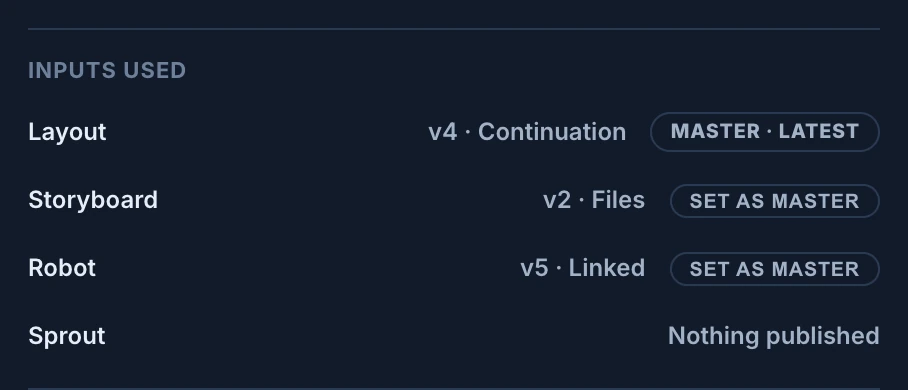
Set as master on a row pins that exact version as the master of its source stage, so every stage that uses it gets it again. When a later version of the Robot's rig breaks the shot, pin the v5 that version 4 used, one click per input. A row that is already the master says Master · Latest or Master · Pinned.
A version followed by · Pipeline comes from the pipeline at the time of publishing, because the publish didn't report what it used. Point at a version to read where it comes from.
When a revision has several work files, the one marked Main is the one later stages use. Unless you choose one, it is the first work file, marked Main · Default. Set as main on another work file makes that one the stage's main file, and Follow first primary in its Main menu goes back to the first one.
Masters on disk
The Helper never places a master inside your own stage folder. It keeps it in the source stage's folder, in a hidden folder named after the version:
- Layout stage folder
- .animanager/
- masters/
- v008/read onlythe master of Layout, version 8
- Lookdev stage folder
- your work filelinks the file inside the v008 folder of Layout
- The path tells whose master it is and which version.
- Each version has its own folder, so two stages can use different versions at the same time.
- Master files are read only. They belong to another stage: changes to them would never be published, and the next download would overwrite them.
- Masters are never uploaded with your revision. Your revision only records which versions it used: see Inputs used in the revision's technical info.
Starting a stage
When a Blender or Photoshop stage has no revision yet, its chat shows a No revisions yet banner.
- If the stage has inputs, the banner says Prepare and the stage name, and offers GET FILES. It lists every input with its mode, its master version and its size.
- If the stage has no inputs, the banner says Start and the stage name from blank, and offers CREATE BLANK FILE. It creates an empty work file with the stage collection ready. Without the Helper, it offers a Blender starter file to download and Upload work files instead.
An input that can't be used yet shows a clock. Hover it to read why and what will happen. The banner never blocks you: it builds the file with what is available and skips the rest. If the pending input is the continuation, starting now creates a new file instead of continuing from that stage.
Once the stage has revisions, Prepare files in its chat creates a new base file next to your current one, with the inputs you select. On a Blender stage without a continuation, Also create a blank .blend adds an empty one. Your current files are never overwritten.
Get files
Get files downloads a stage and its inputs. Open it with GET FILES on the banner, or with All files in the chat of the stage and then Get files. The window lists the stage's inputs, and Prepare files opens the same window. Get files on a revision card is different: it downloads only that revision's files. See Get files.
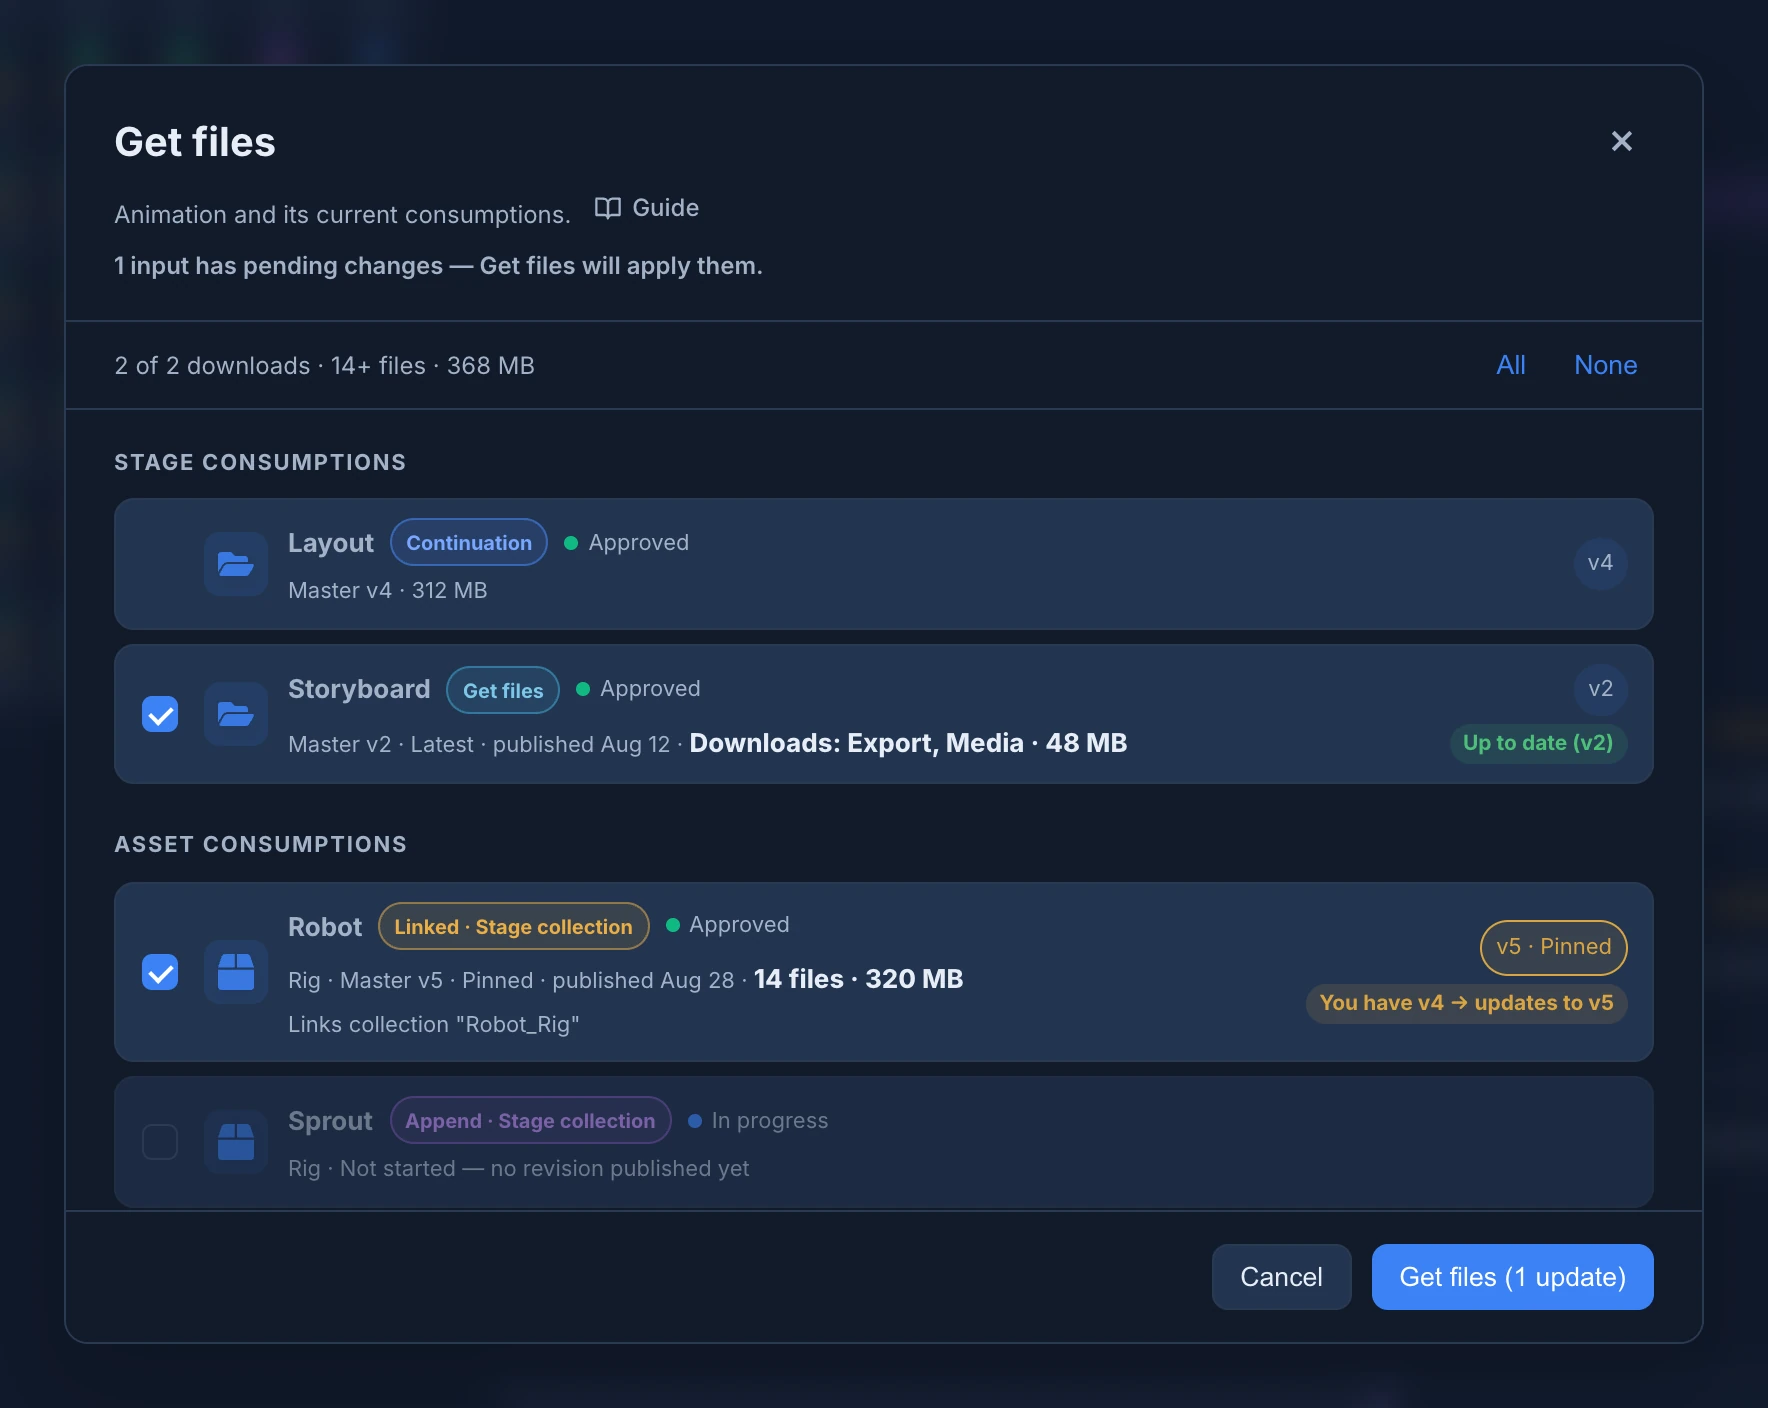
- Your own stage's files are always downloaded.
- Inputs are grouped as Stage consumptions and Asset consumptions. Each row shows its mode, its master (for example
Master v5 · Pinned · published Aug 28), and the number of files and size. - The toolbar shows the total, for example
2 of 2 downloads · 14+ files · 368 MB. All and None tick or clear every row. - Every available input starts ticked. The window doesn't remember your choice, and leaving an input out only affects this download, not the pipeline.
- The Continuation row has no checkbox. It is used whenever you have no work file yet.
- Inputs that come inside the continued file appear under Carried through and the stage name. They are downloaded or repaired when needed.
- When a source revision has several work files, a button such as 2 primaries lists them. The main one always comes, and you can tick the others to download them too.
Each row also says what this computer already has:
| Chip | Meaning |
|---|---|
| Up to date (v8) | You already have the current master. |
| You have v6 → updates to v8 | A newer master was published. Get files brings it. |
| Not downloaded to this workspace yet | You never downloaded this input here. |
| On this computer (v8) — links without downloading | Another stage folder on this computer already has it. |
| Local copy broken — Get files repairs it | Local files are missing or changed. |
| Mode changed — Get files applies and a mode | Someone changed the connection's mode. |
When inputs have pending changes, the window says so at the top and the button reads, for example, Get files (1 update). A greyed-out row can't be downloaded yet and says why, for example Not started — no revision published yet. Animanager never replaces a missing input with another stage. See An input has no master.
When it finishes, Files ready locally sums up what came in. Files on your computer that differ from Animanager's are kept, under Kept local versions: Animanager saves its copies next to them. A routine download that changed nothing special shows only a short message.
While the window is open, it reloads by itself when a source publishes a new version. Rows of inputs taken out of the pipeline are cleaned up on your computer at the next Get files.
The work files of a stage
All files, in the chat of a stage, opens Work files: what the stage has published, by kind.
- Primary: the work files, one series per file, each with its versions.
- Exports and Files: the files of the revisions' exports and files folders.
- Show history lists the older versions too.
- The download button of a row (Get this version and related files locally) brings that version with the Helper. Without the Helper, it downloads the file in the browser.
- Get files, at the top, opens the Get files window for the stage and its inputs.
Inside Blender
To install the add-on, save the file and publish it, see Save in Blender and publish the revision.
When you open the work file, the Animanager add-on reads what the Helper downloaded and updates the file:
- Links are created or repaired. A correct link is never added twice.
- New appends are offered in a Compose Appended Inputs dialog: "Appends available - compose them into this file?". If you cancel, the input keeps a Compose button in the sidebar.
- The Animanager tab of the sidebar (N) lists the stage inputs under Upstreams and the assets under Assets, each with its state and its own buttons. Get inputs appears when inputs are missing. Every state of an input and its buttons are listed in Inputs, and the shot's frame range and resolution in Metadata.
A linked master that has a newer version shows v6 -> v8 available. By default nothing reloads by itself: press Reload on the input, or Reload masters for all of them, when you are ready. In the add-on preferences, Linked master updates switches between Warn, update manually (the default) and Update automatically, which reloads them when the file opens.
Publishing is the same as for any revision. Save with Save for Animanager. Masters are not copied into your file package.
Reconciliation in Blender
When it appears
Reconciliation appears when the same asset reaches your file through more than one stage. In the example shot, the character reaches Lookdev from Spline, Location and FX. Blender sees three different characters, but they are copies of the same one, each changed in a different way: Spline animated it, Location lit it, FX used it for collisions.
Animanager recognises the copies because every item inside a stage collection carries a hidden identity. In Blender these items are called datablocks: objects, meshes, materials, actions, and so on.
When this happens:
- A popup Animanager inputs need attention lists, for example, "Location v1 and Spline v1: same assets - reconcile them".
- The sidebar shows Reconciliation pending and the asset's name, and the button Reconcile....
Nothing is merged until you review it.
Review reconciliation
Press Reconcile.... The add-on compares the stages the asset comes from and opens the Reconcile asset list. If you close it before confirming, Review reconciliation opens it again.
The list shows:
- How many items there are to decide and how many are unchanged, and a line such as "Location v1 and Spline v1 merge into one local copy".
- Base: the earlier revision every copy comes from, used to tell what each stage changed.
- One row per item that differs, with its type icon, what each stage did (for example "changed in Spline v1") and a decision.
Rows that need a decision come first, in red. Hover an item's name to see what each stage did to it.
What you decide on each row
| Situation | Choices | Default |
|---|---|---|
| Changed in one stage only | Keep the current version, take that stage's version, or Delete from shot | That stage's version |
| Changed differently in more than one stage | Which stage's version to keep | None: you must choose |
| Deleted in one stage, changed in another | Keep a changed version or Delete from shot | None: you must choose |
| Deleted in one stage, untouched elsewhere | Keep it or Delete from shot | Delete |
| Renamed | Name from a stage, for each name | The stage that renamed it |
| Missing here but present in another stage | Bring back from that stage or Delete from shot | Bring back |
For every row has one button per choice: it applies that decision to every row where it is possible. Hover a choice in a row to read what it keeps and what it discards.
Confirmation and undo
- Reconciliation always asks for confirmation, even when there is nothing to decide.
- OK says Decide every conflict first. until every row has a decision.
- Cancel changes nothing.
- OK applies everything as one step. Ctrl+Z undoes it completely.
- Then save with Save for Animanager to keep the result. The decisions are published with your next revision. You can read them later with History on the revision card.
The render farm never reconciles
Reconciliation is always a decision made by an artist. The farm renders the published file as it is, including the reconciliations it already contains. It never asks and never decides.
Common problems
Common problems with inputs, masters and reconciliation are now in Troubleshooting, with their messages and what to do.