
Appearance
Create a studio and invite people
A studio holds your team, your projects and their settings. You create it with a three-step wizard, invite people with a link, and adjust everything later on the Settings page.
Create a studio
- Click + (Create studio) at the bottom of the studio rail. On a phone, tap the studio name at the top and choose Create studio.
- Studio: type the Studio name and press Continue.
- Studio type: answer Do you work in Blender? and Are you a team or one person? The answers pick a type. You can still click another card.
- Review: check the stage pool, the status pool, the workflow presets and the modules, and press Create studio.
The steps are listed on the left of the wizard. Continue stays grey until the step is complete: a name on the first step, a type on the second. Click a step you have already completed, or press Back, to change it. A click outside the wizard doesn't close it, so nothing is lost by accident: close it with Cancel on the first step or the close button at the top. Studio types in the guide, at the top, opens this page.
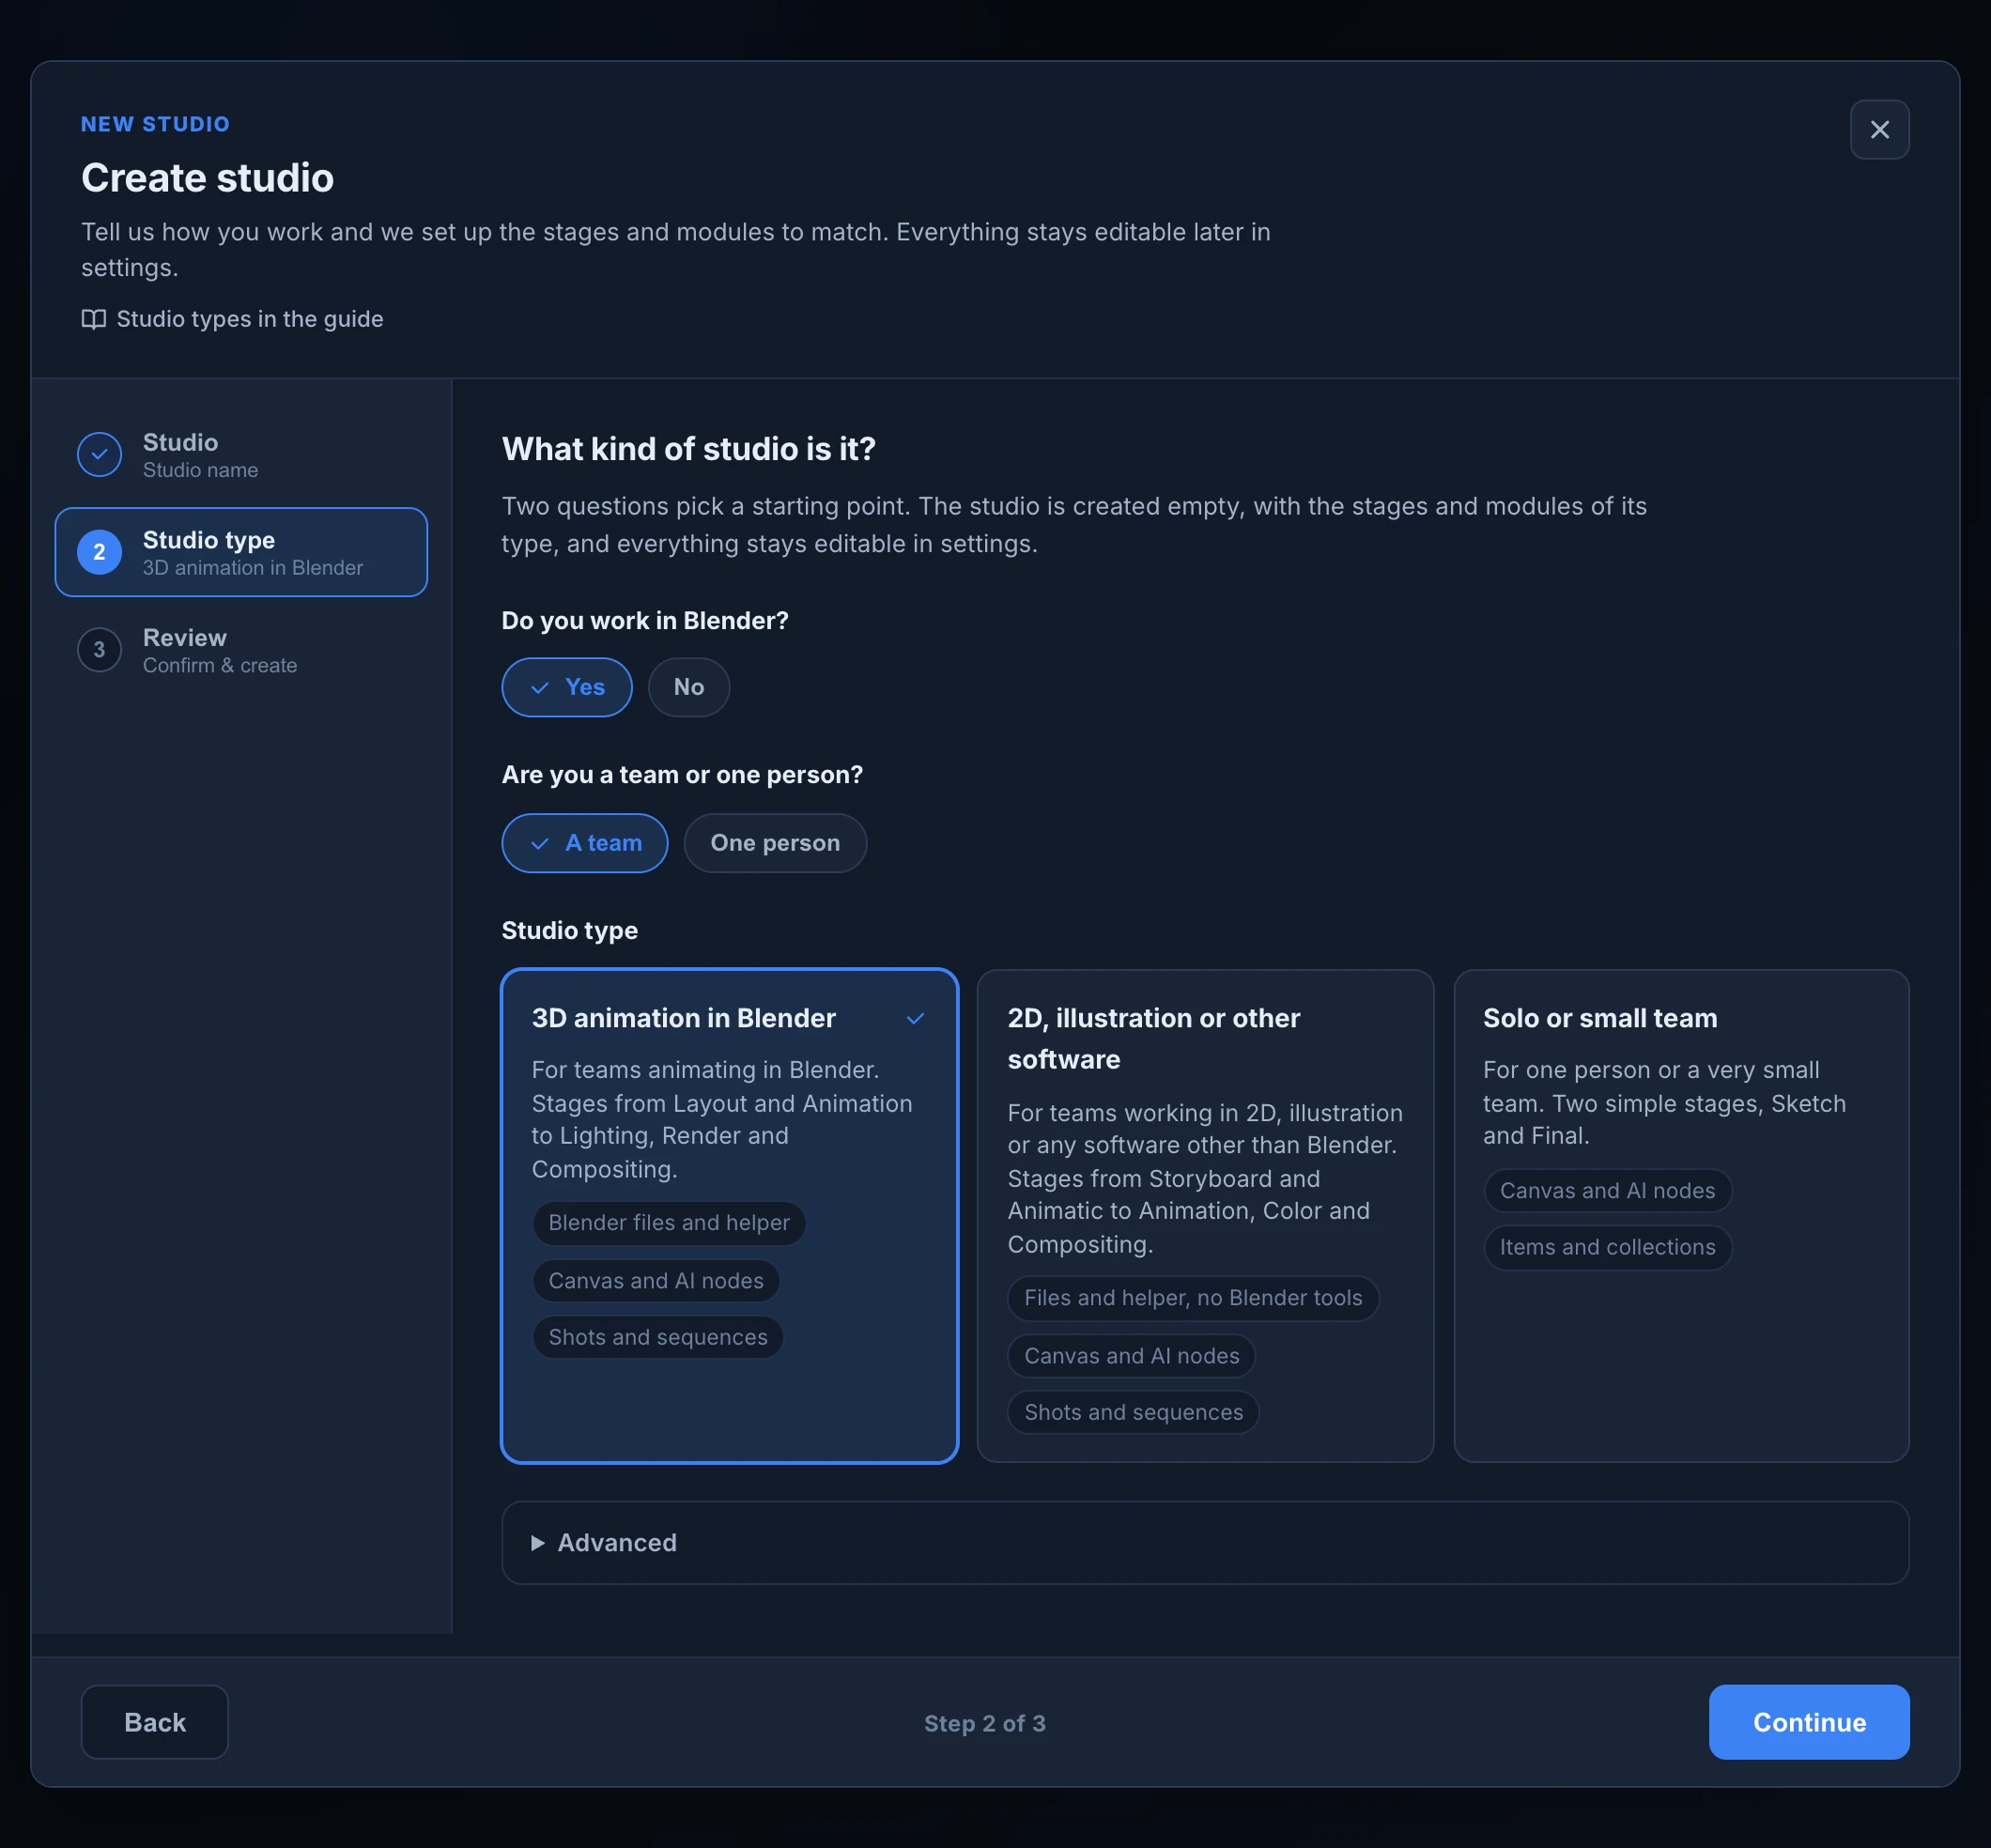
| Type | For | Starts with |
|---|---|---|
| 3D animation in Blender | Teams animating in Blender | Stages Layout, Animation, Lighting, Render and Compositing. Files and helper, Timeline, Canvas and AI nodes. Units named shots, grouped in sequences. |
| 2D, illustration or other software | Teams working in any software other than Blender | Stages Storyboard, Animatic, Animation, Color and Compositing. Files and helper, Timeline, Canvas and AI nodes. Shots and sequences. |
| Solo or small team | One person or a very small team | Two stages, Sketch and Final. Timeline, Canvas and AI nodes, plus Files and helper if you answered Yes to Blender. Items and collections. |
Every type starts with the statuses To Do, In Progress, Feedback and Done. To Do, Feedback and Done are always there and can't be removed.
If you click the Solo or small team card without answering the questions, the studio starts without Files and helper. Turn it on later in Features if you need it.
Advanced
Once a type is picked, Advanced appears below the cards. Open it to change what the type starts with:
- Name of the units: Shots, Items, Illustrations or Assets. This is the word the studio uses for its units of work.
- Name of the groups of units: Sequence, Group or Collection.
- Activate workflows: the workflow presets the studio starts with, each with its number of stages. Their stages make up the stage pool. If you clear every workflow, the studio starts with one stage, Production.
- Review statuses: To Do, Feedback and Done are under Always included. Check a status preset to add its statuses to the pool.
Pick the type before Advanced
Answering the two questions again, or clicking another card, puts back everything the type starts with. What you changed in Advanced is lost.
Review and create
Review & create sums up the studio: its name, its type, its units (for example Shots in sequences), the Stage pool, the Status pool, the Workflow presets and the Modules, each with how many there are. Press Create studio.
The page reloads and opens the new studio, empty, with you as its Owner. Review and chat are always on. Video editor and Translations start off: turn them on in Features. Render farm, Finances and Publisher are never part of a type: see Modules managed by Animanager. Everything the wizard sets stays editable on the Settings page.
If the studio can't be created
- A studio with this name already exists. Choose another name. Studio names are unique across all of Animanager, whatever their capitals: if "Greenhouse Studio" exists, "greenhouse studio" is taken too. The wizard goes back to the first step.
- The Free plan allows 2 studios per person and you already created 2. Move one of them to Pro to create another. Only the Free studios you created count: the ones you joined, and the ones on Pro or billed through a Pro account, don't. See Plans, seats and storage.
Your first sign in
You sign in to Animanager with your Google account. Every new account joins the Animanager studio. While that is the only studio your account belongs to, and you didn't come with an invite link, Animanager opens Welcome to Animanager, with the same wizard to set up a studio of your own. You can also:
- paste the link your team sent you under Join with invite link and press Join studio. Paste the whole link, as you received it;
- press Not now, go to the Animanager studio. This browser stops asking, and you can create your studio later with + in the studio rail.
The Settings page
All the settings of a studio live on one page, Settings, with a side menu in three groups. Each section shows a short caption under its name:
| Group | Section | Caption | Who sees it |
|---|---|---|---|
| Studio | General | Name & avatar | Studio settings |
| Studio | Members | People, invitations & skills | Studio settings, or Members at Invite or Manage |
| Studio | Roles & permissions | What each role can do | Roles and permissions |
| Studio | Features | Product areas | Studio settings |
| Studio | Workflows & pipeline | Stages, statuses & options | Studio settings or Pipeline |
| Studio | Billing | Plan, seats & invoices | Billing |
| Project | General | Appearance & feedback | Everyone, when a project is in context |
| Project | Pipeline | Stages & dependencies | Everyone, when a project is in context |
| Project | Schedule | Due date | Everyone, when a project is in context |
| Project | Permissions | Audience & roles | Everyone, when a project is in context |
| My account | Profile, Notifications, Preferences | Name & avatar, Sounds, Language & theme | Everyone |
The studio permissions in the last column are explained in Roles and permissions. You only see the studio sections you can change. The Project group appears when a project is in context: you opened Settings from a project, or you were working in one. Its sections are visible to everyone, and read-only for those who can't change them. See Set up a project in Settings.
Ways to open it:
- Studio settings in the profile menu of the header, or in Manage studios (the gear below the studio rail). It is there when you can change the studio's settings or its roles, and opens General, or Roles & permissions if roles are all you can change.
- Account in the profile menu opens My account, and from there the side menu reaches every other section you can see. See Your account and preferences.
- The Pipeline button in the header opens Workflows & pipeline.
- Settings in the Tree context menu of a project, space or collection, and the gear of a collection in the Grid. See Set up a project in Settings.
- Manage billing in the usage pill of the header opens Billing.
On a phone, the side menu becomes a strip of sections above the content: swipe it sideways.
Save your changes
Changes wait in the save bar at the bottom of the page. With nothing pending it says All changes saved. Once you change something it says Unsaved changes and counts the sections you changed. Press Save changes, or Discard to drop them all.

- Moving to another section keeps what you changed: you can change several sections and save them once.
- Ctrl/⌘ + S also saves, even while you type in a field.
- If something can't be saved, the bar shows why instead of the count. The sections are saved one after the other: the ones saved before the error stay saved, and the rest wait for you to fix it and save again.
- The browser warns you before you close or reload the tab with unsaved changes.
The close button doesn't ask
The close button at the top right of Settings takes you back to where you were without asking: unsaved changes are lost. Save first.
Each section title has a Guide link to the matching page of this guide.
Studio General
General holds the Studio name and the Studio avatar:
- Upload image picks an image from your computer.
- Choose from studio opens Choose studio avatar, with the images the studio already has.
- Remove goes back to the default icon, which also shows whenever no image is set.
The studio's avatar is what everyone sees in the studio rail. Changing either needs the studio permission Studio settings, and is saved with Save changes.
Invite people
- Open Settings → Studio → Members and press Invite member.
- Under Invite with Link, choose the Role the person joins with. It starts on the Default studio role.
- Press Generate Link, then Copy, and send the link by email or chat.
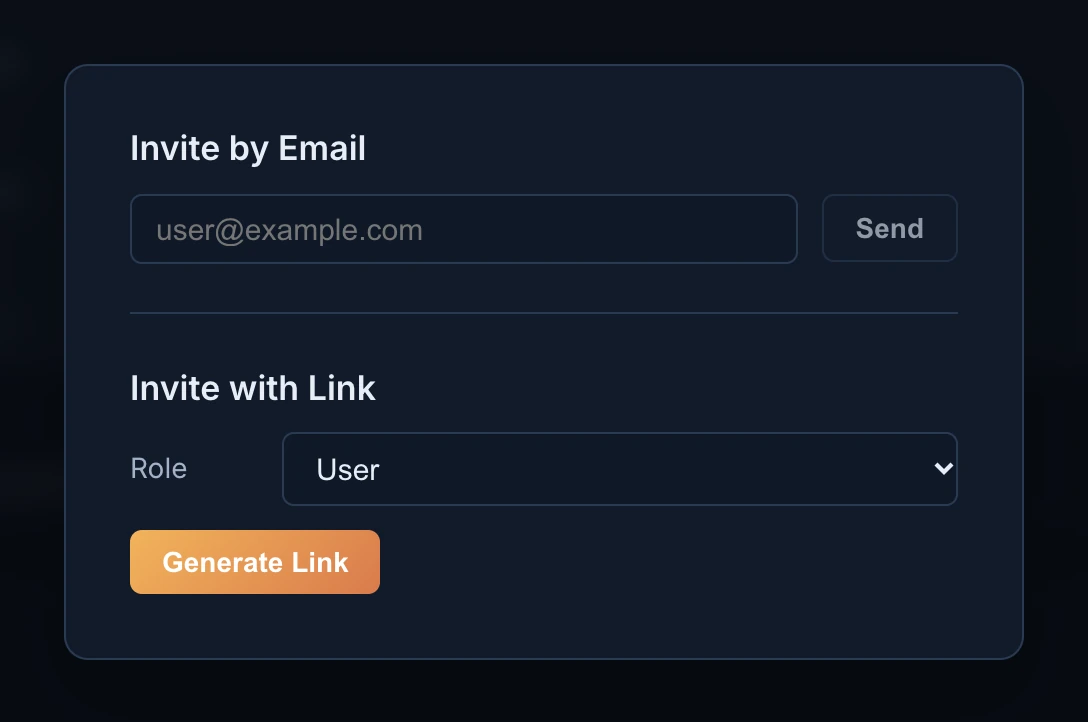
Role appears only if you can manage members, and lists the active roles below your own. Without it, the link gives the Default studio role set in Roles & permissions. Inviting needs the studio permission Members set to Invite. Add a seat in Billing makes the same kind of link, with the default role: see Seats.
What the person sees:
- They open the link. If they are not signed in, Animanager asks them to sign in with Google, or create their account the same way.
- They land in the studio, with the role of the link. If that role was deleted or turned off since, they get the default role instead.
- If they were already a member, the link just opens the studio, with the role they had.
If the studio has no seat left, they are told The Free plan includes 1 member. This studio has no seat left. Ask a studio admin to move to Pro. and don't join.
A link can't be taken back
An invite link has no expiry date, works for any number of people, and can't be turned off. Anyone who opens it and signs in joins the studio with its role. Each press of Generate Link makes a new link, and the earlier ones keep working. Send links only to the people you want in the studio, and archive anyone who joins by mistake.
Every member takes a seat, so a studio with no seat left can't invite anyone new. A Free studio has room for one member: see Plans, seats and storage.
Manage members
Members lists the people of the studio, with their name and email. Search members... filters them by name. The list shows 50 people at a time: Load more shows the next ones. Depending on your permissions, each row lets you:
- Change the role in its menu. You can give only the roles below your own, to members whose role is below yours. The Owner's role can't be changed. This needs Members set to Manage.
- Archive a member, or Restore one from Archived. Archived members can't open the studio any more and take no seat; what they did stays where it is. Restoring needs a free seat. This needs Members set to Manage, and works only on members whose role is below yours. Nobody can archive themselves, or the Owner.
- Set their Skills. This needs Studio settings.
Skills
Skills tell Replan who can work on each stage. Press Skills on a member's row. The button counts the skills set, for example Skills (2).
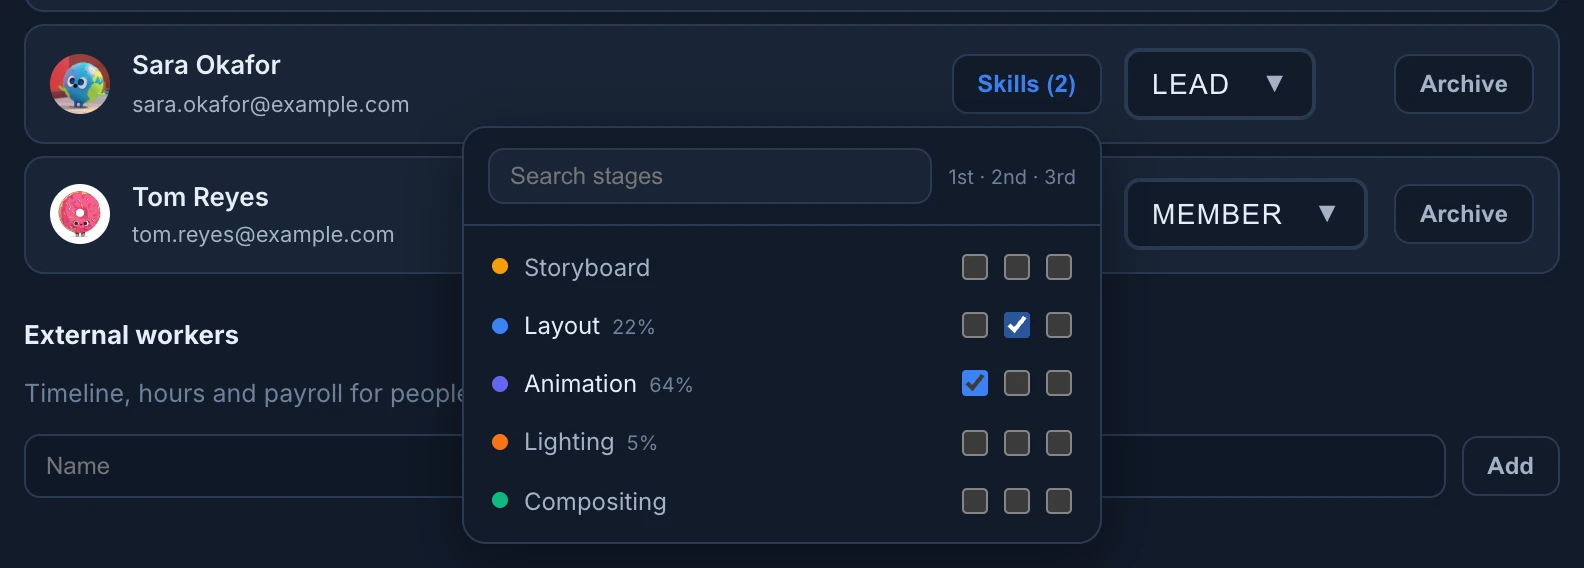
- Each stage has three boxes, 1st, 2nd and 3rd: a primary, secondary or tertiary skill. A stage has one level at most. Click the checked box again to clear it.
- Search stages finds a stage by name.
- Next to a stage, a percentage shows the share of the studio's work on that stage the person has done so far. Use it to set skills from what people really do.
When the studio has set skills, Replan gives a stage only to people who have it as a skill, unless nobody does.
External workers
External workers are people without a login: freelancers you plan on the Timeline and count in hours and payroll. Type a Name, and an Email (optional), and press Add. Edit a name or an email in its field. Archive and Unarchive hide them and bring them back. They need Studio settings, and take no seat.
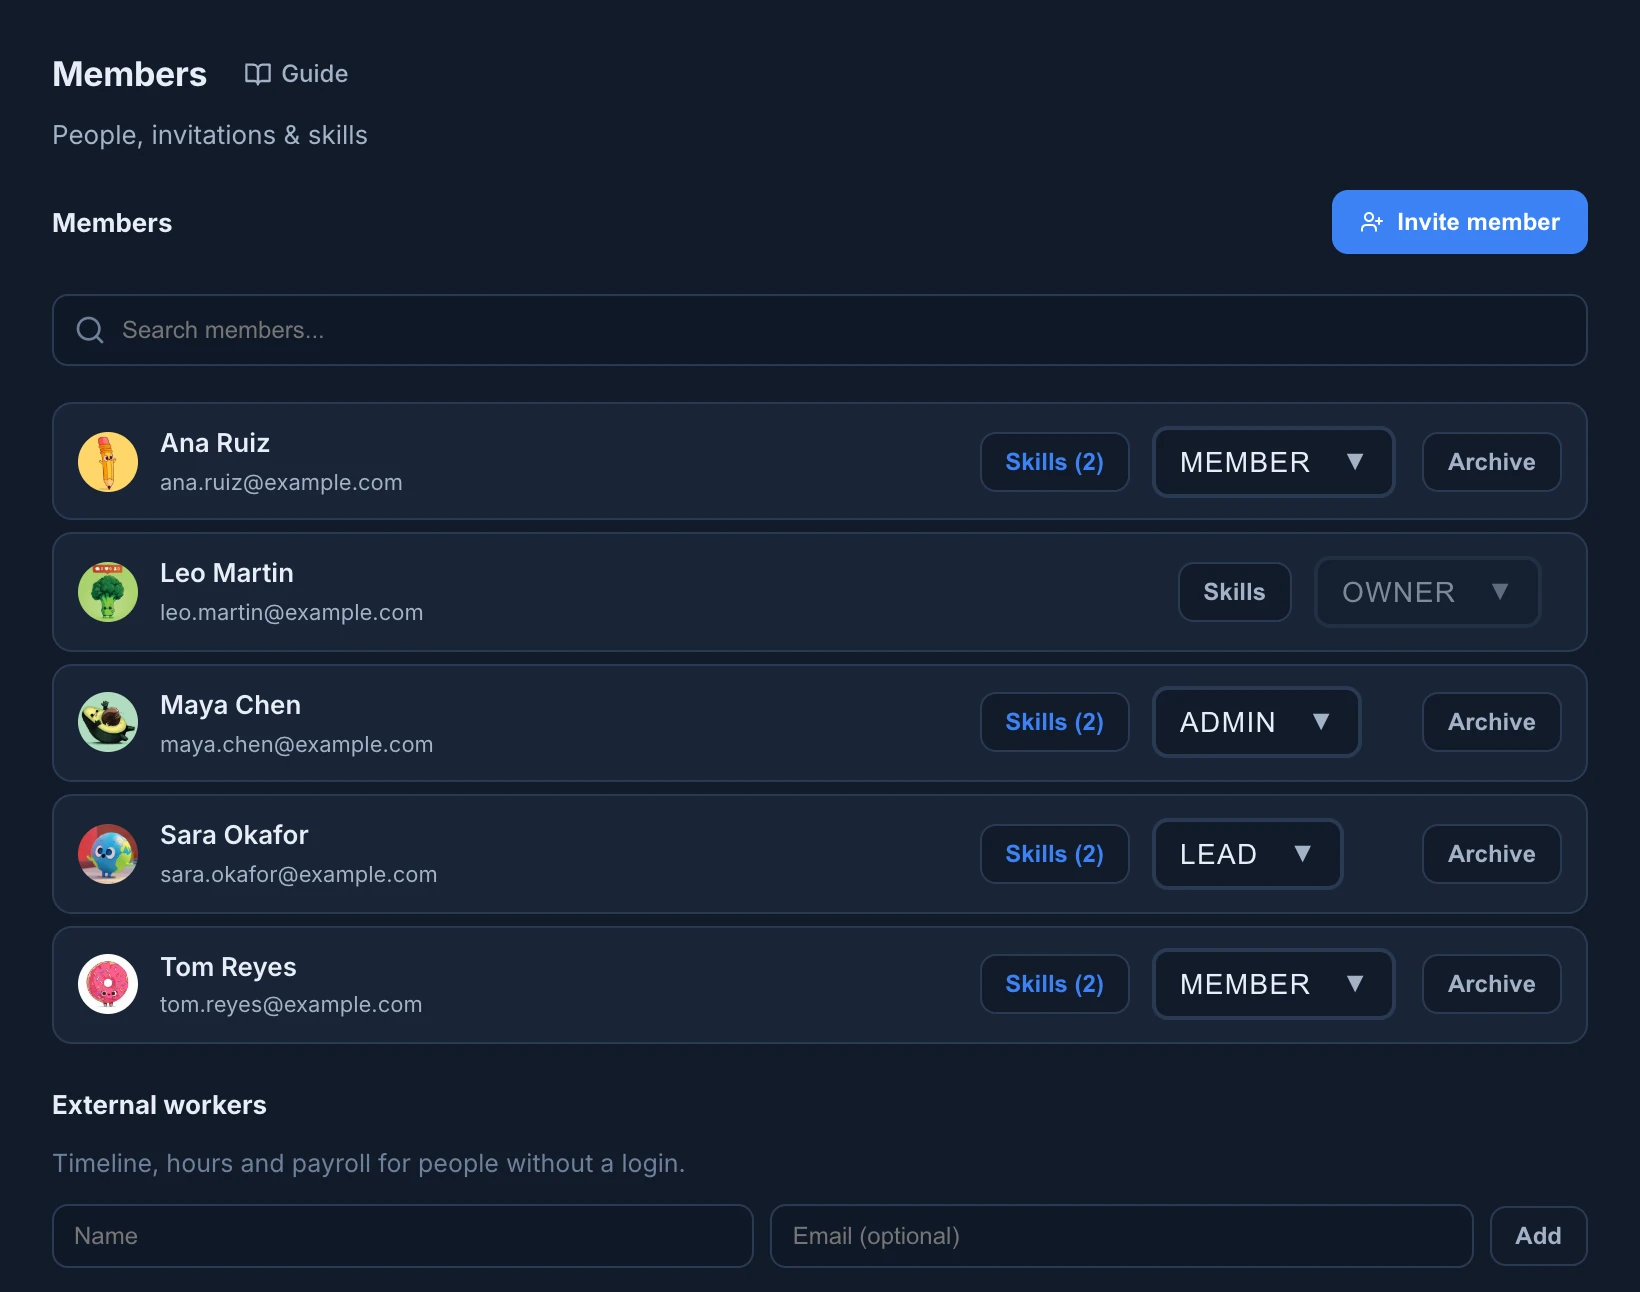
Role changes, archives, skills and external workers are all saved with Save changes.
Project settings
The Project group of Settings sets up one project, or one of its spaces or collections, chosen in Settings for: its name, icon and feedback buffer in General, its stages in Pipeline, its due date in Schedule and who can open it in Permissions. Everything is in Set up a project in Settings.
Items keep their own settings in the item dialog: Configure Item in the Tree context menu of an item. See Configure items and recurring work.