
Appearance
Draw feedback on the frame
In Review mode you can draw on the frame you are looking at, write your notes next to it and send both as one feedback. The team finds it in the chat of the stage, and View feedback brings anyone back to that exact frame.
Start drawing
- Open the revision in Review mode and stop on the frame you want to talk about.
- Press Feedback in the header, or a tool key: B (Pencil), T (Text), S (Circle) or L (Line).
- The drawing tools take the place of Feedback in the header, the notes panel opens on the left as Feedback as your name, and Feedback Layers opens on the right.
Feedback is greyed out while you compare two versions: notes need a single version. Turn compare off first.
The tools
| Tool | Key | What it does |
|---|---|---|
| Pencil | B | Draws freehand. With a pen tablet, pressing harder draws a thicker line. |
| Text | T | Click the frame to place a text box, then type. |
| Circle | S | Drag to draw an ellipse. |
| Line | L | Drag to draw a straight line. |
| Transform | Click a drawing to select it, drag it to move it and drag a corner to resize it. Click an empty spot to deselect. |
Next to the tools:
- The color square (Annotation color). It starts orange.
- Stroke width, from very thin to 48. It starts at 3.
- The line style: Solid, Dashed or Dotted.
- Stroke smooth, for the Pencil only: how much your hand's wobble is smoothed out.
Hold Alt to pick a color from the frame: a magnifier shows the color under the pointer, and a click takes it.
Ctrl/⌘ + Z undoes, up to 40 steps, and Ctrl/⌘ + Shift + Z or Ctrl/⌘ + Y redoes.
Text
Click with Text where the note goes, type, and press Enter or click elsewhere on the frame to place it. Shift + Enter starts a new line. To change a text later, click it with Text, or double-click it with any tool.
On a video, every drawing belongs to one frame
A drawing shows only on the frame you drew it on. Step one frame away and it disappears; step back and it is there. You can draw on several frames in one feedback, and on several files of the same revision: each drawing remembers its frame and its file. The markers under the timeline show every frame you drew on.
Paste a reference
Copy an image anywhere, for example a frame of another shot or a drawing, and press Ctrl/⌘ + V in Review mode. It lands on the frame selected, with Transform, so you can move and size it. It is uploaded when you send.
Feedback Layers
Feedback Layers, on the right, lists what is drawn on the frame you are on. Its number counts the layers. Collapse Panel folds it away to see the whole frame.
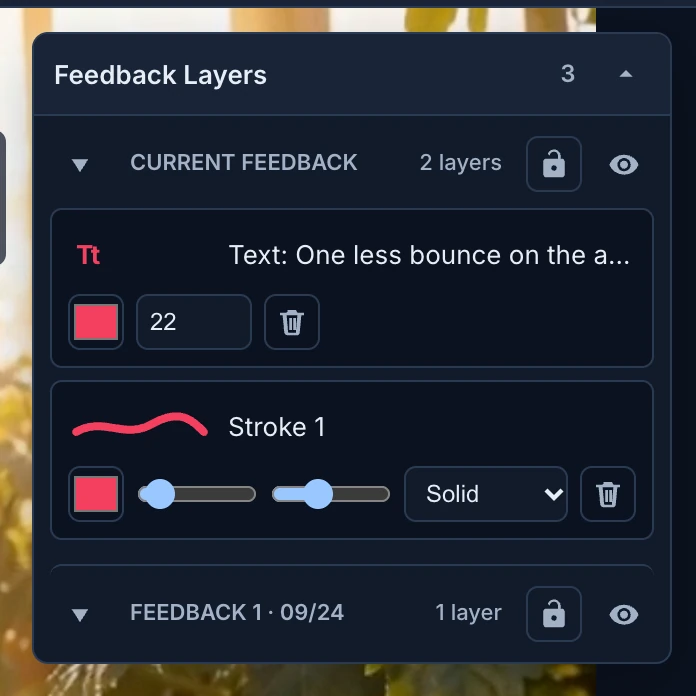
- Current feedback groups what you are drawing now. Double-click its name to rename it.
- Feedback already sent shows as groups such as Feedback 1 · 09/24, which you can't change.
- Each group folds and unfolds, and has Lock Group and Hide Group. Hiding someone else's feedback only hides it for you, while you draw.
- Each layer, such as Stroke 1, Text: One less bounce… or Image 1, has its own settings: the color, width, smoothing and style of a stroke, or the color and size of a text. The bin deletes it.
- Click a layer to select it, Shift-click to select a run of layers and Ctrl/⌘-click to add one. Drag layers to move them to another group.
On a frame with nothing drawn, it says No feedback on this frame.
Write your notes
The notes panel, Feedback as your name, holds the text that goes with your drawings: "Add feedback notes (sent together with your annotations)". It has bold, italic, strikethrough, links, numbered and bullet lists and code. Drag its corner to make it bigger, or fold it with the arrow.
Notes alone are enough: you can send feedback without drawing anything.
Post as client
When a client gives you notes by phone or email, post them in their name:
- Tick Post as client.
- Type the client's name in Client name. The panel then reads Feedback as that name, tagged Client.
- Write the notes and send.
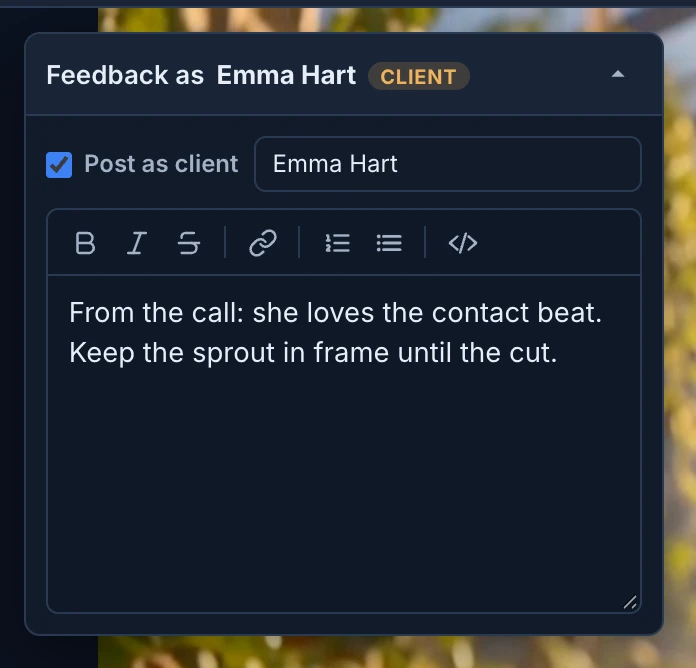
The feedback then looks like one the client sent from a review link: marked Client in the chat and the Feed. Animanager remembers the last client name you typed in this studio, but Post as client starts unticked every time. With the name left empty, the feedback goes out as yours.
Send it
Press Send feedback in the header. It is greyed out until there is a drawing or a note.
- The feedback is posted in the chat of the stage you are reviewing, even if the chat panel shows another one.
- The stage moves to the Feedback status. The studio needs a status named Feedback: without it, Animanager says "Feedback status not found in this studio" and sends nothing.
- "Feedback published" confirms it, and the drawing tools close.
In the chat, the feedback shows as a line such as "Leo Martin changed the status of Animation to Feedback", with your notes, each frame you drew on (VIDEO · FRAME 125), what you drew there and View feedback. The Feed shows the same.
Leave without sending
What you draw is kept in this browser, on that version, until you send it: close Review mode and your drawing is back when you open the same version again, even after a reload. The text of your notes is not kept, so copy it somewhere first if it is long.
The tools have no close button of their own. To put them away without sending, close Review mode with Esc or the ×.