
Appearance
Generate images and video on the canvas
Every item, such as a shot, has its own canvas: a board the whole team shares. You collect references on it, organize them, and wire them into AI nodes that generate images and video. What anyone changes appears on everyone's board.
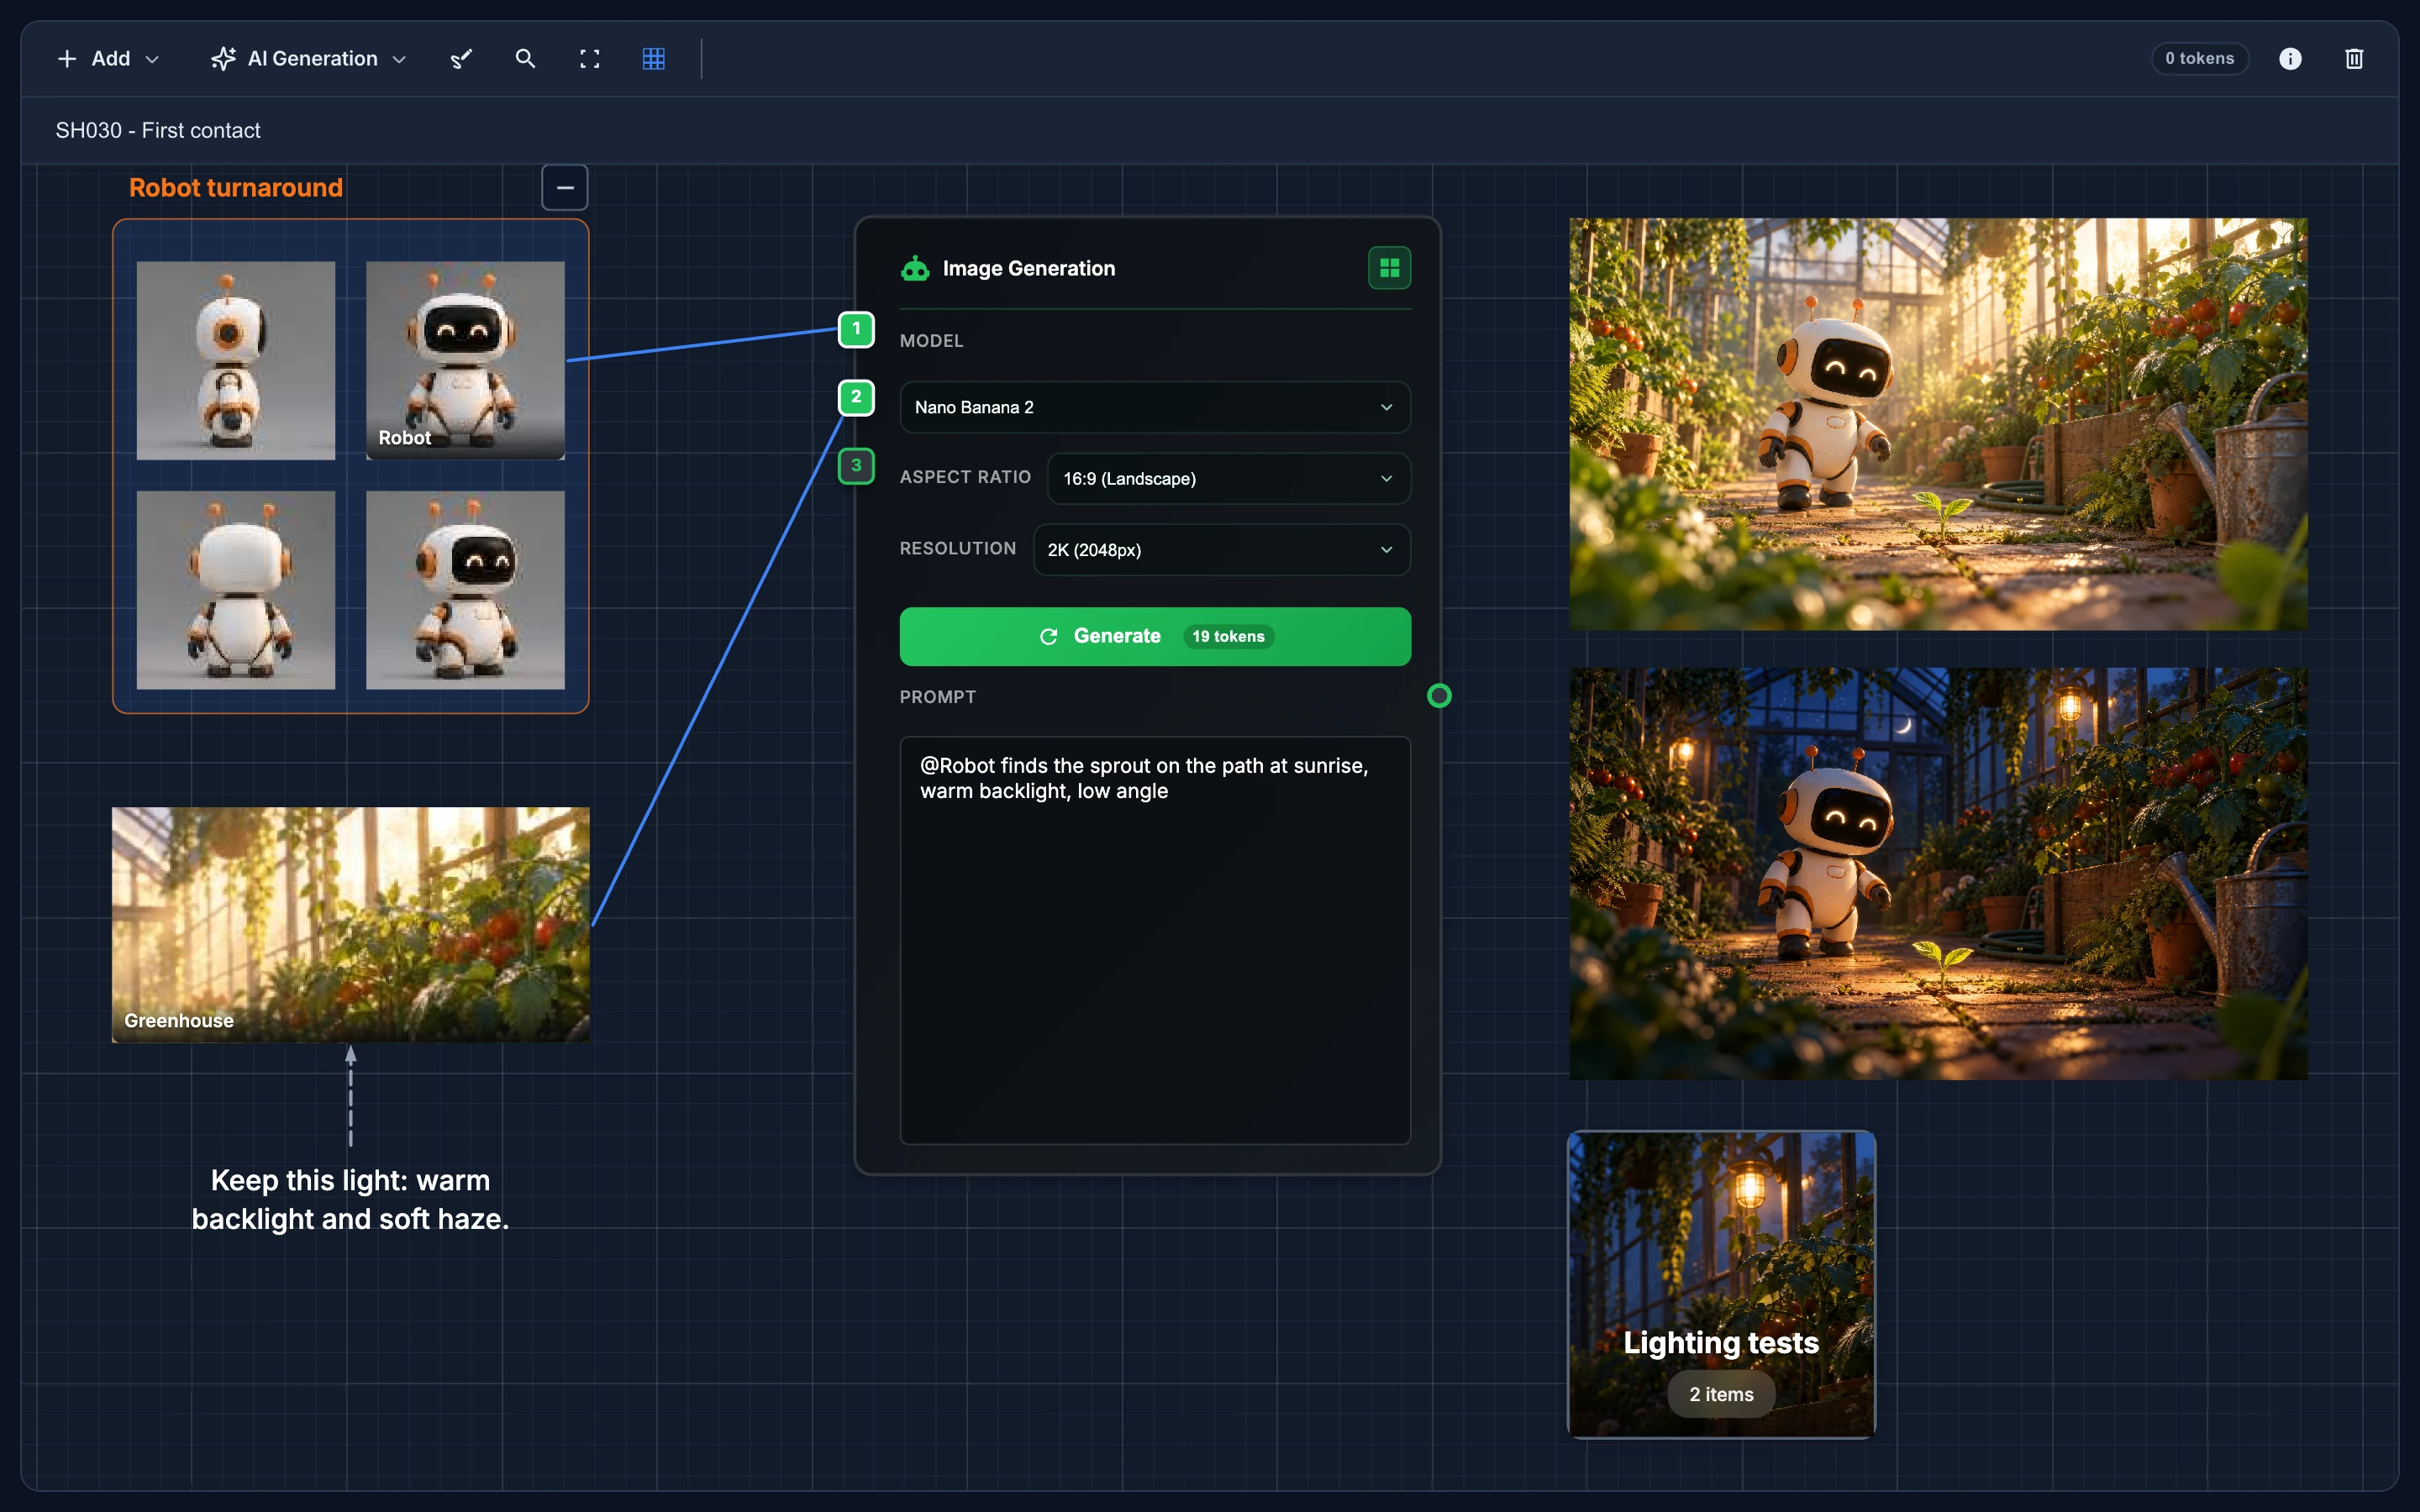
Access a canvas
- Click Canvas in the header. It opens the canvas of the item you are on or, with no item open, the last canvas you had open in this browser.
- Click the canvas icon (Open Canvas) next to an item in the Tree. It opens over the page, without leaving it.
- In the chat of an item or one of its stages, press Open canvas to open it in a new window.
- A notification about a finished generation opens the canvas on the result.
The canvas needs the Canvas module on in the studio (see Modules), and a role with Studio canvas set to Use (see Roles and permissions). Everyone who can open a canvas can edit it.
Each stage of an item also has its own References board, a separate and usually quieter board for that stage alone. The item canvas is the one the team works on, and the one this guide means.
The canvas window
The canvas window shows the board with the item's path above it, and tabs at both edges:
- The studio tree, on the left (Show the studio tree): every item of the studio, with how many elements each canvas holds. Click an item to switch to its canvas in the same window. Drag an item onto the board to copy its whole canvas here as a folder. Drag elements from the board onto an item of the tree and hold them there for half a second to move them to that item's canvas, or hold Alt to copy them.
- Assets, on the right: the studio's reusable sets. See Reuse characters and sets as assets.
- Chat: the chat of the item and of each of its stages, without leaving the canvas. The tab counts unread messages, in red when you are mentioned.
- Generations: everything generated here and around it. See Find and reuse generations.
Animanager remembers which panels you had open, and their width, for each studio.
Add to the board
Open Add in the toolbar, or right-click an empty part of the board.
- Media: Asset, Studio media (see Browse studio media) and Upload files. You can also drag files from your computer onto the board, or paste them.
- Content: Frame, Text, Folder, Checklist, Sketch and Document. See Notes, documents and media on the canvas.
- AI Generation: the image and video nodes and the utilities. See Generate with AI.
Elements added from the toolbar land in the middle of your view, and from the right-click menu where you clicked. The right-click menu starts with a search box, Type to create…: type "seed" and press Enter to add a Seedance node. Under it, Last used keeps your four latest choices, on every computer you use.
Select, move and arrange
- Click an element to select it, and Shift+click to add or take out more. Shift+drag on an empty part of the board draws a box: everything it touches is selected, and a frame only when the box holds all of it. A selects everything not locked.
- Drag to move. Drag a frame and everything inside it moves too. Drag the handles of a selected element to resize it: images and videos keep their shape.
- Alt+drag leaves a copy, with its connectors. Alt+click alone also makes a copy.
- Arrow keys jump the selection to the nearest element in that direction.
- Scroll to zoom, at the pointer. Drag an empty part of the board, or drag with the middle button anywhere, to move around. On a touch screen, pinch to zoom.
- Double-click an element to fit it to the window. Frame All in the toolbar, or ., fits everything; with a selection, . centers on it.
While something is selected, the rest of the board fades so the selection stands out. Click an empty part of the board to clear it. Hold Shift and the AI nodes stay bright, so their inputs are easy to find.
With an element selected, the toolbar shows what you can do with it:
- Bring selected items to front and Send selected items to back.
- With two or more: align their edges or centers, and G, H and V to arrange them as a grid, a row or a column.
- Snap to Grid, on by default, snaps moves to a 20-pixel grid. A selection keeps its spacing.
- Color, opacity and border for text, sketches, checklists and connectors, and the font, size and alignment of text.
- Download for the selected images and videos.
Connectors
A connector is an arrow from one element to another. The same arrow into an AI node's numbered input makes that element a reference of the node.
- Select two or more elements and press C, or the toolbar's Connect to button. The first one you selected is where the arrows start. If they are already connected, C removes those arrows.
- With a single element selected, C removes all its connectors.
- On an AI node, Shift+drag from a numbered input to an element, or select an image and Shift+click the input.
- Select a connector to change its line (Solid Line, Dashed Line, Dotted Line), its shape (Straight Line, Curved Line, Orthogonal (Right Angles)), its direction (Flip Direction) and its Arrow Color. Drag the circle in the middle of a curved one to bend it, and drag an end onto another element to reconnect it.
- To remove one, click it and press Delete.
A connector follows its elements when you move them. It shows structure only: it does not change permissions or statuses.
Folders
A folder keeps part of the board out of the way without a separate canvas.
- Create one with Add › Folder.
- Double-click a folder to open it, and click the path at the top of the board to go back up.
- Drag elements onto a folder to move them in. Hold them over it for half a second and the folder opens, so you can place them inside. Holding them over a level of the path moves them up to it.
- Double-click its name to rename it. The folder shows how many items it holds, with its starred image, or the first one, as its cover. A folder without pictures gets an icon that matches its name, such as a robot for "Robot".
The folder you are in is part of the address, so a refresh or a shared link reopens it. Deleting a folder deletes everything inside it, after you confirm.
Frames
A frame is a named area of the board. Moving the frame moves everything inside it.
- Create one with Add › Frame, or select two or more elements and press F to frame them.
- Drag elements into it. Drop inside shows where they will land.
- Double-click the name to rename it, and pick its color with Frame color in the toolbar.
- Minimize Frame, in the right-click menu or at its corner, folds it into a small card, and double-clicking the card expands it again. Arrows to what is inside point at the card while it is folded. Expanding pushes the elements around it aside to make room.
- Deleting a frame keeps what is inside it.
The star of a frame: hover an image inside a frame and click the star in its corner (Use as this frame's output). A port appears at the right edge of the frame: wire it into an AI node and the node uses the starred image. Star another one and every node wired to the frame switches to it. Folders have a star too.
A folder can become a studio asset that other canvases reuse. See Reuse characters and sets as assets.
Lock, delete and restore
Lock (L, or the right-click menu) pins an element: it can't be selected, moved or edited, and clicks go through it to the board. To unlock it, click the lock badge on it, or hover it and press L. A locked element can still be deleted.
Deleted elements go to Trash, the button at the right of the toolbar, which counts them. Hover one there and choose Restore to canvas to bring it back. Delete Forever removes it for good, after you confirm.
Ctrl/⌘ + Z undoes your last changes on this canvas, up to fifteen steps, and Ctrl/⌘ + Shift + Z redoes them.
Browse studio media
Studio media brings in images and videos the studio already published, without uploading them again.
- Choose Add › Studio media, or Browse Studio Media in the right-click menu.
- Go through Projects, spaces and collections, or search in Search all projects, spaces, collections, items....
- Open an item. Its images and videos are grouped by stage, each marked with its version.
- Click the ones you want, then press Add to Canvas.
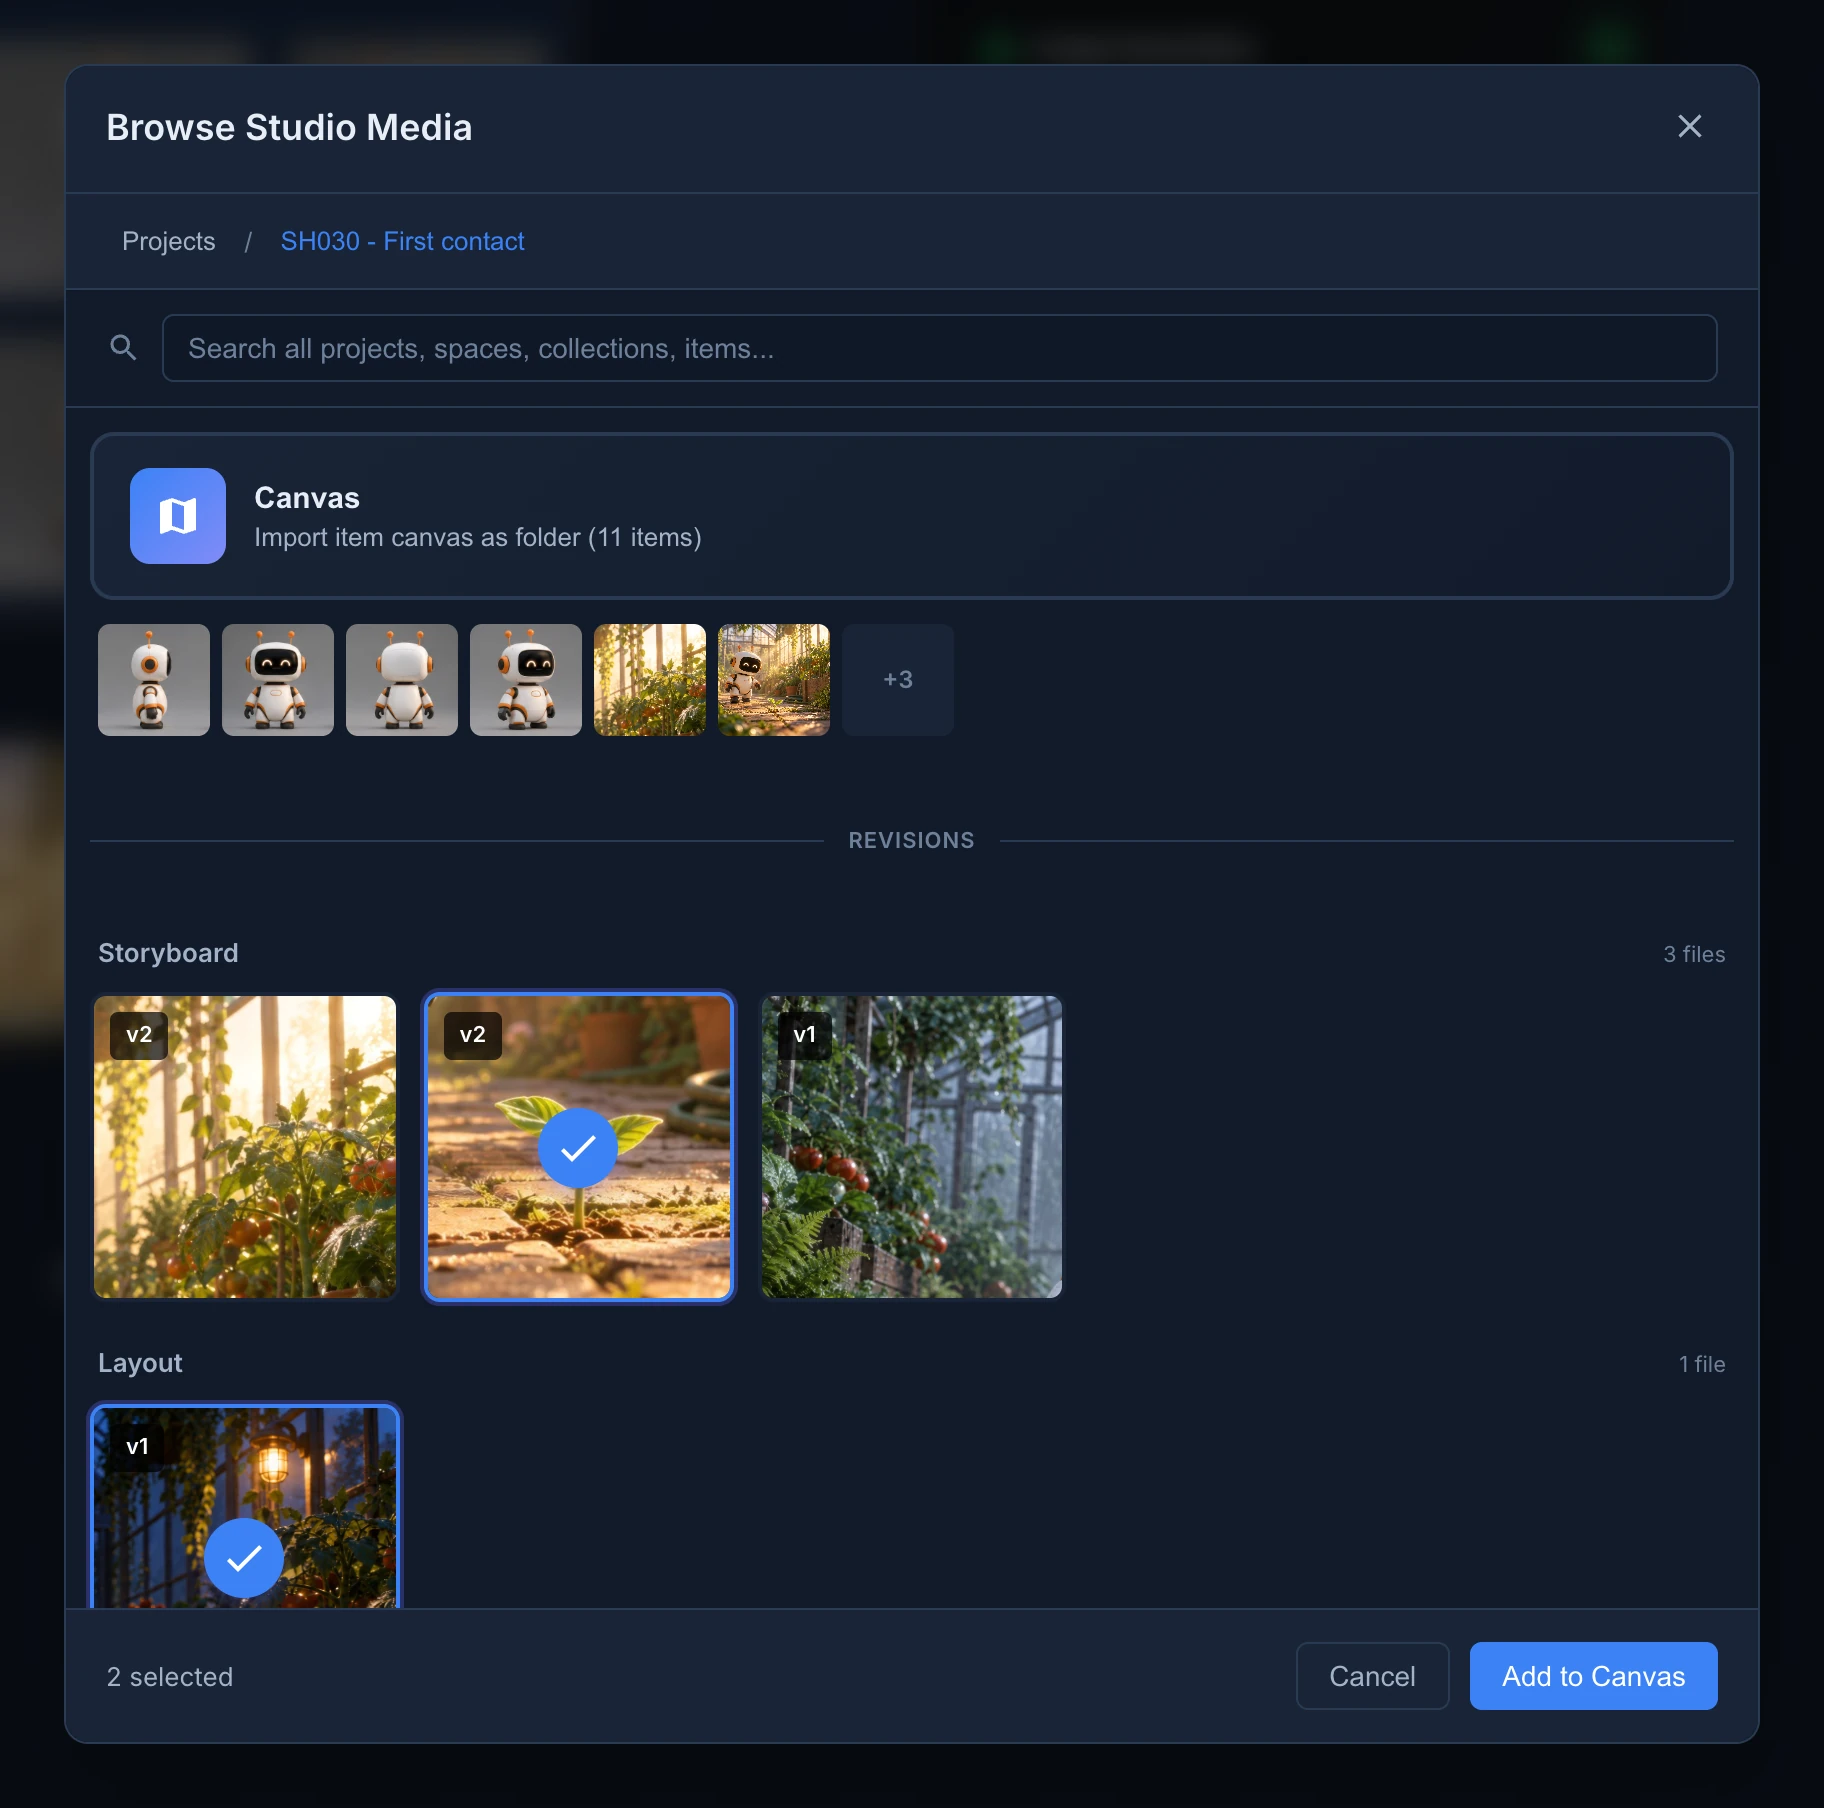
The Canvas card at the top copies the whole canvas of that item into yours as a folder: select it and press Import Canvas. The browser shows only projects you can access.
A published picture keeps where it came from: hover it to see its path, such as "Greenhouse › Shots › SH030 - First contact › Layout › v2", and click the path to open that version.
Copy between canvases
Ctrl/⌘ + C and Ctrl/⌘ + V copy elements with their connectors, also to another canvas of the same studio, in another tab, for up to twelve hours. Pasted elements land in the middle of your view. Copying a single image also puts the picture on your computer's clipboard, ready to paste in another app, and pasting text from elsewhere makes a text note.
Generate with AI
The AI nodes are in AI Generation in the toolbar, and under AI Generation in the right-click menu:
- Generate images on the canvas: the Image Generation node, sketches and the Storyboard Creator.
- Generate video on the canvas: Veo, Seedance, MiniMax H3, P-Video, Kling Motion and Kling Edit.
- Enhance, cut out, add sound and make 3D: the utilities.
- Find and reuse generations: what was generated, by whom, and for how many tokens.
The tokens pill in the toolbar shows what has been spent generating on this canvas. See Choose a model and see what it costs.
Generating spends the studio's tokens
Every run is charged to the studio's token balance, and your prompt and references are sent to the AI provider of the model. See Buy token packs and follow usage.
To produce a stage for a whole space in one go, such as a Layout frame for every shot from its Storyboard, see Generate a stage for a whole space.
Work together
When others are on the same board, the Viewing: bar lists them, their view shows as a rectangle with their name, and an element someone is moving carries their name tag. Text appears as they type it. An element is selected by one person at a time: if someone else selects it, it leaves your selection.
Every change is saved as you make it, and generations run on the server: you can close the canvas at any time.
To show canvas work in a conversation, select images or videos, right-click and choose Attach to chat. They go into the Chat tab of the canvas window, where you pick the stage and post them. Attach to chat shows while the chat tab is open.
The @here reference of the chat points to a frame in Review mode, not to the canvas. See Review a shot.
The video editor canvas
An edit of the video editor has a canvas of its own, opened with Open canvas in the editor. Its Clip creator node turns connections into clips: each image, video, frame or folder wired into Clip 1, Clip 2 and so on is a clip on the timeline, and a frame or folder plays its starred item. Double-click a clip's name to rename it. The node can't be deleted.
A single clip's canvas, opened with Gen image, Gen video or a double-click on the clip, says Clip media at the top: star an image or a video there (Use as this clip's media) and the timeline plays it.
Keyboard shortcuts
Keyboard shortcuts, the i button at the right of the toolbar, lists the main ones.
| Key | What it does |
|---|---|
| A | Select all |
| Delete or Backspace | Delete the selection |
| Ctrl/⌘ + Z / Ctrl/⌘ + Shift + Z | Undo / redo |
| Ctrl/⌘ + C / Ctrl/⌘ + V | Copy / paste |
| Alt+drag | Duplicate |
| G, H, V | Arrange as a grid, a row or a column |
| C | Connect or disconnect |
| F | Frame the selection |
| L | Lock or unlock |
| B | Scribble Mode: draw freehand on the board |
| Space | Play or pause the selected videos |
| . | Fit everything, or center on the selection |
| Arrow keys | Select the nearest element in that direction |
| Esc | Leave Scribble Mode, or close a menu |
Every shortcut of the canvas, with the mouse ones, is in Keyboard shortcuts.