
Appearance
Plan the team on the Timeline
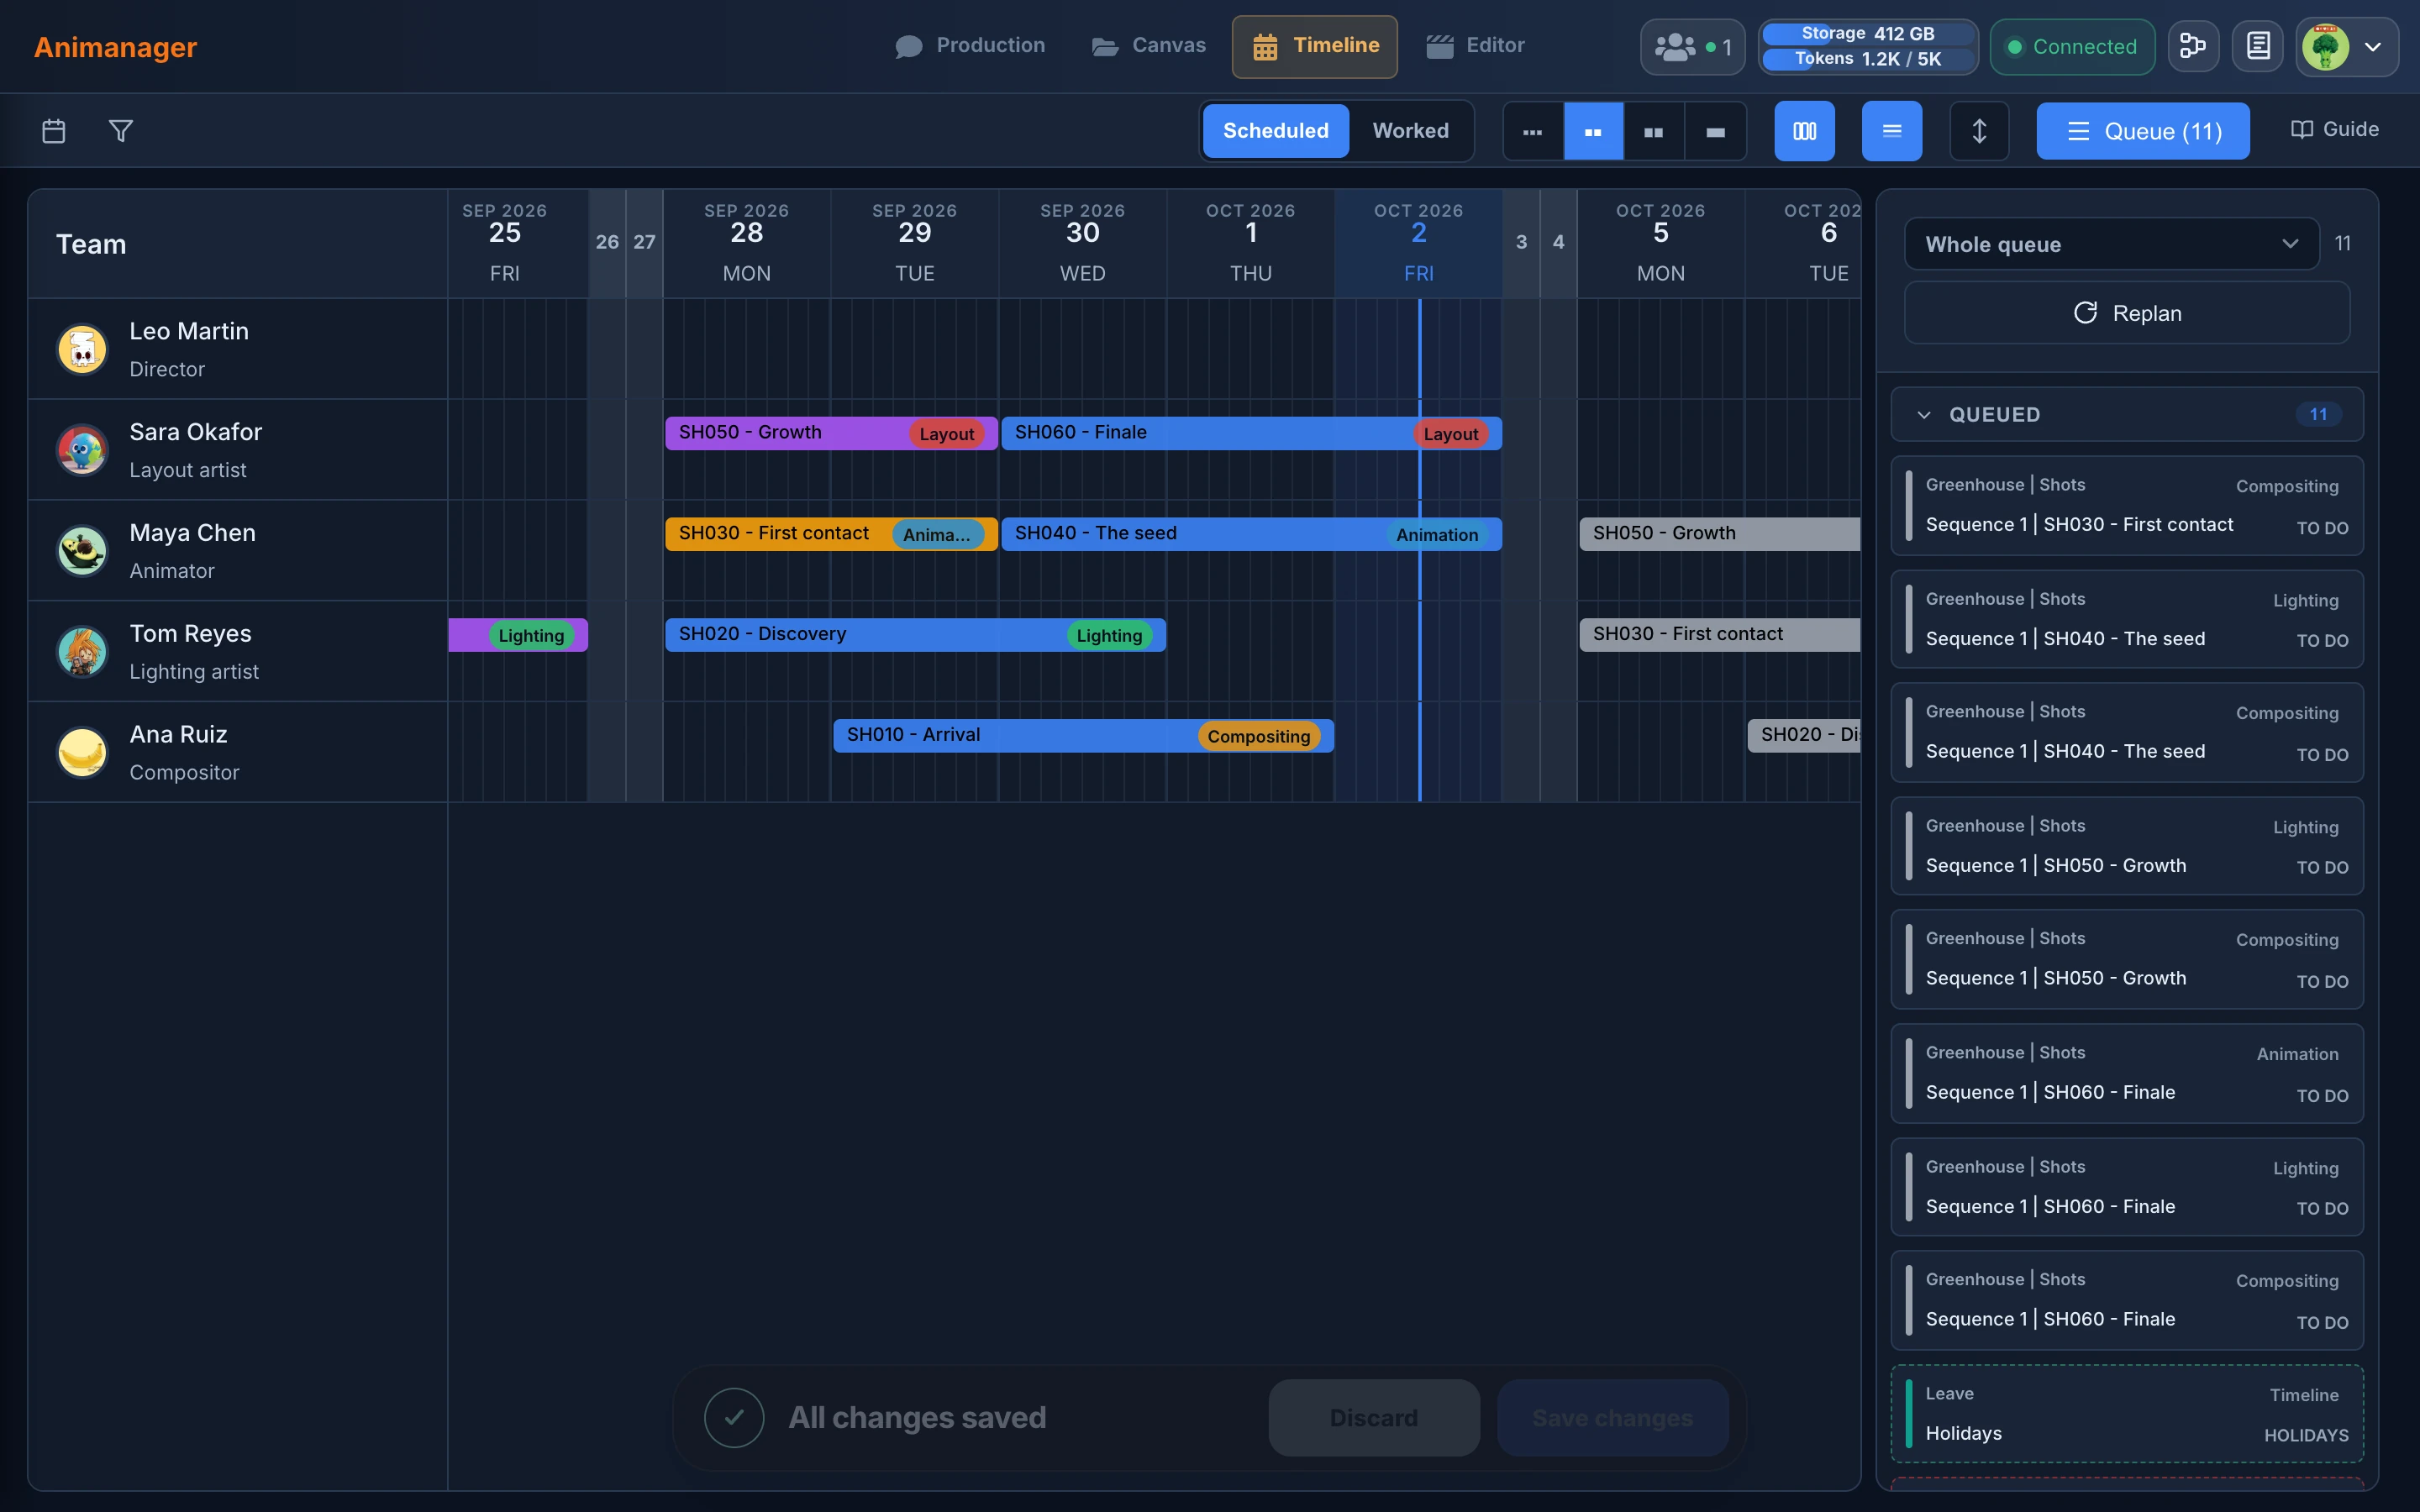
The Timeline shows the studio's people as rows and the stages they work on as bars across the calendar. You assign work from the queue, move and stretch it, mark days off, and save when the plan is right.
Every studio has the Timeline, and new studios start with it on. An administrator can turn it off in Settings → Studio → Features. The Timeline tab appears in the header for people whose role has Timeline module set to Use.
The Timeline belongs to the whole studio. Anyone who can open it sees every person's work and can move any bar, including the stages of projects they can't open in Production. Give Timeline module to the people who plan.
Read the Timeline
- Team, on the left, lists the studio's people with their role: members first, then external workers and archived people. Someone with work on the Timeline who is no longer in the team still gets a row.
- The header shows the days. Today is highlighted and weekends are shaded. The holidays of the studio's calendar are tinted, with their name when you point to the day. A project's due date shows as a vertical line with the project's name and date.
- A bar is a stage of an item, assigned to the person of that row. Its left edge is the start and its width the duration, to the hour. A stage can have more than one bar.
- A bar shows the item and the stage. Expanded rows add the project, space, collection and status. Hover a bar to see its project, stage, item and status.
Stages that wait for others
A stage scheduled before the stages it waits for in the pipeline gets an amber edge, and turns red when it is already running without them. Hover it to read why, for example "Lighting — starts after this task". A stage waiting in a status such as Waiting for approval never holds another back, and neither does a stage in the past.
The toolbar then shows how many stages are blocked. Click N blocked to see only those, and again to see everything. Fix blocked proposes a repair (see Let Replan schedule the work).
Select the bars of one item to see how its stages connect: arrows from each stage to the next, grey when the order is right and amber or red when a stage starts too early, and a line where each stage ends with the stages it unlocks.
Stage deadlines
The Timeline compares the plan with each stage's deadline, the one set in Item Settings, Stats or inherited from the item or the project. Approved and delivered stages are never late.
- On a stage-end label. With the bars of one item selected, each label where a stage ends adds ✓ when the stage finishes on or before its deadline, or +3d in red when it finishes 3 days after it. A label that groups several stages shows the latest one. Point at it to see each stage with its deadline and whether it ends on the day, with days to spare or late.
- ◆ in the header. Each open deadline of the selected item's stages gets a diamond on its day, in the same colors as the rings of the Grid: grey, then amber to red as the date comes. Stages due the same day share one. The diamond of the selected bar's stage is outlined. Deadlines before or after the days on screen are counted at that edge, such as ◆ 2 later. Point at a diamond or a count to see the dates, the stages and the days left.
- On the bars. Any bar that ends after its stage deadline has a red right edge and a pill such as +2d. On the selected item's bars, the part planned after the deadline is hatched in red.
- Hover a bar to see its stage card: the planned dates, Budget · time with the hours spent against the estimate, and Deadline · delivery with the date and fits or ends 2 days late.
Saving a deadline updates the Timeline straight away. If the deadlines of a project can't be loaded, Deadlines unavailable. shows at the left of the day header. Point at it for the reason, and click Retry to ask again.
The toolbar
- The calendar button sets the dates the Timeline covers: From and To, or This month, Previous month, This quarter, Previous quarter, This year or Last year. The Timeline opens on six months either side of today.
- The funnel opens the filters.
- Scheduled shows the plan. Worked shows the time each person logged, day by day. See Log time and review it.
- The four zoom buttons show 50, 100, 200 or 300 pixels per day. 100 is the default.
- Collapse weekends narrows Saturdays and Sundays to a letter.
- Other task shading: when you select a bar, the bars of other items fade.
- The rows button switches between compact rows and expanded rows, which add the project, space, collection and status. Compact is the default.
- Queue (N) opens the queue of stages to schedule.
- Guide opens this page in a new tab.
The Timeline remembers, for you and for each studio, Scheduled or Worked and the weekends and shading switches. The zoom, the row height and the dates go back to the defaults each time.
Task assignments
An assignment puts a stage on a person's row, on the days they work on it.
Assign from the schedule
- Press Queue in the toolbar. Queued lists the stages waiting to be scheduled.
- To see fewer, press Whole queue, pick items or stages in the tree and press Filter the queue. Or select bars on the Timeline and press F to see the queue of those items. A narrowed queue also lists, under Scheduled, their stages already on the calendar.
- Drag a stage from the queue onto a person's row, on the day it starts.
- Drag its right edge to make it as long as the work needs.
- Press Save changes.
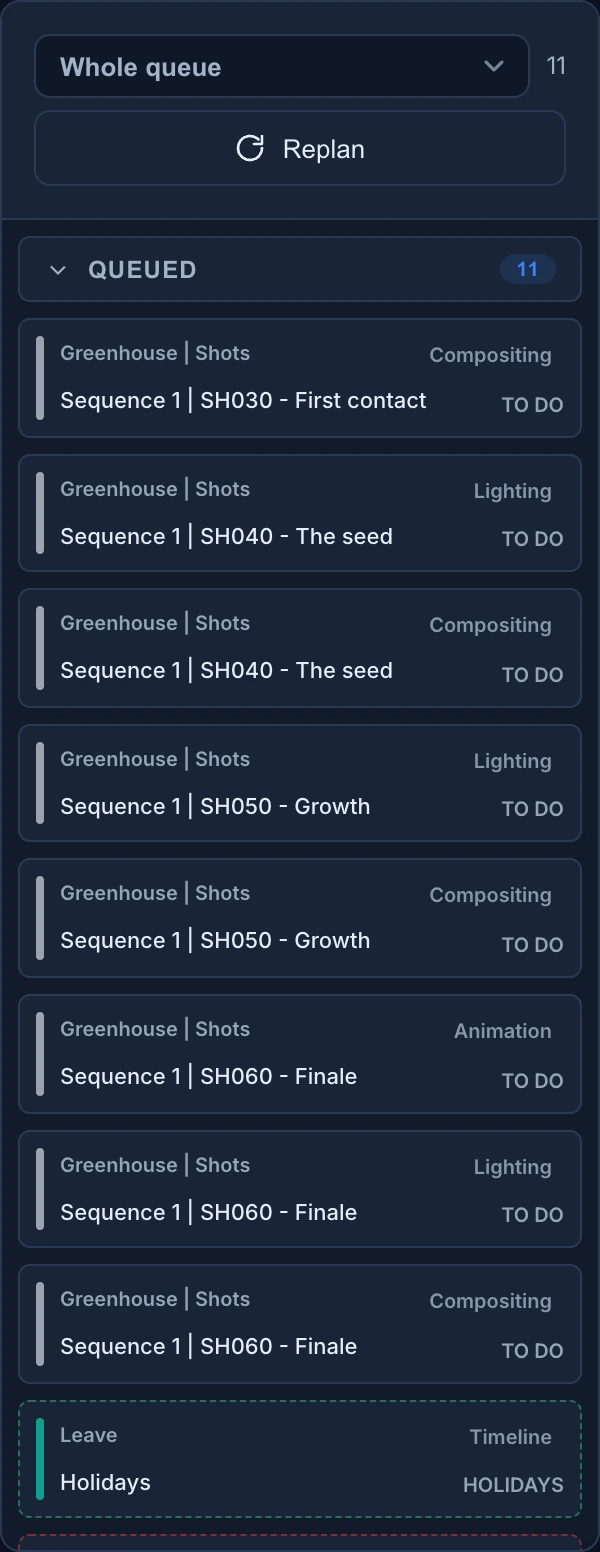
In a narrowed queue:
- Click a card under Scheduled to highlight its bars on the Timeline, and double-click it to scroll there.
- Dragging a card from Scheduled adds another bar for that stage. The bars it has stay.
- The ✕ next to Selected items or the scope button shows the whole queue again.
To let Animanager propose who does each stage and when, press Replan at the top of the queue. See Let Replan schedule the work.
Move and resize
- Drag a bar to other days or to another person's row. With several bars selected, they move together: the bars of the row you grab go to the new person, and the others keep their person and move by the same number of days.
- Drag the right edge of a bar to change its length. With several bars selected, they all change by the same amount.
- With one bar selected, type its length in hours: 12 is a day and a half. Type the digits within a second of each other.
- Hold Alt while you drag to copy the bar instead of moving it. The copy shows a +. You can press or release Alt during the drag.
- Bars snap to the hour, and are at least an hour long.
- Drag near the left or right edge of the window to scroll.
When the bar you move has later stages waiting for it, the Timeline says how many follow it and offers Preview domino, which replans them.
To take a stage off the calendar, select its bar and press Backspace: it goes back to the queue. You can't drag a bar back to the queue.
Days off
The queue always ends with Holidays, Sick and Leave. Drag one onto a person's row to mark days off, then stretch it. On the row, Leave reads Garden leave.
- Days off show with their type and length, for example Holidays 2 d, in their own colour.
- Move them, stretch them or remove them with Backspace, like a bar. They wait for Save changes too. Alt doesn't copy them.
- Anyone who can open the Timeline can mark days off for anyone.
- Replan counts them as busy days, like the studio's holidays.
Recurring work
Items set to Recurring in their dialog, every week on some days or every month on a day, put a grey bar labelled RECURRING on the people assigned, on each of those days.
These bars can't be moved, stretched, removed or given a status from the Timeline: change the item instead. Double-click one to open the item's chat. Replan leaves them where they are and counts them as busy.
Save or discard your changes
Moves, lengths, copies, removals, days off and budgets stay on your screen until you save them. They are kept while you scroll or visit other pages.
- The bar at the bottom says Unsaved changes and how many changes are waiting. Save changes, or Cmd/Ctrl + S, saves them for everyone. With nothing to save, it reads All changes saved.
- Discard goes back to what is saved, after you confirm.
- Status changes, time entries and an applied Replan are saved at once.
- If some changes can't be saved, the bar says how many and why, and keeps them waiting.
If you close the tab with unsaved changes, the browser asks first.
The changes other people save appear on your Timeline as they happen, under your own unsaved ones. If two people change the same bar, the last one to save wins. Save often when several people plan at once.
Automatic sorting
The Timeline never moves a stage to other days or to another person on its own. What it arranges is how bars stack in a row:
- Bars that overlap stack in lanes, and the row grows to fit them. Each bar keeps its lane when you save.
- Dropping a bar on a lane that is taken pushes that person's bars in that lane down one lane.
- With weekends collapsed, the bars on screen are packed into as few lanes as they fit. With Hide filtered tasks on, the bars left move up to fill the gaps. Both only change what you see.
- Rows are in the order of Team: members first, and the people ticked in the Team filter before the others.
The order on the Timeline does not change the order of projects, spaces, collections or items in the tree or the grid.
Filters
- Press the funnel in the toolbar.
- Untick what you don't want to see in Projects, Spaces, Collections, Items and Status. Each list has a Search... box and All and None. A list with nothing ticked doesn't filter. New projects, items and statuses show up without touching the filter.
- The bars left out dim and can't be selected or dragged, and so do the queue cards. Press the check mark (Hide filtered tasks) to hide them instead.
- Press the brush to color the bars By Status, By Project, By Space, By Collection, By Item, By Stage or By Artist.
- Press Save Filter to open the Timeline with these filters and colors next time.
Team only puts the ticked people first. It hides no one. Days off are never dimmed.
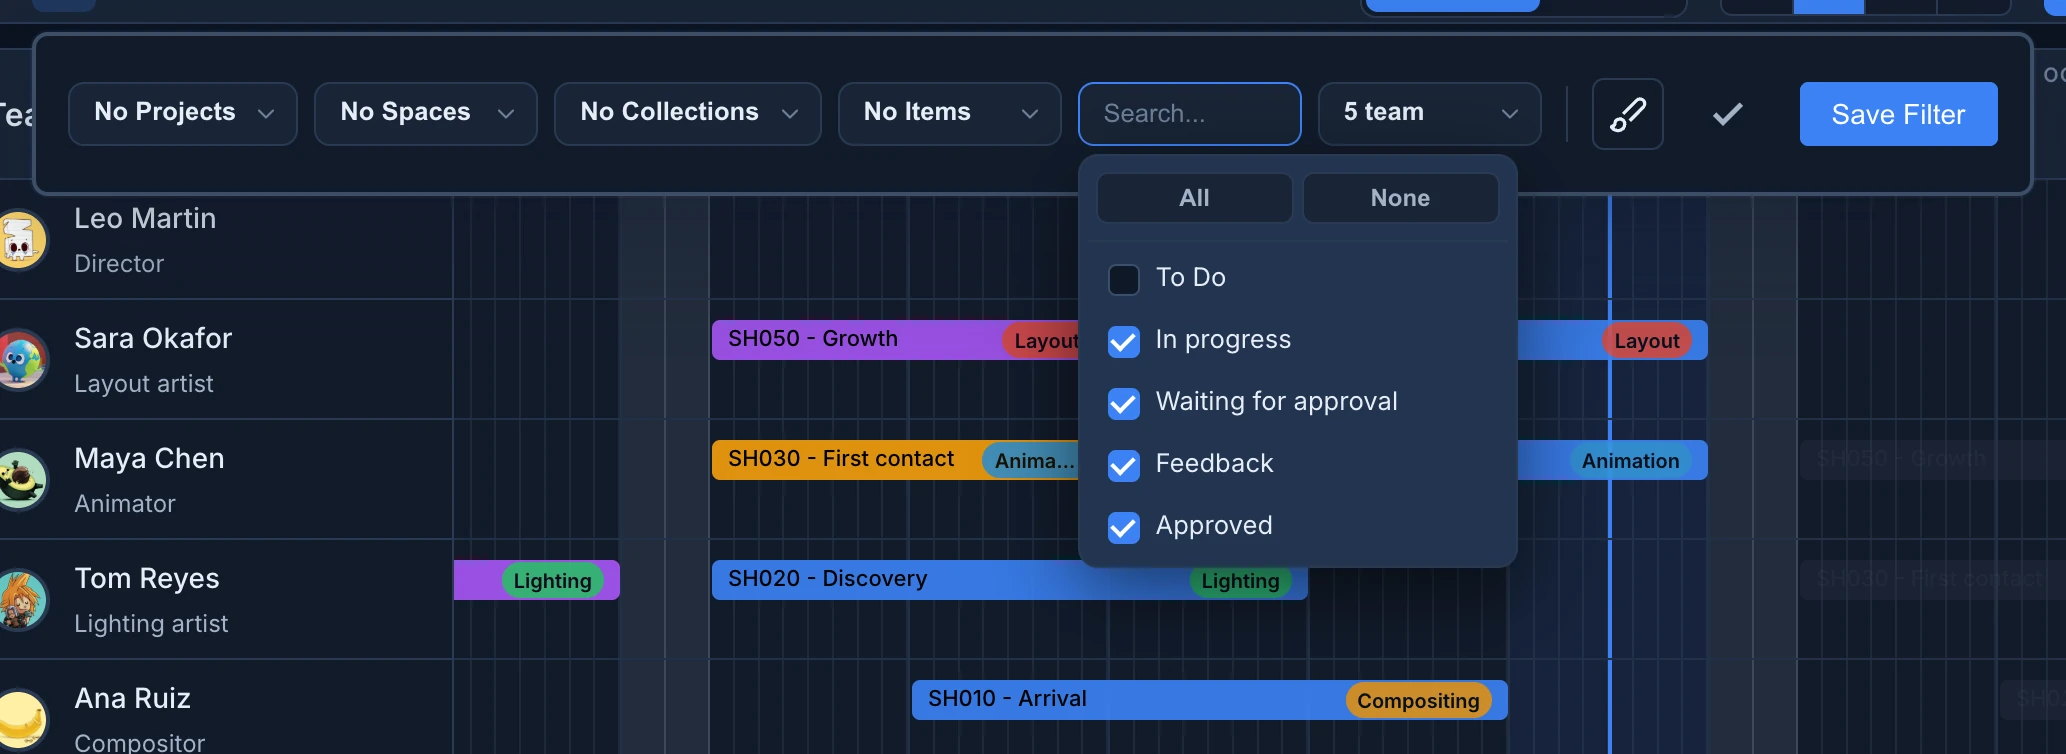
The Timeline has no search box for the bars themselves: filter by item instead.
Selection and bulk changes
- Click a bar to select it. Cmd/Ctrl-click or Shift-click adds or removes a bar. In the queue, Shift-click selects a range.
- Drag across an empty part of the Timeline to select the bars in the box. Hold Cmd/Ctrl to add them to the selection.
- Cmd/Ctrl + A selects every bar loaded around the dates on screen that matches the filters.
- With one bar selected, ↑ and ↓ select the previous or next bar. With Shift, they add it.
- Click an empty space or press Esc to clear the selection.
- Backspace removes the selected bars. A stage's only bar goes back to the queue, and extra bars are deleted. Removals wait for Save changes.
- Double-click a bar to open the Task Chat of its stage. It opens on the left and can be widened from its edge. While it is open, a click on another bar switches it to that stage. Esc closes it.
The right-click menu
Right-click a bar or a queue card. If it isn't selected, it becomes the only one selected.
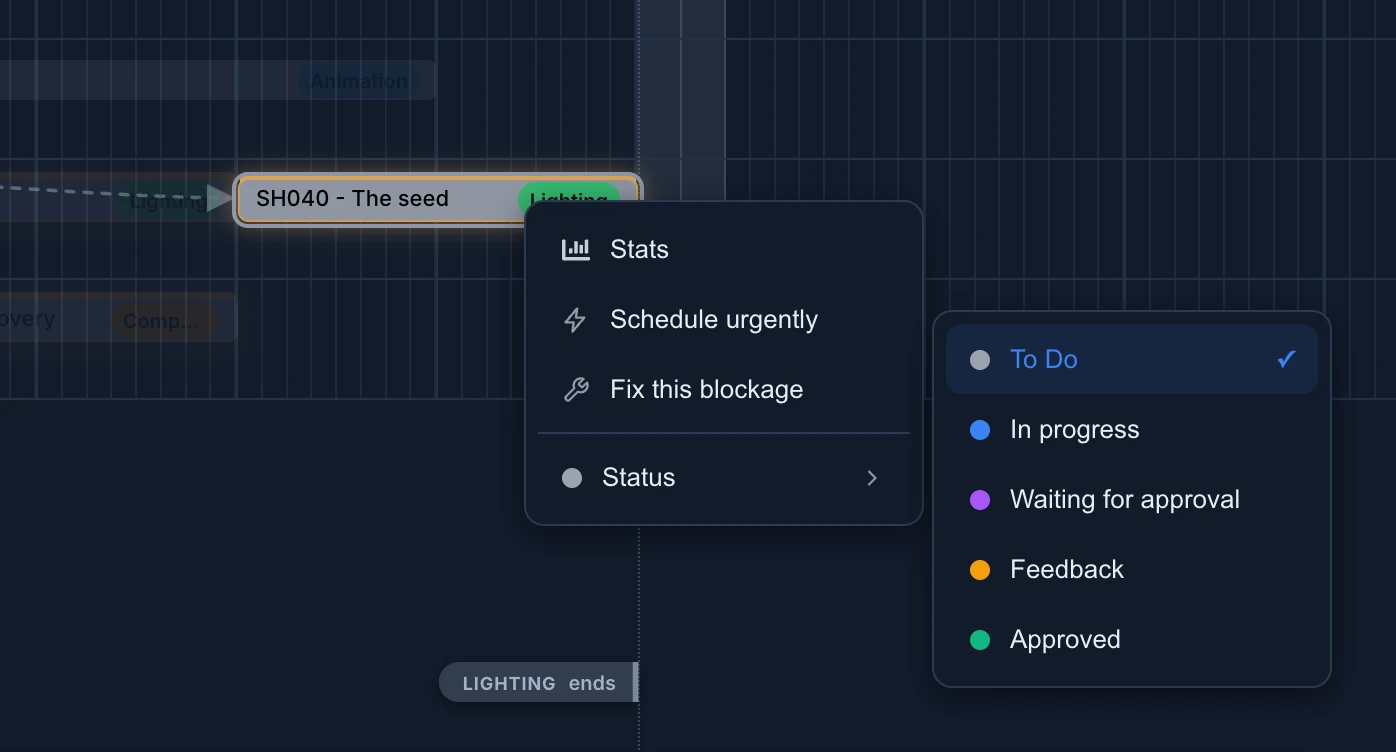
- Status changes the status of every selected stage at once. It is saved straight away, and each stage's chat gets a message with the new status, as when someone changes it in the chat.
- Stats shows the pace and estimates of the item.
- Schedule urgently finds room for this stage before a deadline. See Let Replan schedule the work.
- Fix this blockage, on a blocked stage, moves it and the stages after it so they start in order.
- In Worked, the studio owner also has Add time entry, Edit time entry and Remove time entry. See Log time and review it.
Days off have no menu, and neither do dimmed bars.
Budget of a stage
With one bar selected, the bottom of the Timeline shows the budget of its stage.

- The path of the stage, and how much of the budget is left: Xh available, or Xh spent in red when it is over.
- The track shows the hours scheduled on the Timeline and, stretch by stretch, the hours worked on each revision, coloured by the status it was posted with. Diamonds mark when feedback started and when the stage was done. Click a stretch or a diamond to open that message in the Task Chat.
- Budget is the stage's estimate. Click it to type a new one, or drag the green marker along the track. A new budget waits for Save changes.
- A stage with no estimate borrows the average of similar finished stages in its collection, marked auto. Press Set to keep it as the stage's budget.
- Point to Budget for the detail: hours worked of the budget, hours scheduled and how many over, and the last hours kept for feedback.
- Hide budget folds the panel away.
All stages opens every stage of the item on one timeline, with the revisions posted on each, day by day or by real hours. Click a revision to see it, and Open in chat to go to its message.
On a phone
On a phone, Timeline in the bottom bar shows the plan as a list:
- 7d, 21d or 45d choose how many days the strip covers, a few of them in the past.
- Tap a day in the strip to see its stages, each with its path, stage, status and person.
- Search timeline... finds by project, item, stage, status or person, and Just me keeps your own work.
- Tap a stage to open its chat.
Planning, the queue and changes are on a computer only.
Replan
Replan, at the top of the queue, proposes who does each queued stage and when. See Let Replan schedule the work.