
Appearance
Render on your own machines
The render farm renders the Blender scenes of your published revisions on the studio's own computers. Animanager splits each render into chunks of frames and hands them out. The Desktop Helper on each machine runs Blender and uploads the frames.
Turn on the farm
The render farm is a module managed by Animanager. It is not in Settings → Studio → Features and no studio type includes it: ask Animanager support to switch it on for your studio. Keep the Files and helper module on too, since publishing Blender revisions and downloading renders go through the Desktop Helper.
Once it is on:
- The Farm tab appears in the header for people whose role has Render Farm module set to Use. Without it, the Farm address takes you back to the studio's home.
- Launch render appears on the revision cards that hold a Blender file. Launching, pausing or retrying a job needs the same permission and access to the stage's project.
- Update all nodes needs Studio settings set to Manage.
The Farm page
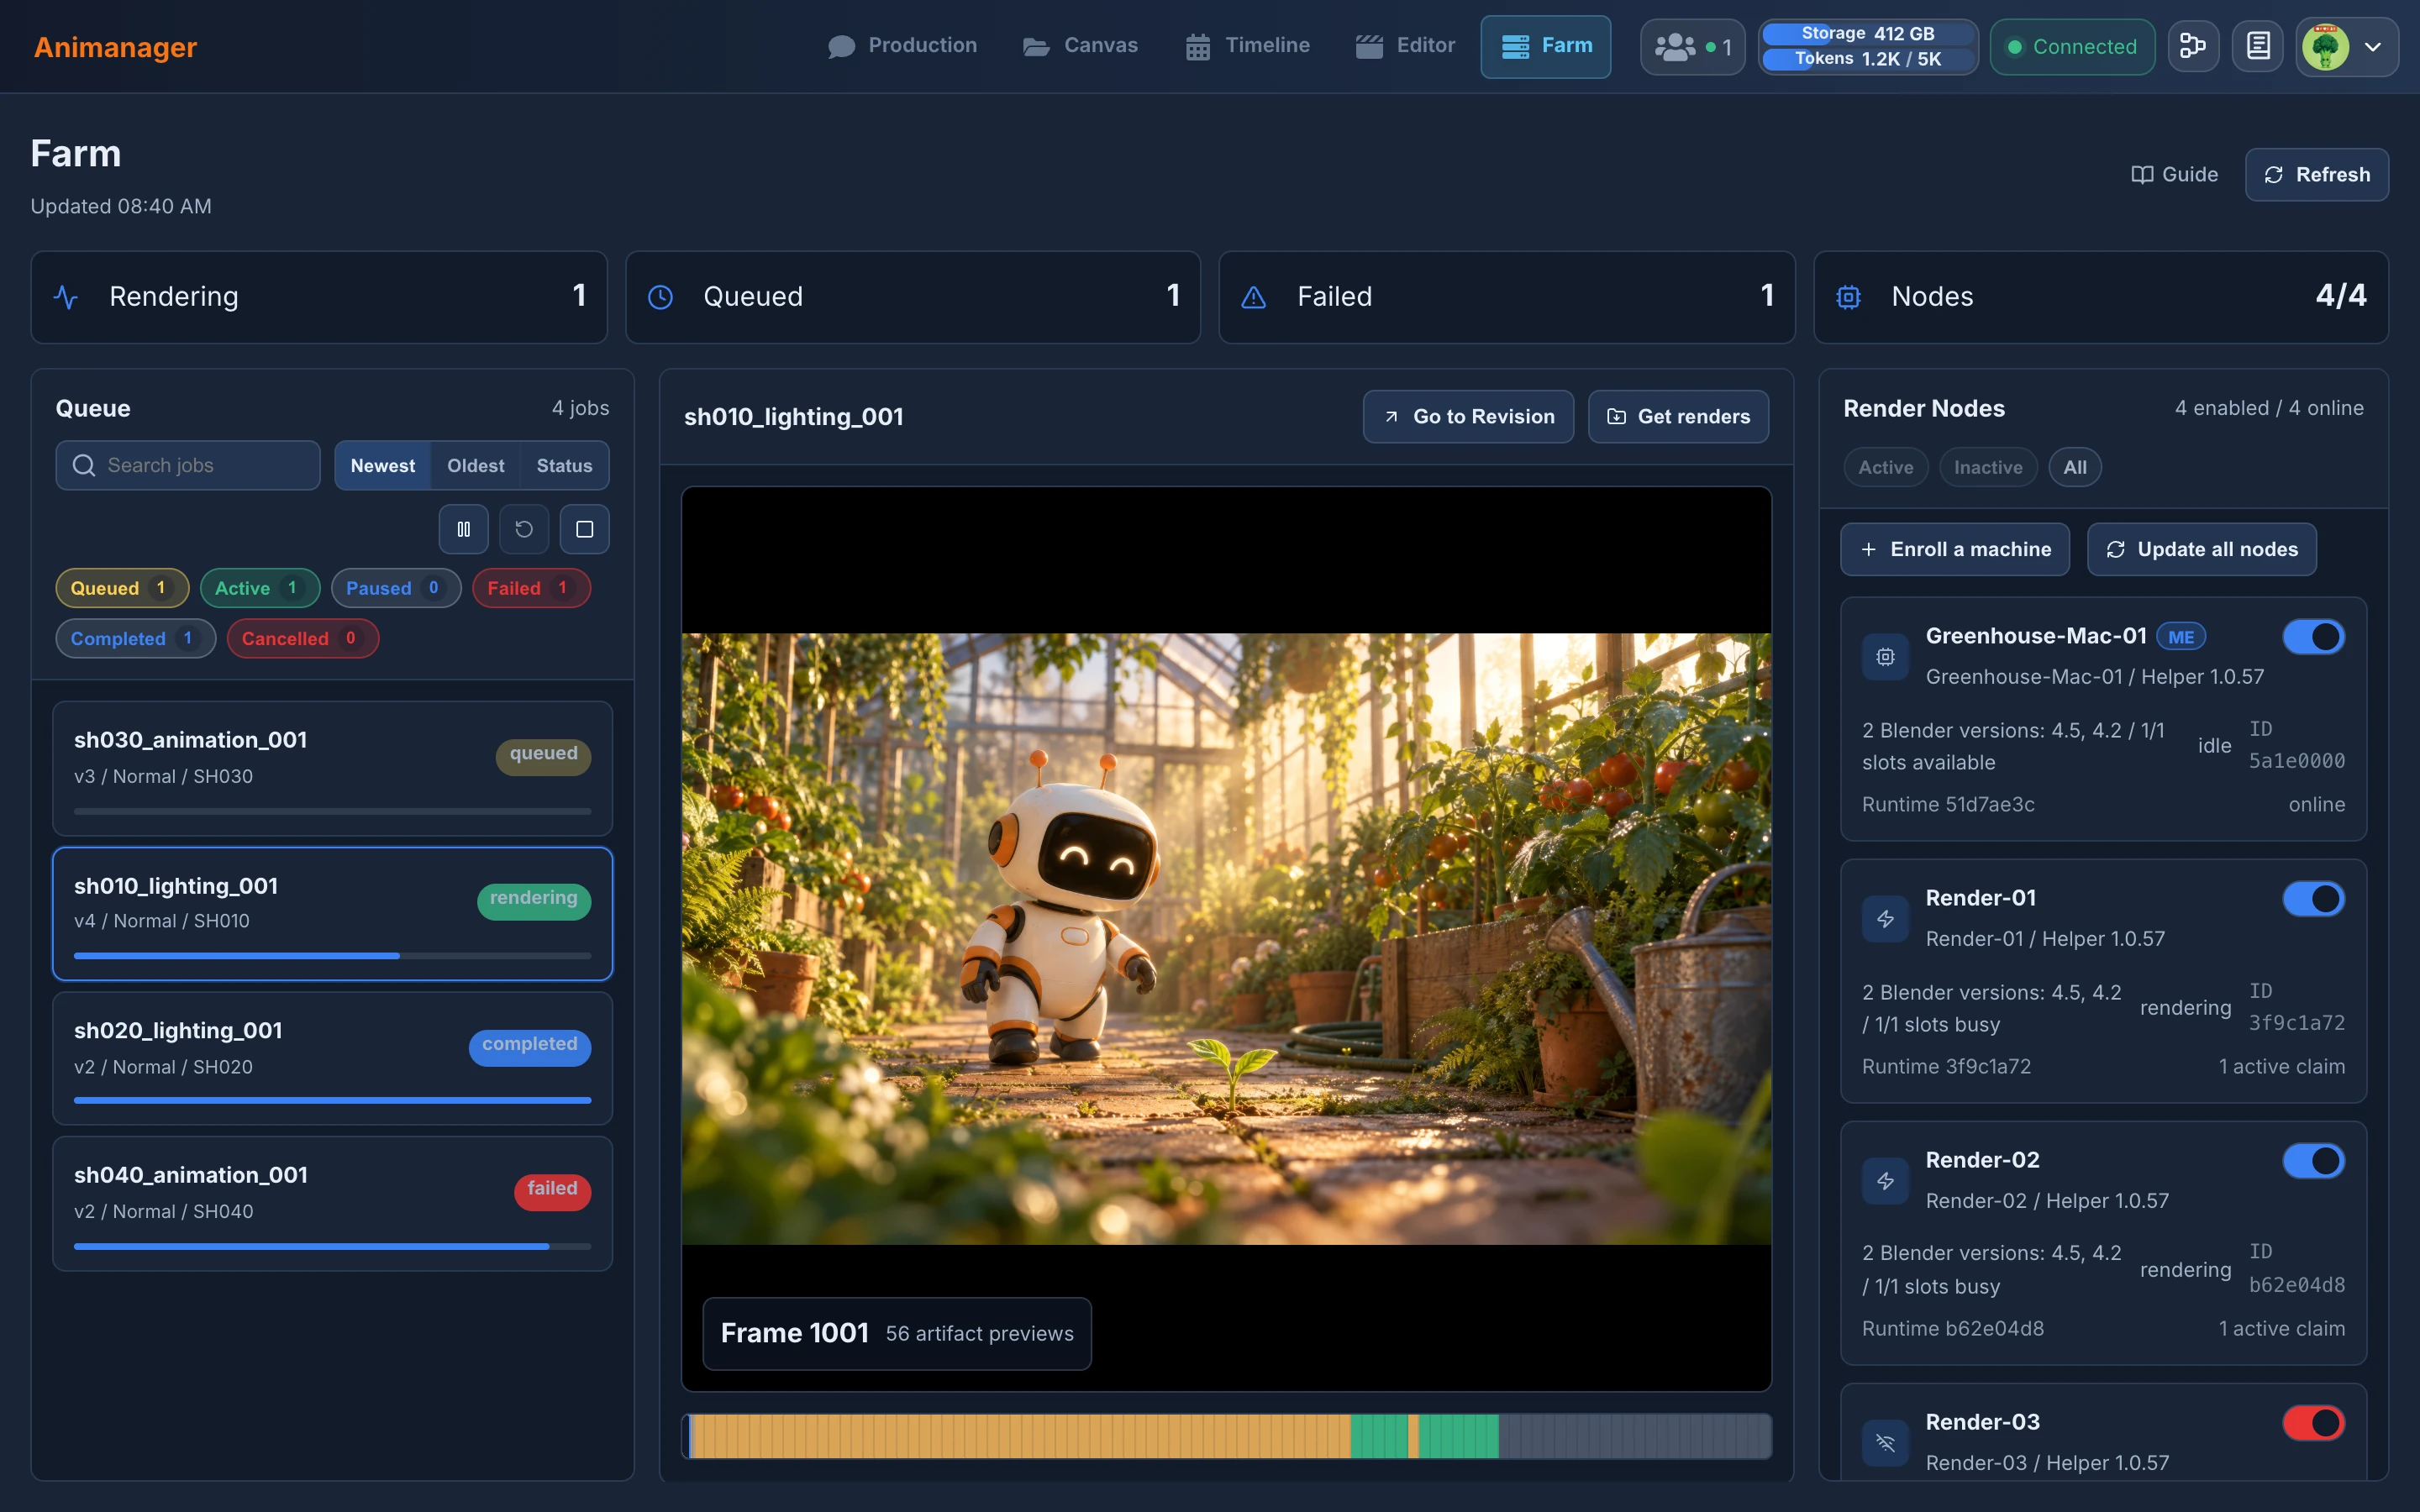
- The tiles at the top count the jobs Rendering, Queued (paused ones included) and Failed, and the Nodes switched on and online.
- Queue lists the render jobs. See The queue.
- In the middle, the selected job: its preview with a frame slider, Go to Revision, Get renders, and Job details under it.
- Render Nodes, on the right, lists the machines that render for the studio.
The page updates itself every 10 seconds, every 5 while something renders or waits, and stops while the browser tab is hidden. The line under Farm says when it last updated. Refresh reloads it at once, and Guide opens this page.
Add render nodes
A computer becomes a render node when someone enrolls it with a one-time code. Nobody needs to be signed in on it.
- In Render Nodes, press Enroll a machine.
- Press Create a one-time code, then Copy code. The code works once, and the dialog says at what time it expires.
- Install the Desktop Helper on the computer that will render and open it. Download for macOS or Download for Windows at the bottom of the dialog gets it.
- In the Helper window, paste the code under Render farms and press Enroll, or press Enter. The Helper says Done. This machine now renders for the studio.
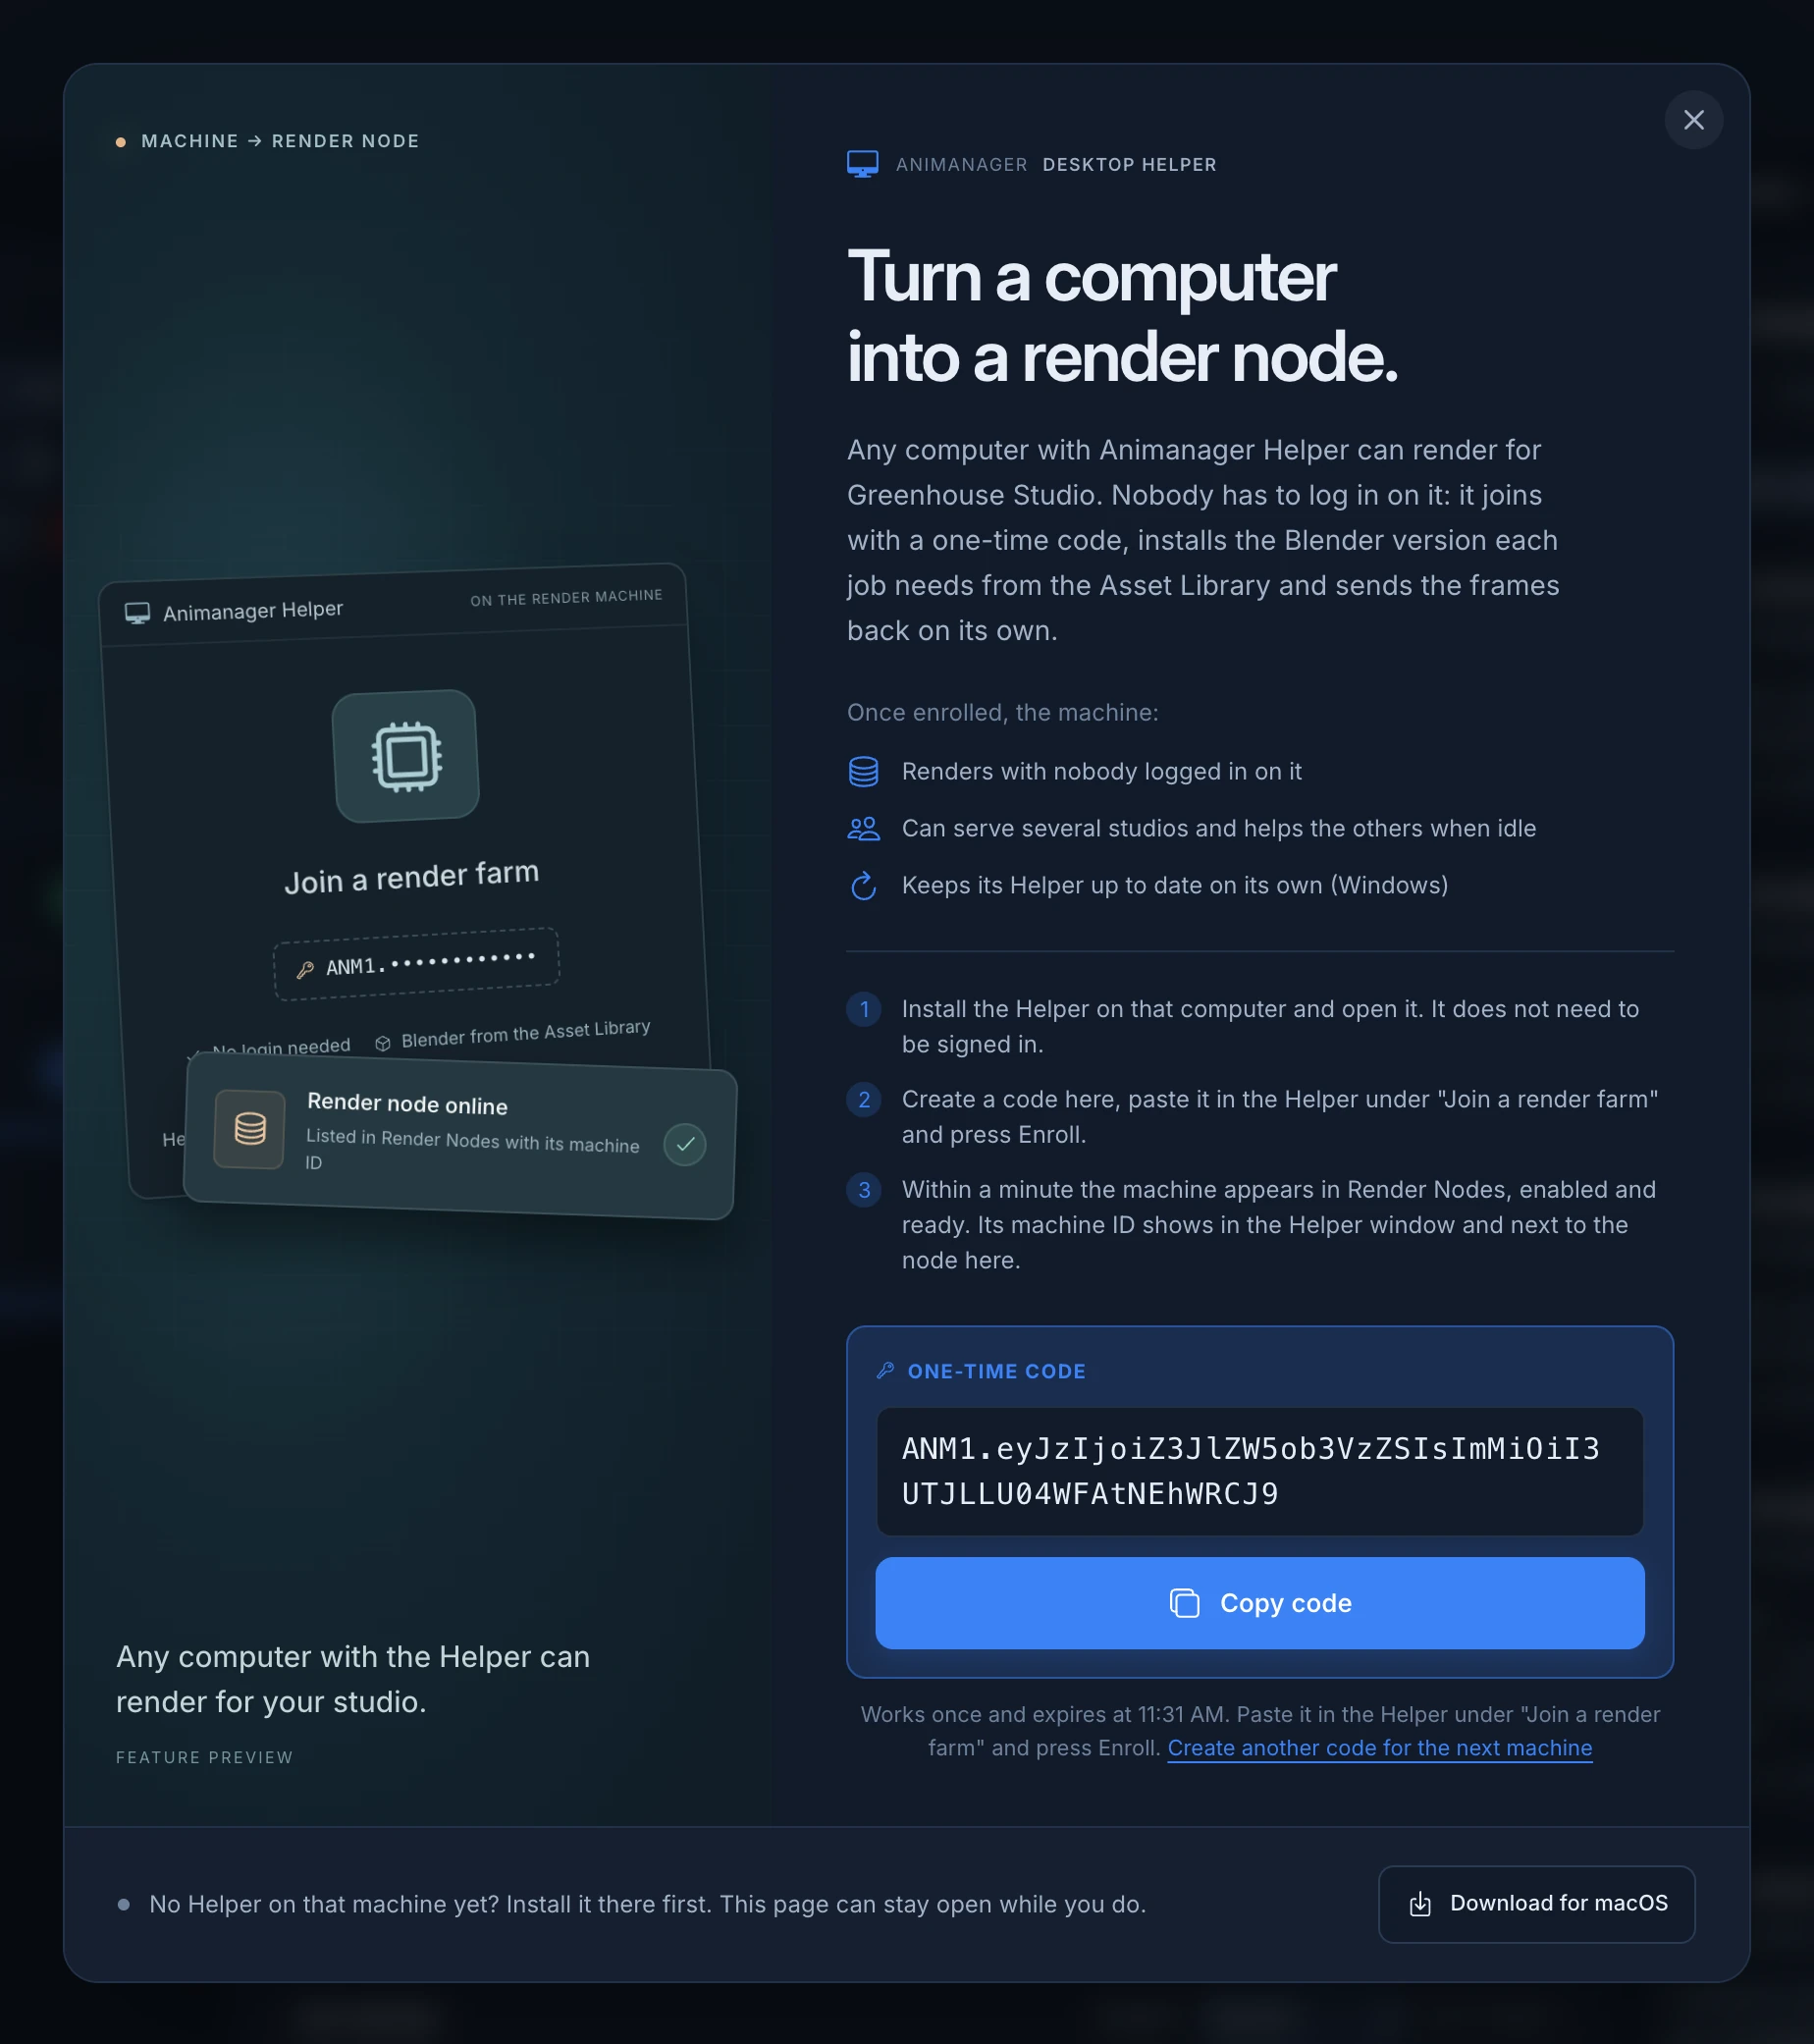
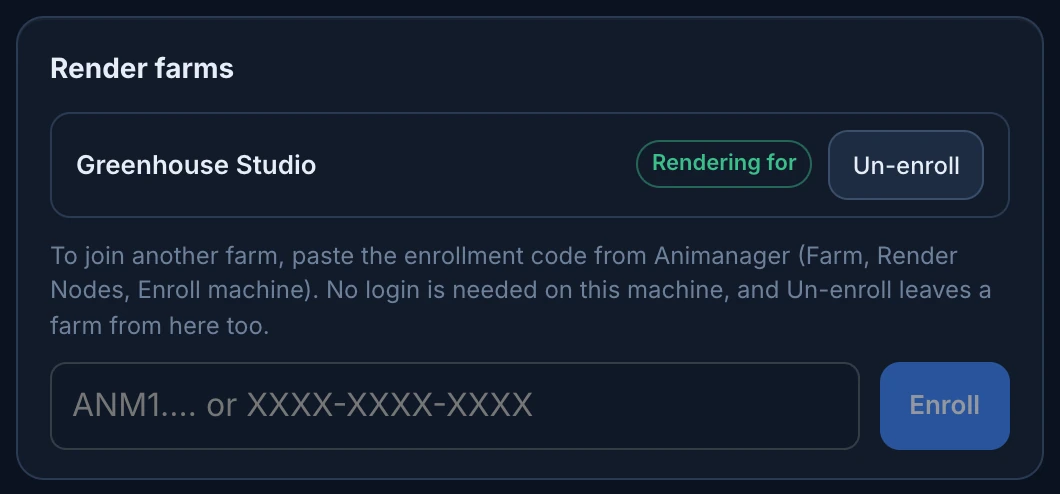
Within a minute the machine appears in Render Nodes, switched on and ready. Its machine ID shows both in the Helper window and on the node. To add another machine, choose Create another code for the next machine.
A node takes the name of its Helper alias, or of the computer. Change it in the Helper window, in Helper alias.
One machine, several studios
A Helper can be enrolled in the farms of several studios: paste a code of each. Render farms in its window lists them, and Rendering for marks the one it works for now: the studio last used in Animanager on that computer, the Farm page first. When that studio has nothing to render, the machine helps the others.
To stop a computer rendering for a studio, press Un-enroll next to it in the Helper window, then Un-enroll and the studio's name to confirm. Its work in progress goes back to the queue. Paste a new code to join again.
Render Nodes
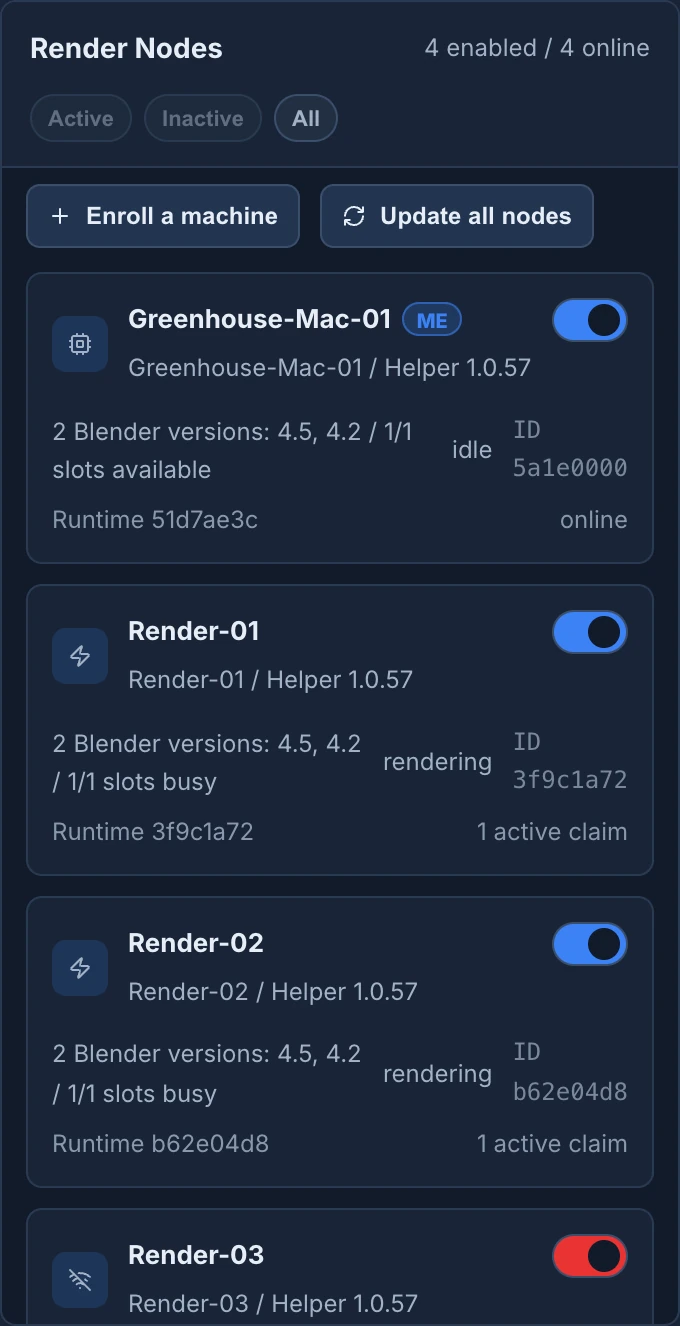
- Active (the default) lists the machines switched on and reporting now, including one that is restarting. Inactive lists the ones switched off or opted out, old installs that no longer report and removed Helpers. All lists every machine ever registered for the studio. The page remembers your choice.
- The header counts the machines switched on and online.
- Your own computer comes first, marked ME.
- Each node shows its Helper version, the Blender versions it has (hover to see where each one is installed), its slots (1/1 slots busy while it renders), its state and its machine ID.
- The switch turns a node on or off for the farm. Its work in progress goes back to the queue, and an offline node applies the change when it reconnects.
- Remove takes an offline machine off the list, after you confirm. It comes back if its Helper reports again.
- Update all nodes asks the machines reporting right now to install the latest Helper as soon as they are not rendering. It says how many machines got the request. Windows nodes also check for updates on their own every 6 hours.
A node that can't take work says why instead of idle or rendering:
| State | What it means |
|---|---|
| offline or stale | The Helper is not reporting, or stopped reporting a moment ago. |
| Render opt-in off | The node is switched off for the farm. |
| No disk space | The disk filled up. The node goes back to work by itself when it has 2 GB free. |
| Missing Blender inventory | The node found no Blender, or hasn't reported its versions yet. |
| Unsupported Blender version | It has no Blender version the farm can use. |
| Helper outdated | The Helper is too old for the farm. Update it. |
| Helper revoked | The machine was un-enrolled. Enroll it again with a new code. |
| Studio disabled or Runtime disabled | The farm or the node is switched off. |
Launch a render
A render starts from a published revision whose Blender file was saved with Save for Animanager in the Blender add-on, which records its render settings. The add-on does not send renders itself.
- In the chat of the stage, press Launch render on the card of the revision.
- If the revision has more than one Blender file, choose it in Item.
- Check the settings. They start as the scene has them:
- Queue: Priority, and Chunk, the number of frames a machine takes at a time (8 unless you change it).
- Frames: Start, End and Step.
- Render: Scene, Engine (Cycles, Eevee Next, Eevee or Workbench), the settings of that engine, Render region and Compositing.
- Output: Format, Scale, Width, Height, Color, Depth and EXR codec.
- Press Add to Farm. Animanager says Render job added to Farm.
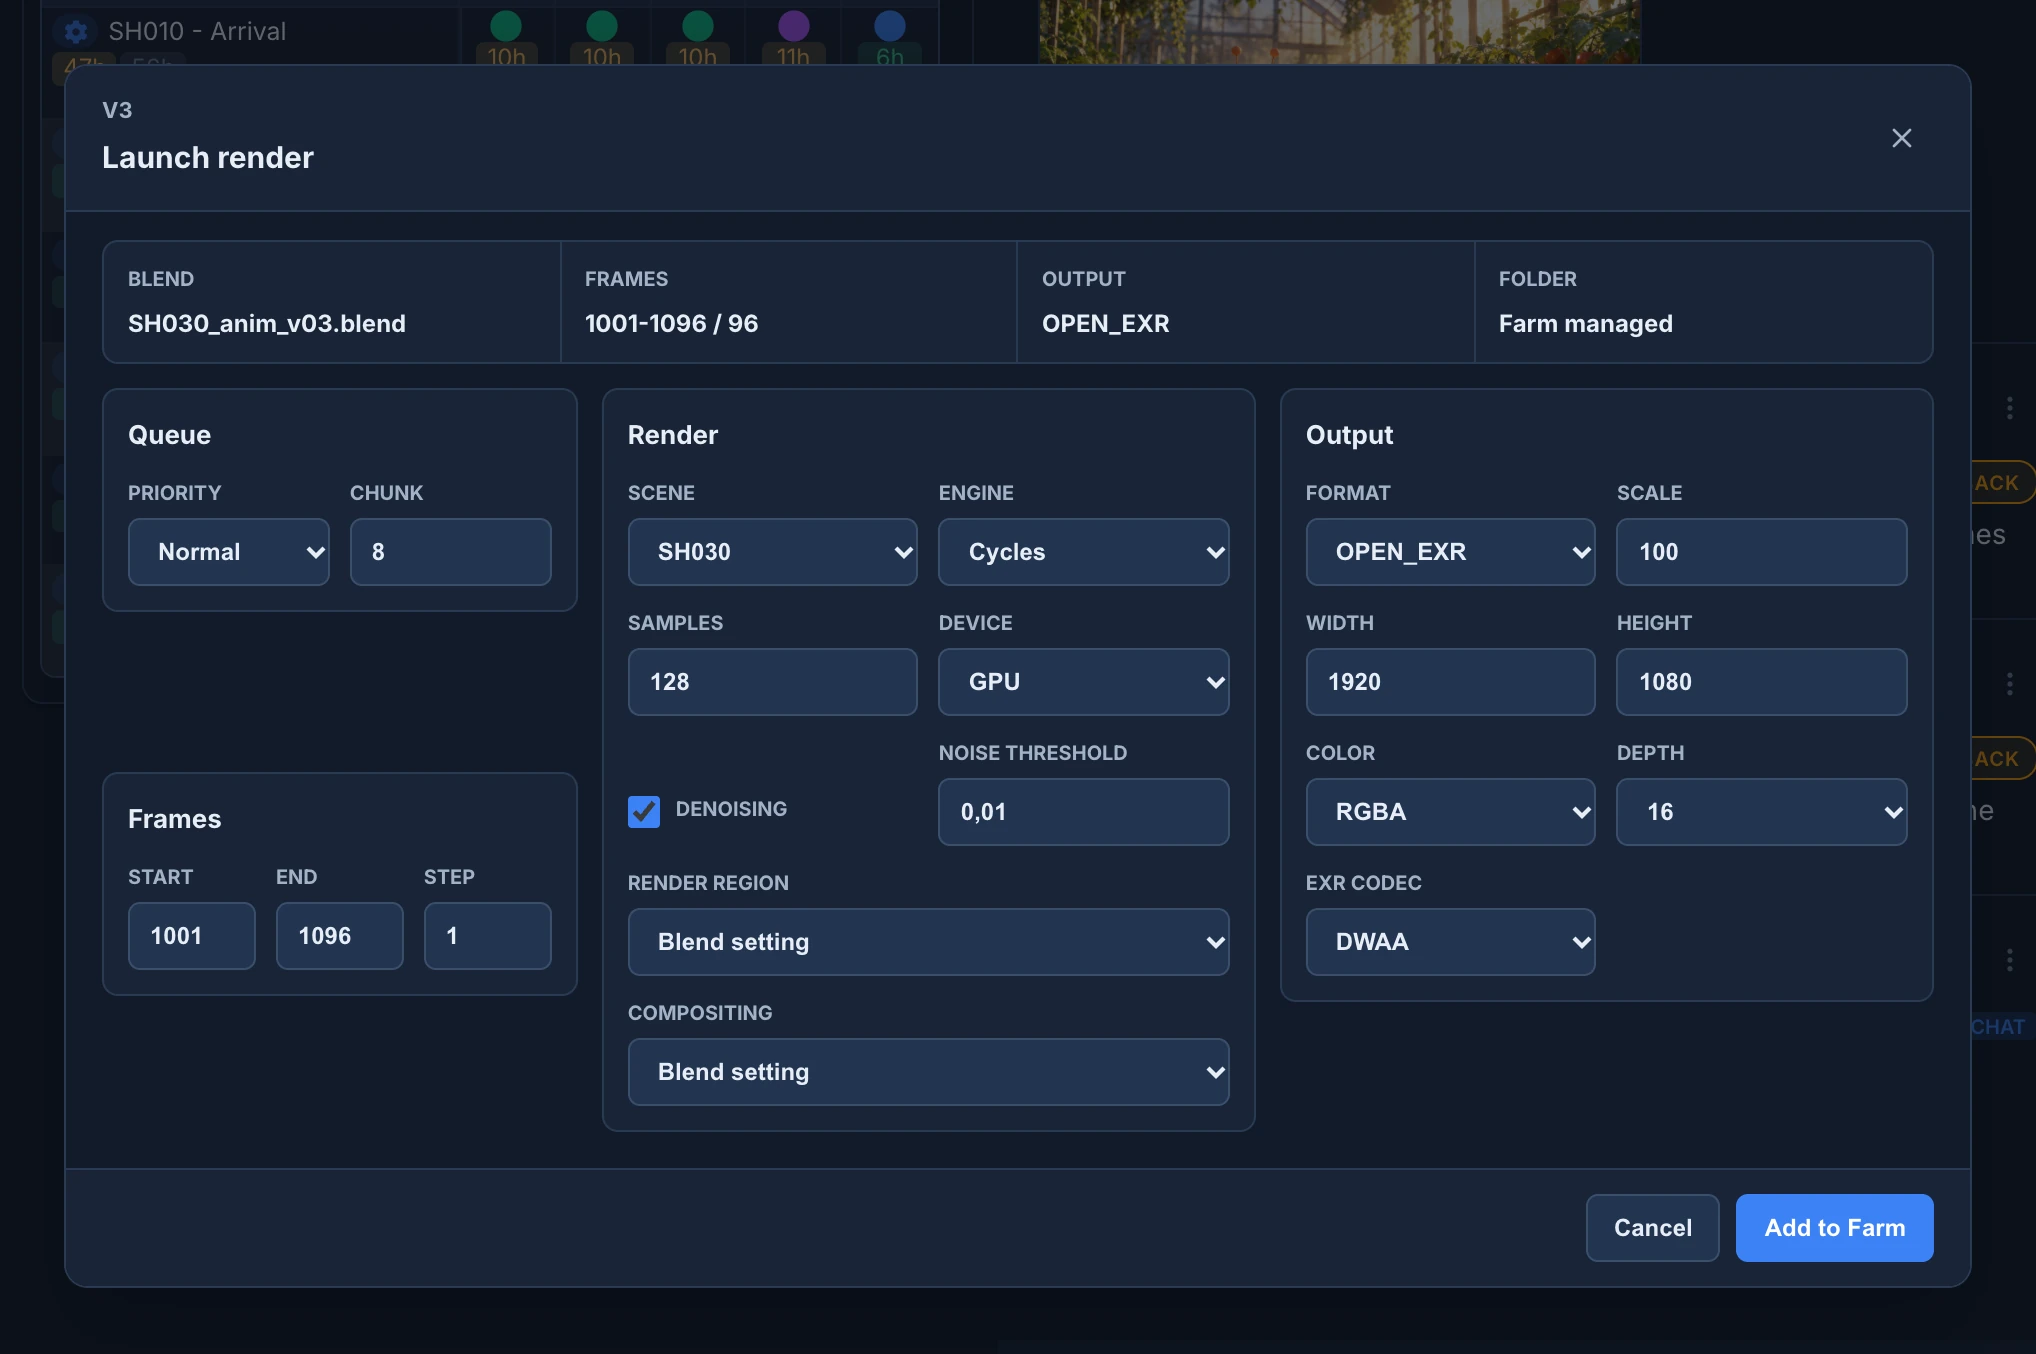
Details of the settings:
- Scene: changing it loads that scene's settings, and keeps the fields you already changed.
- Engine: the fields below it change with the engine.
- Cycles: Samples, Device (Default, CPU or GPU), Denoising and Noise threshold.
- Eevee and Eevee Next: Samples.
- Workbench: Samples (No Anti-Aliasing, Single Pass Anti-Aliasing, or 5, 8, 11, 16 or 32 samples), Lighting (Studio, Matcap or Flat), Color (Material, Object, Random, Attribute, Texture or Custom, which keeps the color set in the file), Cavity and Outline. Revisions saved before the add-on recorded these settings start with Blender's defaults: 8 samples, Studio, Material, no cavity and no outline.
- Render region: Blend setting uses the border saved in the file, Full frame renders the whole frame, and Custom region adds Left %, Right %, Bottom %, Top % and Crop output to region. A yellow note warns when the file has a border, so the job renders only that part.
- Compositing: Blend setting, Enabled or Disabled. A yellow note warns when the job will run the compositor on every frame.
- Format: PNG, OpenEXR, OpenEXR multilayer, JPEG, TIFF, Targa or BMP.
The frames go to a folder the farm manages, under Farm/Renders and named after the item and the stage. The scene's own camera is used. If the revision was published before the add-on recorded render settings, Animanager says This revision has no render settings snapshot yet: save it again with Save for Animanager and publish a new revision.
The job joins the queue even if no machine is free. Each chunk goes to the next free node that is switched on, the highest priority first and then the oldest job. Anibot posts in the chat of the stage when the job is queued and when it finishes.
Blender versions
A job asks for the Blender version its file was saved with. A node that has any release of that version can render it: a file saved with 4.2 renders on 4.2.3.
- Each node lists the versions it has.
- A node without the version downloads it from the studio's Asset Library project: in the space Software and the collection Blender, an item named after the version (for example Blender 4.2) holds the portable Blender download for each system in its published files. If it is not there, the chunk fails with "Blender 4.2 is not available in Asset Library / Software / Blender. Upload the portable zip and try again."
- The node turns on the Animanager add-on in that Blender by itself.
Changing Blender version can change simulations, geometry nodes, color management, add-ons and the output. Treat it as a production change.
Node lifecycle
- The job is split into chunks of frames.
- A free node claims the next chunk.
- The Helper brings the inputs of the stage, opens the scene in Blender and renders the frames.
- It uploads the frames and their previews, and the chunk shows as delivered. While a chunk uploads, the node already renders the next one.
- The node claims the next chunk.
If a node stops answering, its chunk goes back to the queue when its claim runs out. A chunk that fails is tried again on its own, up to 3 attempts, and then shows as failed. When a node has not finished a frame in 10 minutes, Anibot says so in the chat of the stage. Don't launch the same render again while the farm recovers a chunk.
The queue
- Search jobs finds a job by its name, revision, item, stage or scene.
- Newest, Oldest and Status sort the list. Status puts rendering jobs first, then queued, paused and failed ones, and finished ones last, by priority and then by age.
- Queued, Active (rendering), Paused, Failed, Completed and Cancelled show or hide the jobs in each status, with how many there are.
- Each job shows its name, its revision, priority and scene, its status, and a bar of the frames done. Load more shows older jobs.
- The buttons at the top act on the selected job: pause or resume, reactivate a cancelled job, retry its failed chunks, and cancel. Hover a button to see what it does.
Priorities go from Critical to Very Low: Critical, Very High, High, Elevated, Normal, Reduced, Low and Very Low.
Monitor and recover a job
Select a job in Queue to see it in the middle of the page.
The preview
The preview shows one frame at a time. Drag the slider under it, or use the arrow keys, to move through the frames. Its colours show the state of each frame, so failed frames stand out in red. The Helper downloads the previews of the job you open by itself; until a frame's preview arrives, the preview says No preview for this frame on this computer yet.
- Go to Revision opens the revision the job came from, in the chat of its stage.
- Get renders downloads the rendered frames with the Desktop Helper and opens their folder. One job downloads at a time: press Get renders on another job and it waits as Queued, and pressing it again takes it out of the line. The job's card in the queue shows Downloading and the percentage. Frames you changed on your computer are kept, and Animanager says so.
Job details
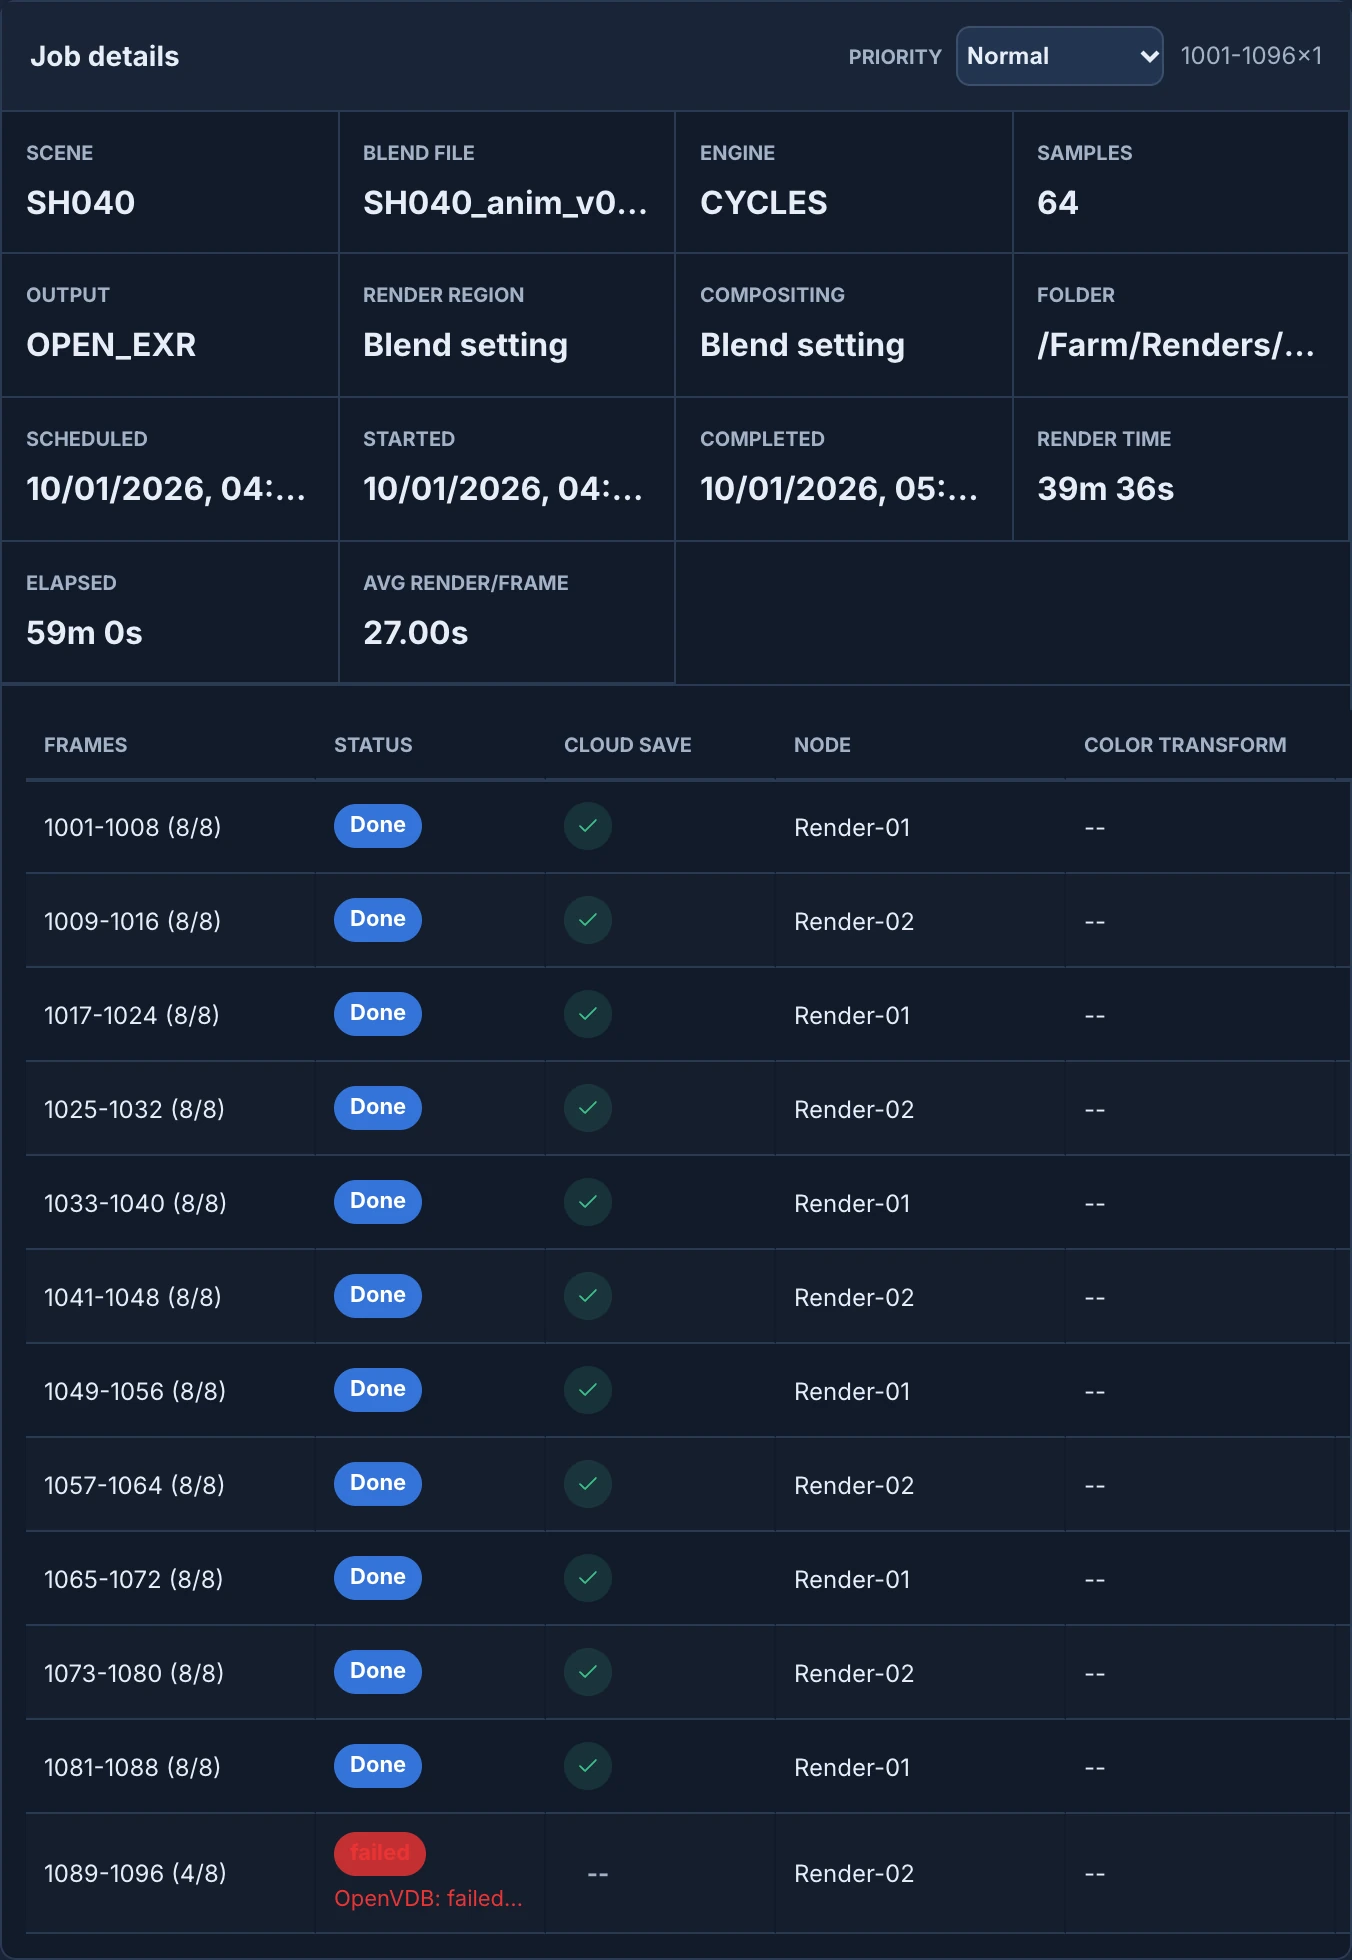
Job details shows the job's settings and times: Scene, Blend File, Engine, Samples (with Workbench, Anti-aliasing and Shading instead), Output, Render region, Compositing, Folder, Scheduled, Started, Completed, Render time, Elapsed (paused time not counted) and Avg render/frame. Priority at the top moves a job up or down the queue while it is not finished.
The table lists each chunk:
- Frames: its frames, how many are done, and the frame rendering now.
- Status: Done, queued, rendering, uploading, failed and the steps before rendering, such as downloading or installing a Blender version, with their percentage.
- Cloud save: a check when every frame reached Animanager, uploading, or a warning when the upload failed.
- Node, Blender version, Engine, Device and Attempts.
- Render and Avg time: how long the chunk took. Avg time turns green or red when the chunk was clearly faster or slower than the job's average.
- Stats opens the time of each frame: preparing, rendering and uploading.
- Command shows the Blender command the node ran, with Copy, for whoever needs to reproduce the render by hand.
- Actions: Retry chunk from start renders the chunk again. When all its frames are rendered but some didn't upload, a second button retries only the upload.
A failed chunk shows the last error line of Blender under its status. Hover it to read the end of the log, and tell a Blender error from a transfer or machine problem.
Pause, cancel and retry
- Pause sends the frames in progress back to the queue and keeps the job waiting.
- Cancel asks first. It takes the job's frames out of the queue and frees the machines. A cancelled job can be reactivated: the frames already delivered are kept and the rest render again.
- Retry failed chunks sends every failed chunk of the job back to the queue.
Retrying a chunk from the start
Retry chunk from start deletes the frames that chunk already delivered and renders them again. It doesn't ask first.
Notices from Anibot
Anibot posts in the chat of the stage when a job:
- is queued: "Render job
sh010_lighting_001(v4) is queued on the farm: 96 frames."; - finishes: "… finished: all 96 frames rendered.", or "… finished with errors: 8 of 96 frames failed.";
- stalls: "Node
Render-02has not finished a frame in 10 minutes on frames 1089-1096 of render job …. It may be stalling."
The same notices show in the activity feed as FARM · queued, FARM · finished, FARM · finished with errors and FARM · stalling. Farm notices, in the feed settings, shows or hides them in the feed.
When you report a problem, include the job, the node, the Blender version, the chunk and the end of its log.
Ask an AI agent
An AI agent connected to Animanager, such as Claude or Codex, can work with the farm for you. See Connect Claude, Codex or another MCP client. It uses your permissions: the studio needs the farm, and your role needs Render Farm module set to Use. If either is missing, the agent says so.
- Follow the queue. "What is rendering right now?", "Which of my renders failed this week?", "Show the renders of SH010." It lists each job with its frames done, priority, item, stage, revision and dates, and the render nodes with their state.
- Explain a job. "Why did the lighting render of SH040 fail?" It reads the same Job details: the settings, the folder, the times and each chunk with its node, attempts and the end of its Blender log.
- Launch a render. "Render the latest revision of SH030 Lighting, frames 1001 to 1048 at 64 samples, high priority." It starts from the same render settings as Launch render and changes only what you name: scene, frames, engine, samples, resolution, render region, priority and chunk. It launches only when you ask for it, and it can first show you the settings it would use. A revision published without render settings gets the same message as in the app: This revision has no render settings snapshot yet.
- Get the renders. "Give me links to the frames of that render", or "Download it to my computer". The links last 24 hours. The download goes through the Desktop Helper into the job's folder under
Farm/Rendersof the stage, like Get renders, and keeps the frames you changed.
Pausing, cancelling or retrying jobs, and switching nodes on or off, stay on the Farm page.
Good practice
- Keep the artists' computers for light work, and let dedicated machines take long renders.
- Keep enough free disk space on each node for the files of the job and its frames.
- Give each node a clear Helper alias, so everyone knows which machine it is.
- Switch a node off before maintenance.
- Publish simulation caches with the revision: a node only has the files of the published revision. See What Save for Animanager does.