
Appearance
Organize projects, spaces and items
The Tree, on the left of the app, holds your whole production: projects, their spaces, and inside each open space a Grid with one row per item and one column per stage. You create, find and arrange everything from here.
Navigate the hierarchy
Work is organized in these levels:
- Studio
- Project
- Space
- Collectionoptional
- Item
- Stage
- Team Chat, at the top, is the chat of the whole studio.
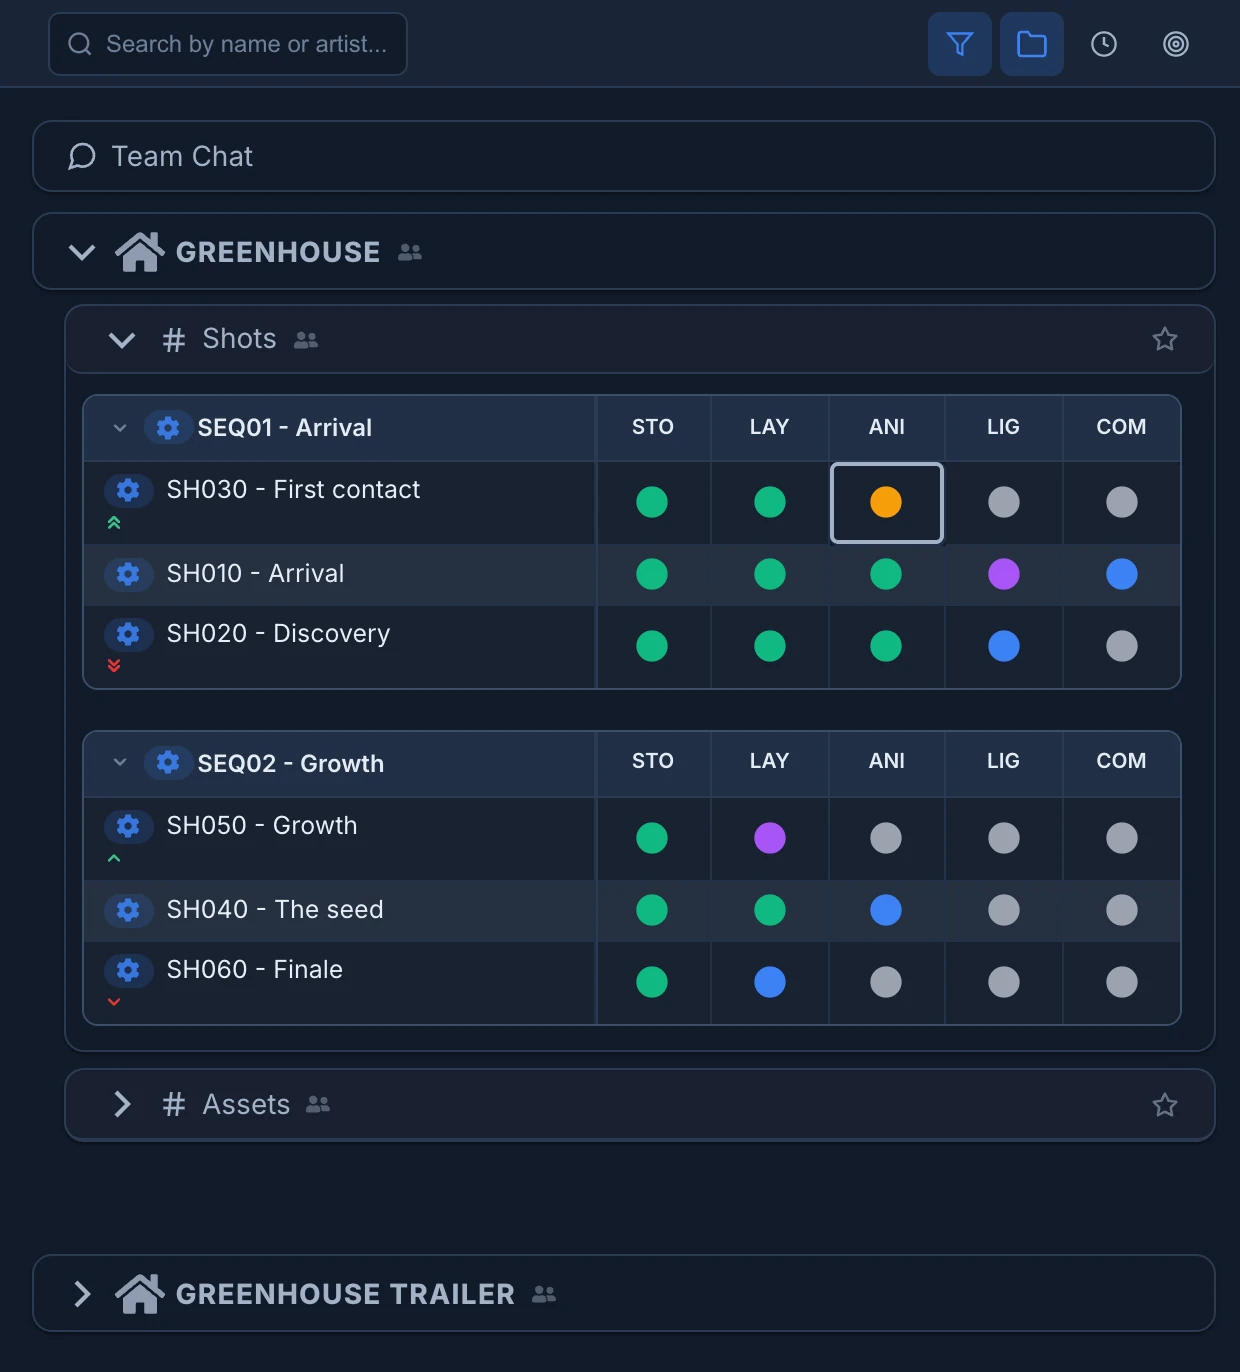
- Click the arrow of a project to show its spaces, and the arrow of a space to open its Grid. A closed project or space shows how many unread messages it holds.
- In the Grid, items are rows and the stages of the space are columns. The colored dot of a cell is the status of that stage for that item. Point to a column to see the full stage name.
- Point to a dot to see the stage's status, its hours against the estimate and its deadline. See Deadlines in the Grid.
- Click an item's name to open the item, or a cell to open that stage. Click a project or a space to open its chat.
- Right-click any row for what you can do at that level. You only see the actions your role allows.
The Tree opens and scrolls to whatever you open from the Feed, a notification or a link.
What opens by itself
You don't have to open every project and space by hand:
- A project or a space opens by itself when it holds unread messages, the place you have open, or an item you keep Always Visible. It also opens when it matches your search.
- A space that opened by itself shows only those items: the ones with unread messages, the Always Visible ones and the one you have open. Click its arrow to see all its items.
- A project or a space you closed stays closed, even with new messages. Opening an item inside it, from the Feed or a link, opens the way to it again.
- . on the numeric keypad shows the place of the open chat in the Tree.
Point at the people icon of a project or a space to see who can open it: Roles with access, with what each role can do (View, Post) and how many members it has, then Users with access.
Drag the edge between the Tree and the Chat to make the Tree wider or narrower. The Grid shrinks to fit a narrow Tree, and the width is remembered in this browser.
Create a new project
Needs the studio permission Project creation.
- Right-click Team Chat or an empty part of the Tree and choose New Project.
- In General, enter the Project Name. Project Icon, Icon Color and Feedback Buffer are optional.
- In Permissions, choose who can access the project and what each role can do in it.
- Press Create Project.
To change these later, right-click the project and choose Settings. See Set up a project in Settings.
Create a new space
A space holds one kind of work in a project, for example the shots or the assets.
- Right-click the project and choose New Space.
- In Details, enter the Name.
- In Stages, choose a workflow or the stages the space uses. See Set up stages and workflows.
- Check Dependencies and Permissions. A space starts with the permissions of its project and can narrow them.
- Press Create Space.
Create a new collection
A collection groups items inside a space, such as a sequence, an episode or a family of assets.
- Right-click the space and choose New Collection.
- Enter the Name.
- In Stages, choose which stage columns the collection shows in the Grid when it is grouped by collection.
- Press Create Collection.
Collections in the Grid
The folder button at the top of the Tree (Group by collection) shows each collection of a space as its own table, such as the sequences SEQ01 and SEQ02 of the Greenhouse shots. Its header has:
- the arrow to fold the collection, and the number of items it holds while folded;
- the gear (Collection settings), which opens its stages and pipeline in Settings;
- an arrow when its priority is High (green) or Low (red). Higher collections come first.
Right-click the header for New Item, Settings, Priority (High, Normal or Low), Sort by, Rename and Delete. Two collections of a space can't have the same name.
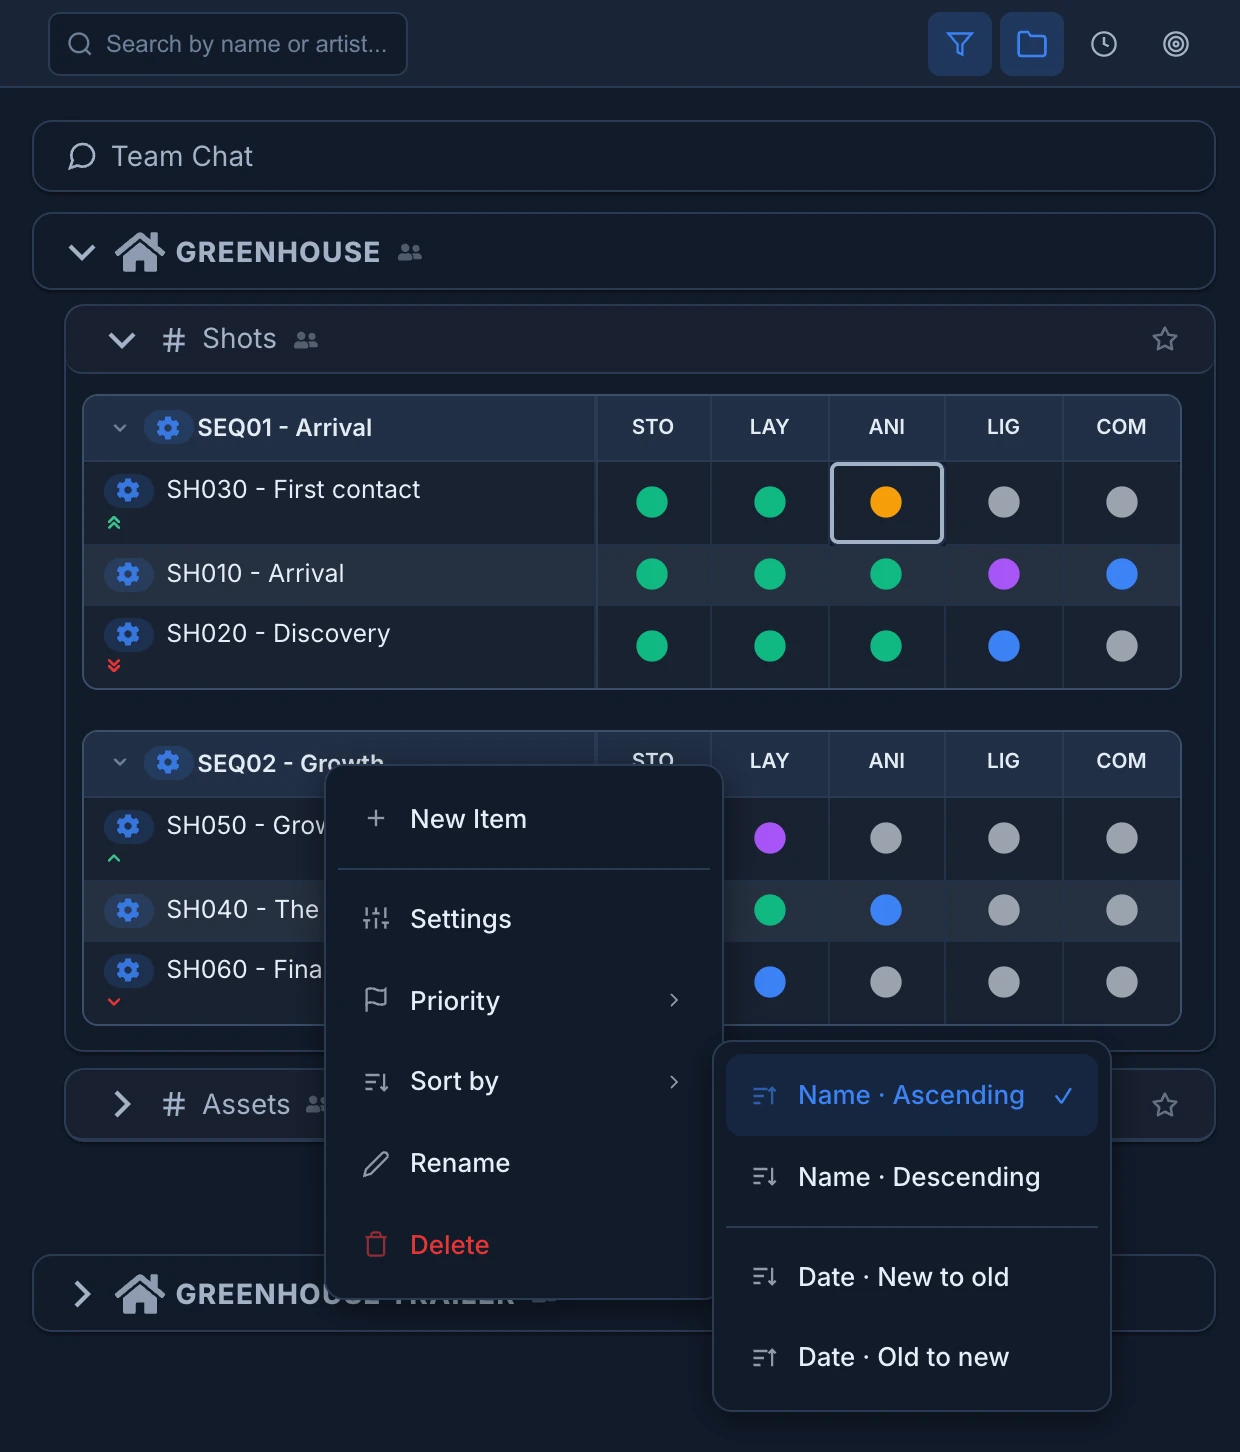
To move items to another collection:
- Drag an item's row onto the table of another collection, or
- Select the items, right-click one and choose Move to Collection, then pick the collection. Type in Search collections... when there are many.
Both work while the Grid is grouped by collection. In the flat Grid, Move to Collection doesn't appear. An item that is in no collection doesn't show in the grouped Grid.
Create a new item
- Right-click the space and choose New Item, or right-click a collection and choose New Item to create it there.
- Type the title in Titles. Press Enter to add another row and create several items at once, or Ctrl + Enter (Cmd + Enter on a Mac) to create them.
- Leave Mode on Standard for an item with production stages. Recurring creates repeating blocks on the Timeline instead: see Recurring work.
- In Stages, check the stages the item gets.
- Check Dependencies if the item's stages should connect differently from the rest of the space.
- Press Create Item (or Create 3 Items for three rows).
Created from the space's menu, the item goes into the space's default collection. To put it in a sequence, right-click the collection's header in the grouped Grid and choose New Item there.
Name items the same way across the project, so search, exports and file folders stay easy to read.
To change an item later, its title, stages, estimates, metadata or dependencies, choose Configure Item in its menu or click its gear in the Grid. See Configure items and recurring work.
Filters
A filter shows only the items of a space whose stages are in the statuses you choose. It is yours alone: nobody else's Tree changes, and no item is deleted.
- Right-click the space and choose Filters.
- Click the statuses to keep. Select All and Select None set them all at once.
- Press Apply Filters.
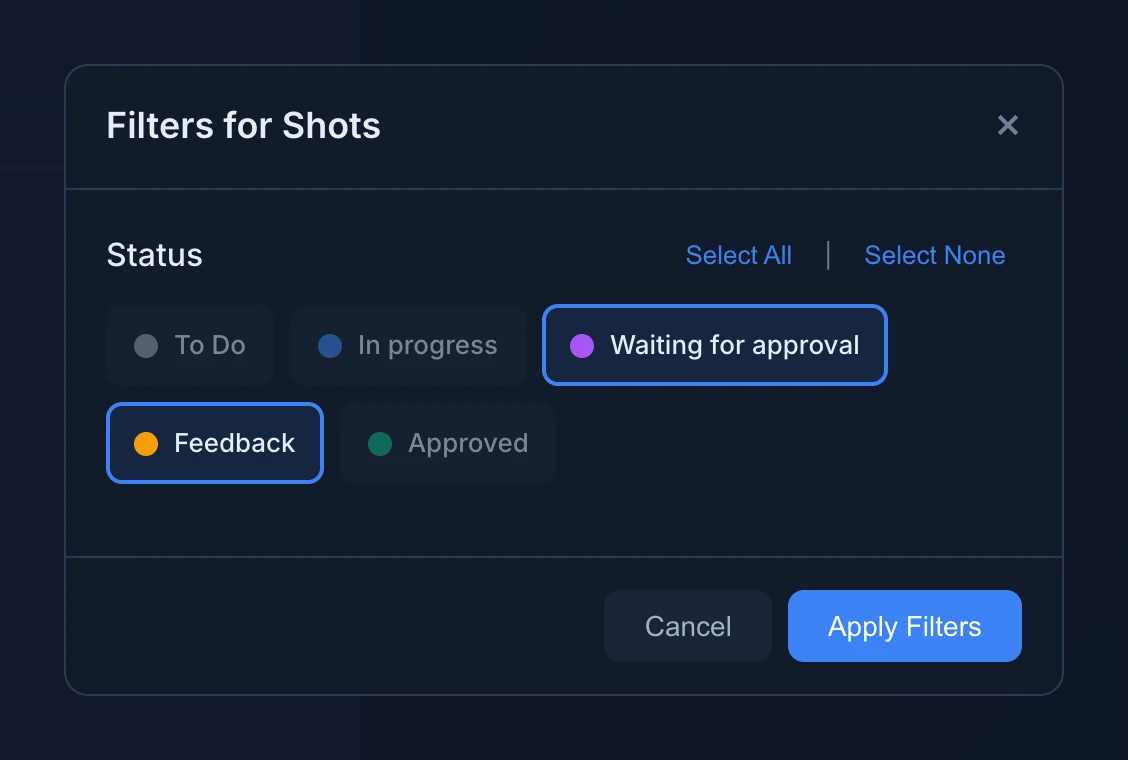
An item stays in view when at least one of its stages has a selected status. The item you have open always stays in view, and so does an item with no stages. To see everything again, press Select All and Apply Filters.
The filter button at the top of the Tree turns all your filters off and on again without losing them. Filters only work while it is on, and the space's row doesn't show that a filter is set, so check this button when items seem to be missing. In the grouped Grid, a collection with no item left after the filter is hidden.
Your filters are saved to your account, so they follow you to another browser.
Deadlines in the Grid
Each stage has two limits: its budget in hours and its deadline. The Grid shows both.
- Ring around a dot. A stage with a deadline has a thin ring around its status dot. It is grey until the project's Deadline warning starts (14 days before by default, see Schedule), then turns from grey to amber to red as the date comes. Once the date has passed the ring is thicker, red and pulses gently. Approved and delivered stages have no ring.
- Stage card. Point to a dot to see the stage and its status, then Budget · time with the hours spent against the estimate, a bar and 2h left, 1h over budget or No estimate, then Deadline · delivery with the date and 5 days left, Due today, 3 days overdue or Approved. The last line says whether the deadline is set on the stage or inherited from the item or the project. The budget colors are those of the time capsules: green, amber from 80% and red over the estimate or without one.
- Item deadline. Next to the item's name, such as Oct 30, is the latest deadline of its stages, whether a stage has its own date or inherits the item's or the project's. Items whose stages have no deadline show nothing. The border uses the same colors as the rings and is grey once every stage of the item is approved. Point to it for the full date, the days left and the stage the date comes from, such as Release, deadline inherited from the item.
Deadlines are set in Item Settings, Stats. If they can't be loaded, a small Deadlines unavailable. line above the Grid gives the reason, with Retry.
Item priority
Items have five priority levels, from Very high to Very low, shown with arrows next to their names. See Set item priority.
Quick status
To change a status without writing a message, right-click a cell of the Grid and pick the new status. To change several at once, Cmd-click (Ctrl-click on Windows) the cells, or Shift-click to select a rectangle of cells, then right-click one of them.
The change is recorded in the chat of each stage and reaches everyone's Tree at once. It needs the project permission Task changes. When the change needs an explanation or a file, post a comment or a revision with the status instead.
Search
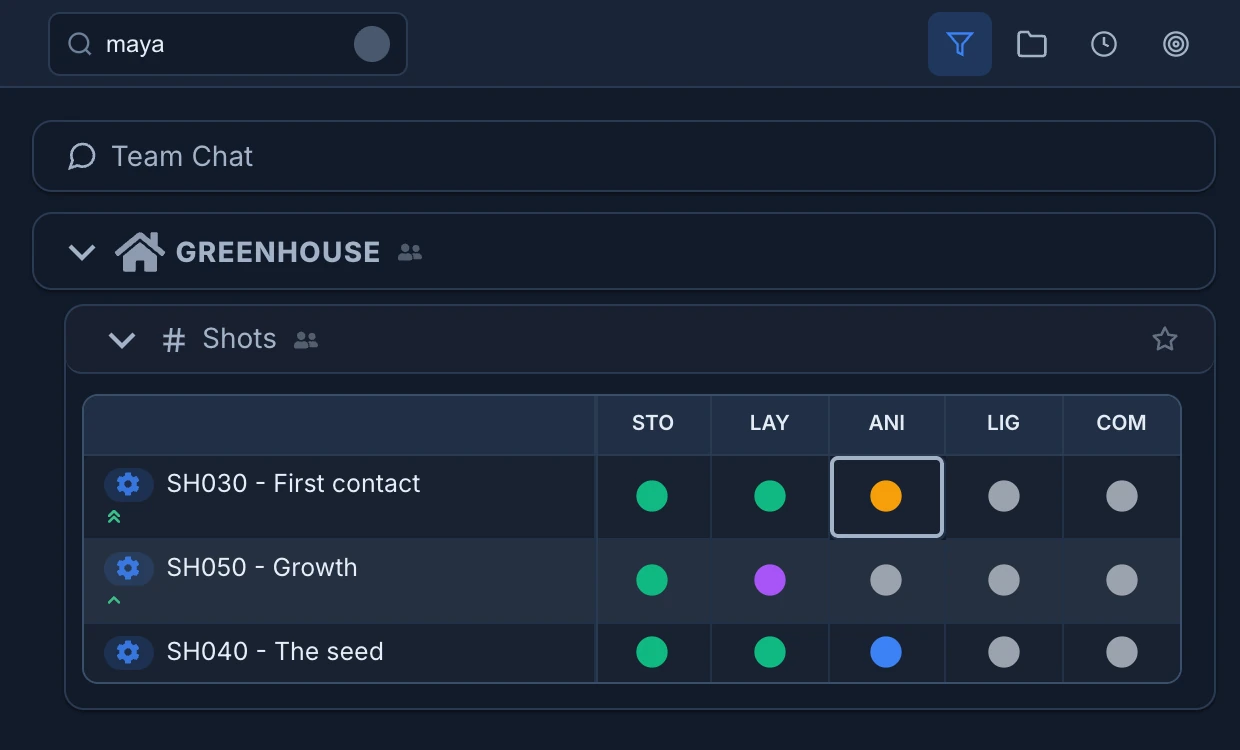
Type in Search by name or artist... at the top of the Tree. The Tree keeps only the projects, spaces and items that match, by name or by the people assigned to their stages on the Timeline.
- Join words with + to narrow the search, for example
shots+sh030ormaya+anim. - Press Esc, or the clear button, to see the whole Tree again.
Stage settings
Which stages a space uses, and in what order, is set in its settings. See Set up stages and workflows.
Reorder and activate content
- Reorder Projects, in the menu of Team Chat or an empty part of the Tree, orders the projects of the studio. It needs the studio permission Studio settings.
- Reorder Content, in the menu of a project, orders its spaces. It needs the permission to edit spaces.
The Tree then lists everything in two groups, active and inactive. Drag within a group to change the order, or to the other group to activate or deactivate a project or space. Press Confirm to keep the changes or Cancel to leave them.
A deactivated project or space leaves the Tree but keeps its content. Drag it back to the active group to bring it back.
Rename or delete
Right-click a space, collection or item and choose Rename. A project's name is in its Settings.
Delete asks for confirmation first.
Deleting cannot be undone
Deleting a project removes all its spaces, items and their data. Deleting a space removes all its items and their data. Deleting an item removes all its stages and comments. To stop showing a finished project or space, deactivate it instead (see above). Deleting a collection moves its items to the Default collection of the space.
Export the hours and generate stages
- Export Stats (.csv), in the menu of a project, a space or an item, downloads the hours worked as three CSV files: pre-production, production and post-production. See Export the hours.
- Generate a stage…, in the menu of a space, produces one stage of every item from another with AI, such as the Layout frames of each shot from its Storyboard. Choose From stage, Produce stage and the models, press Estimate to see the cost in tokens, then Run. Only prepare the canvases sets up the canvases without generating, and Publish each result as a revision signed by the bot publishes what it makes. It needs the studio permission to use the canvas. See Generate images and video on the canvas.
Personal navigation tools
These change only your own view of the Tree:
- Always Visible, in the menu of an item, marks it with an eye and keeps its space open for you, with that item in view even when the space shows only some of its items. With several items selected, it says Always Visible (N).
- The star of a space (Add to favorites) adds it to the very top of the Tree, above Team Chat, as Project / Space.
- The folder button at the top switches the Grid between one list of items and a table per collection.
- The clock and target buttons show the hours spent and estimated on each stage. See Track time and estimates.
- Sort by, in the menu of a collection or item, orders the items of that collection by Name or Date, after their priority. It applies when the Grid is grouped by collection. In the flat Grid, items are always in priority order, then by name.
Your filters, favorites, Always Visible items, Sort by choices, the grouping and the time buttons are saved to your account. Which projects, spaces and collections you closed, and the width of the Tree, are remembered in this browser only.