
Appearance
Notes, documents and media on the canvas
Besides the AI nodes, a canvas holds the team's notes and media. Each kind of element has a few tools of its own. Add them from Add in the toolbar, or from the right-click menu.
Text
A text note, such as "Keep this light: warm backlight and soft haze."
- Double-click it, or click the pencil in its middle, to type. Esc stops editing.
- With the note selected, the toolbar sets its Font Family (eighteen fonts, from Inter to Permanent Marker), its Font Size, its alignment, its Text Color, a background with its opacity, and a border.
- Links in the text, such as
www.example.com, open in a new tab when clicked. - Pasting text copied from another app makes a new note.
Checklist
A list to tick, such as the notes for a retake.
- Type a title and an optional description. Enter in an item adds the next one, and Backspace in an empty item removes it.
- The footer counts what is done, such as "3/5 completed".
- A copy made with Alt+drag or copy and paste stays linked to the original: it says Linked, and Convert to independent copy turns it into a list of its own, with "(COPY)" after its title. The original shows how many linked copies it has.
- Deleting an original with linked copies asks whether to delete the copies too or keep them as independent lists.
A checklist can be wired into an AI node as a reference, like an image.
Document
A document the team writes together, live, such as the beat sheet of the sequence.
- Type in it as in a word processor. Everyone on the board sees the changes as they happen.
- The button in its header switches to screenplay mode and back.
- Download as Markdown saves it as a
.mdfile.
Dropping or uploading a .txt or .md file makes a document from it.
Sketch
A rough drawing that guides AI generation, with a description that travels with it into the prompt. See Guide it with a sketch.
Scribble
B, or the pen button in the toolbar (Scribble Mode), draws freehand right on the board: circles around details, arrows, notes in your own hand. The toolbar sets the color, the width, the smoothing and a solid, dashed or dotted line. ↑ and ↓ change the width as you draw. B or Esc stops.
Images
- Name it: double-click the label at its top edge (Name this reference) and type, such as "Robot". The name shows on the board, next to the AI node input it feeds, and is what you cite in a video prompt. See Cite a reference by name.
- Edit Image, in the right-click menu: paint, erase, select, move, crop to a ratio, pick colors and work in layers. Save adds the edited picture as a new image next to the original, which stays as it was.
- Tint and Image Opacity, in the toolbar.
- Enhance, in the right-click menu: clean it up or upscale it. See Enhance, cut out, add sound and make 3D.
- Star it inside a frame or a folder to make it that container's output. See Frames.
- A generated image has an i with how it was made. See The details of a result.
Videos
A video shows its first frame until you play it: click it, or select it and press Space. The time shows in its corner. It keeps playing when you select something else, and pauses when it leaves the screen. Drag it from anywhere except the controls along its bottom edge.
Hover a playing video for two tools:
- Copy as image puts the frame on screen next to the video as a full-size image, ready to use as a reference or a first frame. Copy several and they stack.
- Cut opens the cut strip over the bottom of the video, to split it into clips:
- Click the strip where a shot ends, or press Cut here at the playhead. , and . step one frame back or forward.
- Drag a cut to move it, and double-click it to remove it. Clear removes them all.
- Press Create 3 clips. The clips land next to the video, which stays as it was.
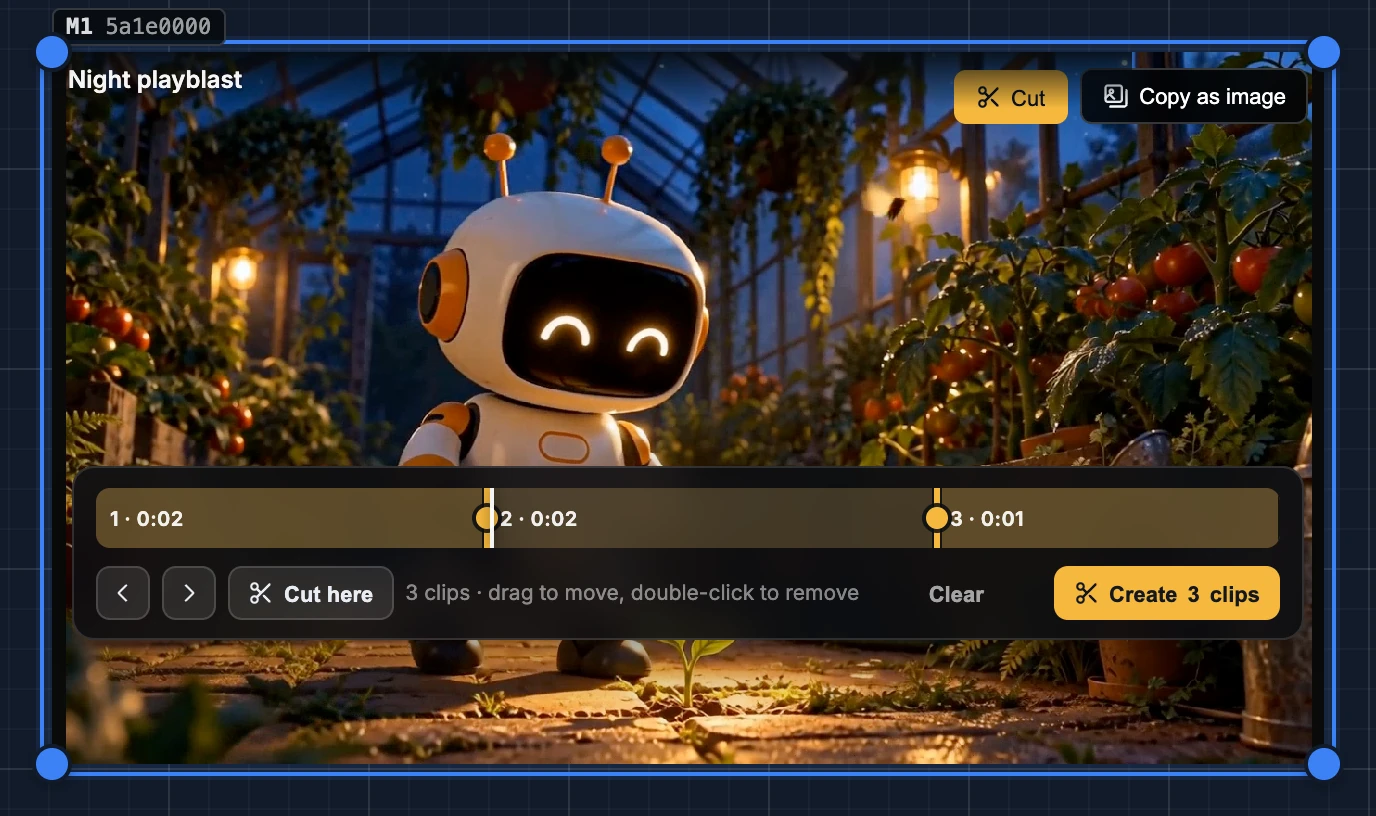
The cuts you mark are also what the Seedance and MiniMax H3 nodes import for Multi-shot.
Files and 3D models
Any other file you drop or upload becomes a file card, with its type, name, size and a Download button: a .blend, a PDF of the script, a sound.
A .glb or .gltf file, or the result of an Image to 3D node, opens as a 3D model you can turn with the mouse. Its buttons change the lighting (Neutral, Studio, Outdoor, Dramatic, Night), hide or show the textures, set the brightness and download the model.
Download
- Select images and videos and press Download in the toolbar, or right-click them and choose Download.
- With two or more, Download as ZIP packs them into one file. What can't be downloaded is left out, and the canvas says how many.